Operation Gladius is one of the most intense missions in Battlefield 6’s campaign, throwing you straight into a full-scale amphibious assault on Gibraltar. This mission picks up right after The Rock mission, but from a completely different perspective—instead of defending the fortress, you’re now part of the attacking force trying to reclaim it from Pax Armata.
Like the previous campaign missions, Operation Gladius hides three dog tag collectibles throughout the chaos of beach landings, urban combat, and building clearances. If you want to complete the mission challenges and unlock all the associated rewards, you’ll need to track down every single one of these tags while explosions are going off around you.
The good news? Once you know where to look, these collectibles are actually pretty straightforward to grab—even during your first playthrough. Let’s break down each location so you can snag them all without missing a beat.
Quick Collection Tips
Before we dive into specific locations, here’s your reminder on how to interact with dog tags:
- PC: Press E
- Xbox: Press X
- PlayStation: Press Square
All dog tags emit a noticeable shine or glint, which is especially helpful in the darker interior sections of this mission. When you collect one, it displays the soldier’s name and date of birth—a small but effective touch that adds weight to the combat you’re experiencing.
Pro tip: Operation Gladius moves at a pretty fast pace with lots of squad movement. Don’t be afraid to tell your AI teammates to wait for a second while you search for collectibles. The game won’t penalize you for taking a few extra moments to explore before pushing forward.
If you’re working on completing all campaign collectibles, make sure to also check out our guides for Always Faithful dog tags and The Rock dog tags.
Dog Tag #1: Near the Sandbag Position
Location: Elevated stone platform with black sandbags after the initial beach assault
How to Find It:
The first dog tag comes shortly after the mission’s explosive opening. Once you’ve survived the beach landing (which honestly feels like a callback to classic war movie moments), your squad will eventually dismount from an armored vehicle.
From there, you’ll fight your way inland through a large shootout around several buildings. Pax Armata forces are dug in pretty heavily here, using the buildings for cover and creating interlocking fields of fire. Take your time clearing this area—rushing in will get you shredded.
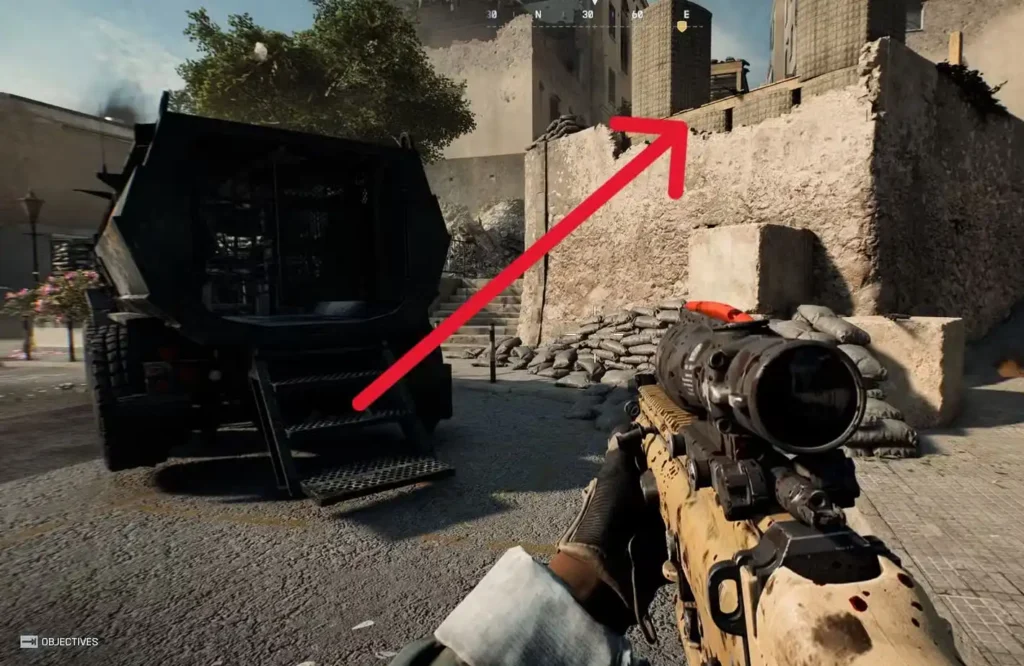
Once you’ve eliminated all hostiles in this section, your infantry squad and the armored vehicle will prepare to move up the hill. Before following them, look for a set of stairs or an approach from further up the street that leads to an elevated stone platform.
This elevated position is marked by:
- Lots of black sandbags (you can’t miss them)
- A wooden crate at the back of the position
- The first dog tag sitting right on top of that crate
This position was likely a defensive emplacement for Pax Armata, so it makes narrative sense that there’d be personal effects left behind. Grab the tag before rejoining your squad for the push uphill.
Combat tip: This elevated position also gives you a great vantage point for any remaining enemies below. If you’re working on weapon challenges or testing out different loadouts, this is a solid spot to get some clean shots.
Dog Tag #2: The Vine-Covered Balcony
Location: Outside balcony area with vines, on a table near potted plants
How to Find It:
The second collectible comes during one of the mission’s more claustrophobic sections. After you’ve finished escorting the armored vehicle through the streets (which is a tense sequence with threats coming from multiple angles), your infantry squad will break off and enter narrow alleyways alone.
You’ll navigate through tight urban corridors before eventually making your way through a multi-story building. As you clear the upper floor, you’ll pass by a TV displaying a red warning message. This is your visual cue that you’re getting close to the second dog tag—the game is actually being pretty generous with this hint.
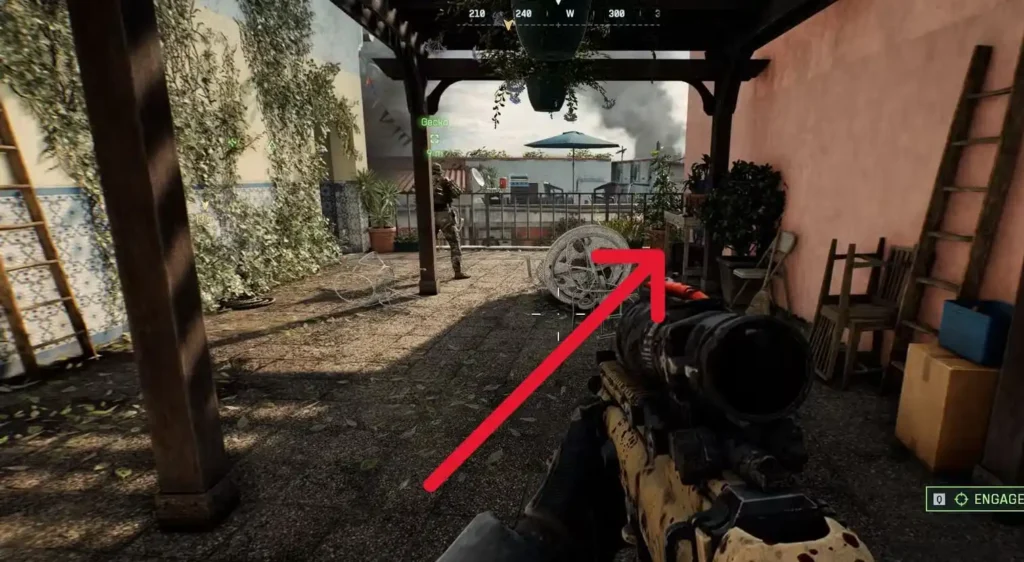
Keep following your squad as they move through the building. You’ll eventually emerge onto an outside area covered in vines—it’s got that overgrown, slightly abandoned aesthetic that contrasts nicely with the combat happening around you.
Once you’re in this vine-covered area, immediately look to your right toward the balcony section. You’ll spot a small table with:
- A potted plant
- Various other items
- The second dog tag sitting among them
This one can blend in slightly with the clutter on the table, so use that glint effect to help you locate it. The vine coverage also affects lighting in this area, which can make spotting collectibles a bit trickier if you’re playing with lower brightness settings. Check our settings optimization guide if you’re having visibility issues.
Dog Tag #3: The Macaque Warning Poster
Location: Inside the large white building, in a side room with an animal warning poster
How to Find It:
The final dog tag is located near the mission’s climax, which makes narrative sense—you’ve fought your way through the entire assault and are now breaching the enemy command center.
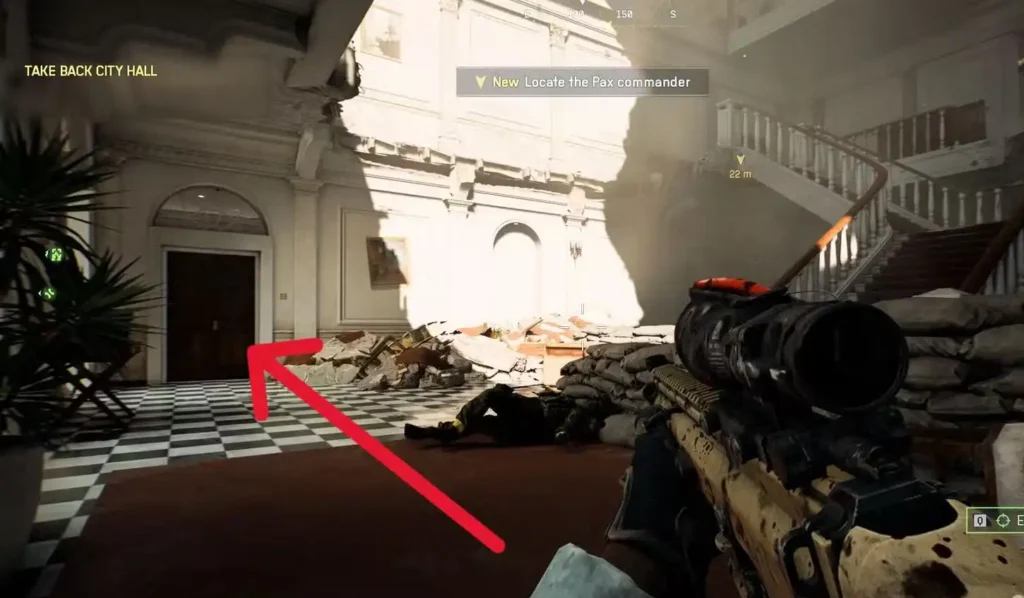
After clearing the large open square (which is usually a pretty intense firefight with enemies positioned on multiple levels), your squad will enter a large white building. This is the same building where you just witnessed the Pax Armata commander execute a hostage in a cutscene—the tension is at maximum here.
Immediately upon entering the building, turn left. Don’t follow your squad straight ahead. Instead, walk toward a closed door and open it to reveal a side room.
Once inside, check the left wall. You’ll see a poster warning not to feed the macaques (which is a nice environmental detail—Gibraltar is famous for its Barbary macaques, and this poster adds a touch of local authenticity).
The third and final dog tag is hanging directly from this poster. It’s the last collectible in Operation Gladius, so make sure you grab it before pushing through the final objectives.
Story note: This room likely served as an office or administrative space, which explains the presence of informational posters. The juxtaposition of mundane wildlife warnings with the brutal combat happening throughout the building is classic Battlefield environmental storytelling.
Mission Context and Strategic Tips
Operation Gladius is unique because it’s essentially a mirror perspective mission—you’re attacking the same location you may have defended in The Rock. This creates some interesting strategic dynamics:
Recognize Defensive Positions
If you played The Rock first, you’ll recognize many of the defensive positions Pax Armata is using—because you potentially used them yourself. This knowledge can give you an edge in predicting enemy placements.
Use the Armored Vehicle Wisely
During the escort sections, your armored vehicle is a massive asset. Let it draw fire while you flank around enemy positions. This is also great practice for coordinating with vehicles in multiplayer modes—check our all game modes guide to see where these skills translate.
Urban Combat Preparation
The narrow alleyways and building clearances are excellent preparation for Close Quarters challenges in multiplayer. Pay attention to corner-checking and room-clearing techniques.
Learn Your Combat Roles
Operation Gladius forces you to adapt between open combat and tight CQB. This versatility is crucial for mastering different class challenges and understanding when to use specific field specs.
Rewards and Completion
Collecting all three dog tags in Operation Gladius contributes to your overall campaign completion percentage and helps unlock various cosmetic rewards tied to mission challenges. While the specific rewards vary, completionists will want to grab these alongside other collectibles.
If you’re systematically working through all campaign content, here’s what you should tackle next:
- No Sleep mission collectibles for more dog tags
- All character skins unlocks to see what else you can earn
- Campaign missions overview for the full mission list
Maximizing Your Playthrough
Since you’re already playing through Operation Gladius, here are some additional objectives you can stack:
Weapon Mastery
Use this mission to work on weapon proficiency. The varied combat scenarios let you test everything from M4A1 builds in medium-range engagements to close-quarters shotguns in the building sections.
Combat Techniques
Practice advanced movement like the combat roll during the beach assault—the open terrain with incoming fire is perfect for testing evasive maneuvers.
Equipment Familiarization
If the mission provides access to gadgets like the laser designator or range finder, take time to learn how they work before jumping into multiplayer.
Challenge Completion
Check if Operation Gladius has specific mission challenges (like completing without dying or achieving certain kill counts) that you can tackle simultaneously with collectible hunting.
Frequently Asked Questions
Absolutely. Use mission select to replay Operation Gladius and grab any dog tags you missed without replaying the entire campaign from the start.
No, collectibles are saved immediately upon collection. However, it’s still good practice to finish the mission to ensure everything is properly checkpointed.
Look for stairs leading up from the street level right after the armored vehicle dismount. The position should be on your right as you’re facing uphill.
Campaign missions give decent XP, but multiplayer is more efficient. Check our XP farming guide for the fastest leveling methods.
Final Thoughts
Operation Gladius is one of those missions that really captures the scale and intensity that Battlefield is known for. From the beach assault opening to the final building clearance, it’s a showcase of varied combat scenarios that test different aspects of your skills.
The three dog tag collectibles are well-placed throughout the mission—they’re not hidden in absurdly obscure locations, but they do require you to pay attention and occasionally deviate from the direct path forward. None of them should take more than 30 seconds to grab once you know where to look.
The amphibious assault on Gibraltar provides an interesting narrative parallel to The Rock, and collecting these dog tags adds another layer to that story. Each tag represents a soldier who fought in this battle, whether on the attacking or defending side, which adds weight to the chaotic urban combat you’re experiencing.
For more Battlefield 6 guides, check out our content on best tips and tricks, all maps ranked, and complete weapons list. The Battlefield 6 subreddit also has active discussions about campaign strategies and collectible hunting.
Now get out there, storm that beach, and collect those dog tags. Gibraltar isn’t going to reclaim itself.
Play Battlefield 6 on: Steam | PlayStation | Epic Games Store | Official Site