The Support class in Battlefield 6 doesn’t get the glory that Assault players chase or the highlight reels that Recon mains create—but make no mistake, a skilled Support player is absolutely crucial to team success. Whether you’re holding down a contested objective or pushing through enemy lines, the Support class offers incredible versatility that can swing matches in your favor.
What makes Support so special? Unlike other classes that specialize in one thing, Support players are true force multipliers. You’re keeping teammates in the fight with ammo resupplies and revives, controlling sightlines with smoke, and delivering sustained firepower that makes enemies think twice about peeking. The only thing you can’t do effectively is deal with heavy vehicles—but that’s what your teammates are for.
Let’s dive into three high-impact Support loadouts that cover different tactical roles, from aggressive frontline medic to defensive area denial specialist.
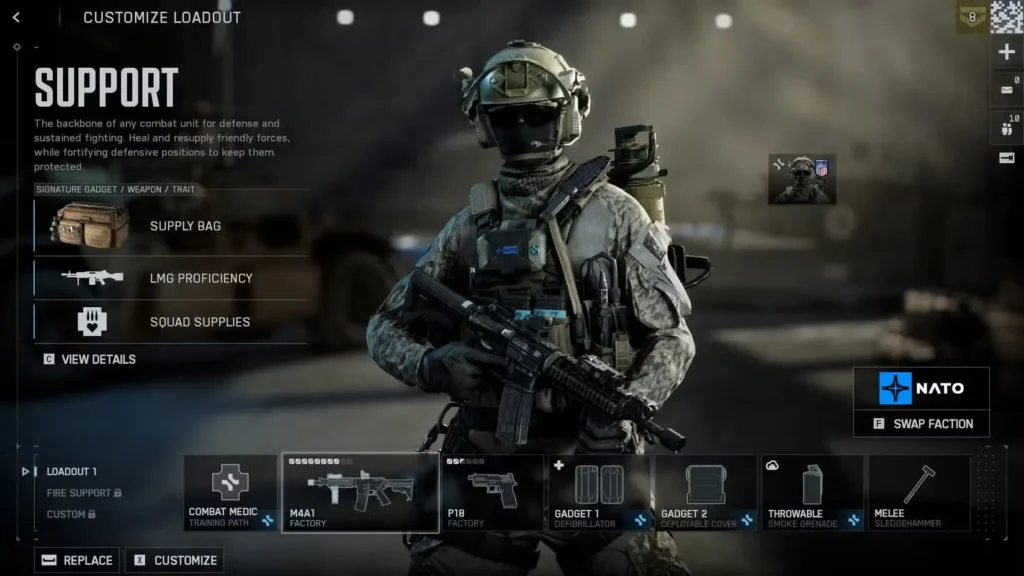
Loadout #1: Aggressive Combat Medic (Frontline Healer)
Best For: Players who want to stay in the thick of combat while keeping teammates alive
| Slot | Equipment / Weapon |
|---|---|
| Weapon | SMG (fast handling for close-quarters rescues) |
| Gadget 1 | Supply Pouch |
| Gadget 2 | Defibrillator |
| Grenade | Smoke Grenade |
| Field Spec | Combat Medic |
How to Play This Loadout
This build transforms you into a mobile resupply station that sticks with your squad through hell and back. Your primary mission? Keep everyone topped off on ammunition and health while creating tactical opportunities with well-placed smoke screens.
Weapon Choice Breakdown: For this aggressive playstyle, you need weapons that handle well at variable ranges. Since you’ll be moving with your squad, engagement distances constantly shift—one moment you’re clearing a building, the next you’re crossing open ground.
Top weapon recommendations:
- RPKM and DRS-IAR – These are essentially assault rifles disguised as Support weapons, offering excellent versatility
- Any reliable Carbine – Perfect balance of mobility and effectiveness
- Fast-firing SMGs – Deadly in urban combat and building interiors
Pro Tip: If you’re attacking on Breakthrough mode (one of Battlefield 6’s core game modes), this loadout becomes absolutely essential. Your smoke grenades will create safe pushing lanes, while your Supply Pouches keep the offensive momentum going.
Combat Medic Tactics
- Stick with your squad: Don’t wander off. Your value multiplies when you’re supporting multiple teammates simultaneously
- Use smoke aggressively: Smoke isn’t just defensive—use it to obscure enemy sightlines during pushes
- Prioritize high-value revives: Don’t suicide-rush into fire for every downed teammate. Revive when it’s tactically sound
- Toss Supply Pouches proactively: Don’t wait for teammates to ask. If you see someone firing heavily, toss them a pouch
This loadout pairs beautifully with mastering the combat roll mechanic, allowing you to dodge incoming fire while reaching downed teammates.
Loadout #2: Defensive Fire Support (Area Denial Specialist)
Best For: Players who prefer methodical, position-based gameplay and long-range engagements
| Slot | Equipment / Weapon |
|---|---|
| Weapon | LMG (for sustained fire and area denial) |
| Gadget 1 | Maxguard 900 Deployable Cover |
| Gadget 2 | LWCMS Portable Mortar |
| Grenade | Smoke Grenade |
| Field Spec | Fire Support |
How to Play This Loadout
Forget charging into battle—this loadout is about becoming an immovable object that controls entire sectors of the map. You’re the artillery battery, the suppressing fire, and the defensive anchor all rolled into one.
Your Mission: Set up strong defensive positions, rain mortar fire on enemy positions, and provide devastating covering fire for your advancing teammates.
Setting Up Your Fortress
- Find the perfect position: Look for elevated spots with good sightlines that cover high-traffic areas or objectives
- Deploy your Maxguard 900: Create instant hard cover that transforms any location into a machine gun nest
- Mount your weapon: The Fire Support Field Spec significantly improves weapon handling when mounted, so always use a bipod or mount against cover
- Rain hell: Use your mortar to soften enemy positions before your team pushes
Weapon Considerations:
LMGs are generally the better choice here because they offer sustained firepower perfect for suppression and area denial. However, if you’re defending on maps with longer sightlines (check our ranked maps guide for terrain analysis), a sniper rifle can pick off enemies trying to advance.
Gadget Alternative: If you’re getting bombarded with grenades, swap the Deployable Cover for a GPDIS Trophy System. This active defense gadget intercepts incoming explosives, keeping your position secure.
Fire Support Tactics
- Communicate mortar strikes: Use voice chat to coordinate with your team before dropping shells
- Reposition regularly: Static positions become grenade magnets. Move after eliminating threats
- Cover your mortar: Always lay down smoke before deploying your mortar to avoid counter-fire
- Support objectives: Don’t just chase kills—focus fire on contested capture points
Understanding field specs is crucial for maximizing this loadout’s effectiveness, especially the weapon stability bonuses.

Loadout #3: Grenadier (Explosive Area Control)
Best For: Players who love explosives and want to control enemy movement through fire and fury
| Slot | Equipment / Weapon |
|---|---|
| Weapon | Carbine (great balance of range & mobility) |
| Gadget 1 | M320A1 SMK Launcher |
| Gadget 2 | SICH G1 WP Airburst Launcher |
| Grenade | Frag Grenade |
| Field Spec | Fire Support (or Combat Medic — your call) |
How to Play This Loadout
Subtlety? Never heard of her. This loadout is pure explosive chaos designed to flush enemies out of cover and deny them safe positions. You’re essentially a walking artillery piece who excels at breaking enemy defensive setups.
Your Arsenal of Destruction:
- Smoke Launcher: Creates instant visual barriers to cover your team’s advance
- Airburst Launcher: Delivers incendiary or white phosphorus payloads that deny areas and force repositioning
- Frag Grenades: Your classic explosive solution to clustered enemies
The Grenadier’s Secret Weapon
Here’s what makes this loadout sustainable: the GOLIATH Supply Bag. As Support, you can resupply your own grenades and gadget ammunition. Drop one near your position, wait a few seconds, and you’re back to full explosive capacity. This self-sufficiency makes you incredibly dangerous in prolonged engagements.
Grenadier Tactics
The Push Protocol:
- Launch smoke to obscure enemy vision
- Move forward with your team
- Deploy airburst incendiary on known enemy positions
- Follow up with frags as enemies retreat
- Drop Supply Bag to restock
- Repeat
Aggressive LMG Synergy: This playstyle pairs exceptionally well with mobile LMGs. Use your explosives to suppress and displace enemies, then finish them with sustained automatic fire. The combination is devastating in close quarters combat.
Pro Tips:
- Time your explosives: Don’t waste grenades on empty positions. Watch for enemy callouts and minimap indicators
- Airburst for rooftops: The airburst launcher excels at clearing enemy snipers from elevated positions
- Smoke for objectives: When capturing points, smoke the objective to protect your team from distant threats
- Resupply teammates: Between your explosive spam, toss ammo to nearby teammates
This loadout also helps with Danger Close challenges if you’re working on those specific unlocks.
General Support Class Tips
No matter which loadout you choose, these universal principles will elevate your Support gameplay:
Maximize Your Impact
Always be resupplying: Even if teammates don’t ask, proactively toss Supply Pouches to anyone engaging enemies. Ammo shortages lose firefights.
Position matters: Support players are valuable targets. Use cover effectively and don’t stand in obvious spots.
Learn the maps: Knowing all the maps helps you predict where teammates will need support and where enemies will push.
Communicate: Voice chat or ping systems—use them. Call out when you’re dropping supplies or deploying smoke.
Complete class challenges: Work on Support class-specific challenges to unlock better equipment options.
Leveling Your Support Class
Looking to rank up quickly? Combine these loadouts with our XP farming guide for maximum efficiency. Support players earn solid XP through assists, resupplies, revives, and objective play—you don’t need tons of kills to level fast.
Weapon Recommendations by Playstyle
Choosing the right primary weapon makes a huge difference. Here’s a quick reference:
Close-Range Aggressive (0-25m):
- Fast-firing SMGs
- High-capacity Carbines
- RPKM (versatile Support weapon)
Medium-Range Balanced (25-75m):
- DRS-IAR
- Accurate LMGs with controllable recoil
- Carbines with good optics
Long-Range Defensive (75m+):
- Belt-fed LMGs with bipods
- Designated Marksman Rifles
- Sniper rifles for specific defensive roles
For a complete breakdown of every weapon available, check our complete weapons list guide. Also understand the difference between Open vs Closed Weapons Playlists to know which weapons you can use in different modes.
Optimizing Your Settings
Don’t forget that your hardware settings matter too. Even the best loadout won’t save you if your sensitivity or graphics settings are holding you back. Our complete tips, tricks, and settings guide covers optimal configurations for different playstyles and hardware setups.
Where to Find Battlefield 6
Ready to put these Support loadouts to work? Grab Battlefield 6 on:
Join the community discussion on the Battlefield 6 subreddit to share your loadout variations and learn from other Support mains.
Final Thoughts: The Support class might not be the flashiest choice in Battlefield 6, but it’s arguably the most satisfying when played well. There’s something deeply rewarding about knowing your ammo pouches enabled that crucial push, or your smoke grenades saved your squad from certain death. Master these three loadouts, adapt them to your personal style, and watch your team’s win rate climb.
Want to expand your tactical knowledge? Don’t miss our guides on Recon class challenges and Deadeye challenges to understand how other classes operate and how you can best support them.