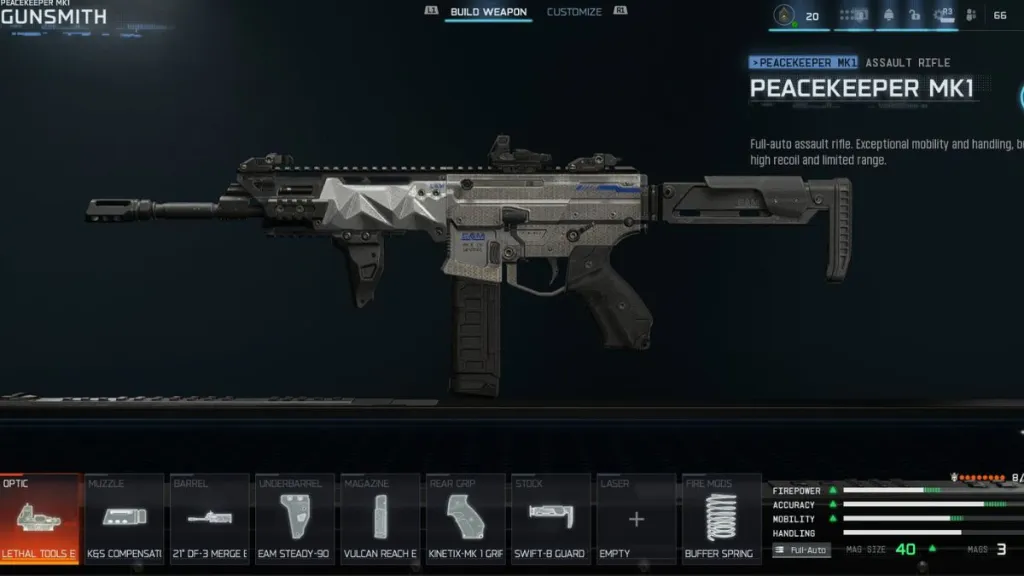
The Peacekeeper MK1 occupies a unique niche in Black Ops 7’s weapon meta—it’s an Assault Rifle that plays like an SMG hybrid, and that’s exactly why it’s become my go-to weapon for aggressive objective modes. After extensive testing across various maps and game modes, I’ve learned that trying to force this weapon into traditional AR roles is a mistake. Embrace its close-quarters identity, and the Peacekeeper becomes one of the most lethal primaries in multiplayer.
This guide will show you how to build the Peacekeeper MK1 to maximize its natural strengths while minimizing its weaknesses, creating an aggressive loadout that excels in the fast-paced, movement-heavy gameplay that defines Black Ops 7.
Understanding the Peacekeeper MK1’s Identity
Weapon Class: Assault Rifle
Unlock Level: Varies (check progression)
Optimal Range: Close to medium (0-15 meters primary effectiveness)
Before we dive into attachments, you need to understand what makes the Peacekeeper MK1 different from traditional ARs.
What the Peacekeeper Does Well
✅ Best-in-class mobility
The Peacekeeper moves faster than any other Assault Rifle, rivaling some SMGs for sprint and strafe speeds.
✅ Lightning-fast ADS speed
Aim-down-sight times are substantially quicker than competing ARs, allowing instant target acquisition.
✅ Competitive close-range TTK
Within its effective damage range (0-15 meters), the time-to-kill is excellent—competitive with meta SMGs.
✅ Aggressive handling
Sprint-to-fire, slide-to-fire, and dive-to-fire speeds all support high-mobility playstyles.
What the Peacekeeper Struggles With
❌ Limited damage range
The 15-meter initial damage falloff is the worst among ARs. Beyond this distance, your TTK drops significantly.
❌ Horizontal recoil pattern
Side-to-side bounce makes long-range engagements frustrating without proper attachment tuning.
❌ Magazine size concerns
The base magazine capacity gets depleted quickly during aggressive multi-kill attempts.
The key insight: Don’t fight the Peacekeeper’s nature. This isn’t the M15 MOD 0 or M8A1 competing at range. This is an aggressive flanking weapon that dominates close-quarters engagements.
Best Peacekeeper MK1 Loadout Build
Core 5-Attachment Setup
Muzzle: K&S Stalker 57-X
Optic: Lethal Tools ELO
Barrel: 14.5” E7-Cuff Barrel
Underbarrel: Lateral Precision Grip
Magazine: Vulcan Reach Extension
Why These Attachments Work
K&S Stalker 57-X (Muzzle)
Provides suppressor benefits without the typical range penalties. You stay off the minimap while firing, which is crucial for aggressive flanking playstyles. Since the Peacekeeper already struggles with range, traditional suppressors that further reduce damage range would be crippling. The Stalker 57-X gives you stealth without meaningful downsides.
Lethal Tools ELO (Optic)
Clean, unobstructed sight picture that accelerates target acquisition. The Peacekeeper’s iron sights are serviceable, but the ELO provides that extra clarity for snapping onto targets during chaotic close-quarters firefights. If you’re comfortable with irons, this slot opens up for Gunfighter customization.
14.5” E7-Cuff Barrel (Barrel)
Extends your effective damage range while improving bullet velocity. This partially compensates for the Peacekeeper’s natural range limitations, pushing your effective engagement distance from 15 meters closer to 20 meters. Every meter counts when you’re playing aggressively.
Lateral Precision Grip (Underbarrel)
Addresses the Peacekeeper’s biggest weakness: horizontal recoil. This attachment significantly tightens the side-to-side bounce, making medium-range sprays much more consistent. Without this, the Peacekeeper feels uncontrollable beyond 10 meters.
Vulcan Reach Extension (Magazine)
Extended magazine capacity is non-negotiable for aggressive play. The Peacekeeper’s fire rate chews through ammo, and multi-kill potential demands you can engage multiple enemies without reloading. This attachment ensures you’re not caught empty mid-fight.
Gunfighter Wildcard Build (8 Attachments)
If you’re running the Gunfighter Wildcard and sacrificing your secondary weapon, add these three attachments:
Diveedge-7 Grip (Rear Grip)
Further accelerates ADS speed and sprint-to-fire times. Stacks beautifully with the Peacekeeper’s already exceptional handling, pushing you into SMG-level responsiveness.
Swift-B Guard Stock (Stock)
Improves strafe speed and overall movement. When you’re rushing objectives or challenging corners, the enhanced mobility gives you an edge in unpredictable gunfights.
EMT3 Agile Laser (Laser)
Boosts sprint-to-fire and ADS speed while active. The visible laser is a minor downside, but the handling benefits outweigh occasional positional giveaways—especially since you’re playing aggressively anyway.
Should You Run Gunfighter?
Yes, if:
- You’re extremely comfortable without a sidearm
- Your playstyle revolves around primary weapon supremacy
- You want absolutely maximum handling performance
- You’re playing objective modes where respawns are instant
No, if:
- You rely on pistol swaps for emergency situations
- You prefer having backup firepower options
- The 5-attachment core already feels sufficient
- You’re new to aggressive AR play
For most players, the 5-attachment build delivers 90% of the performance with more loadout flexibility. Gunfighter is optimization for specialists.
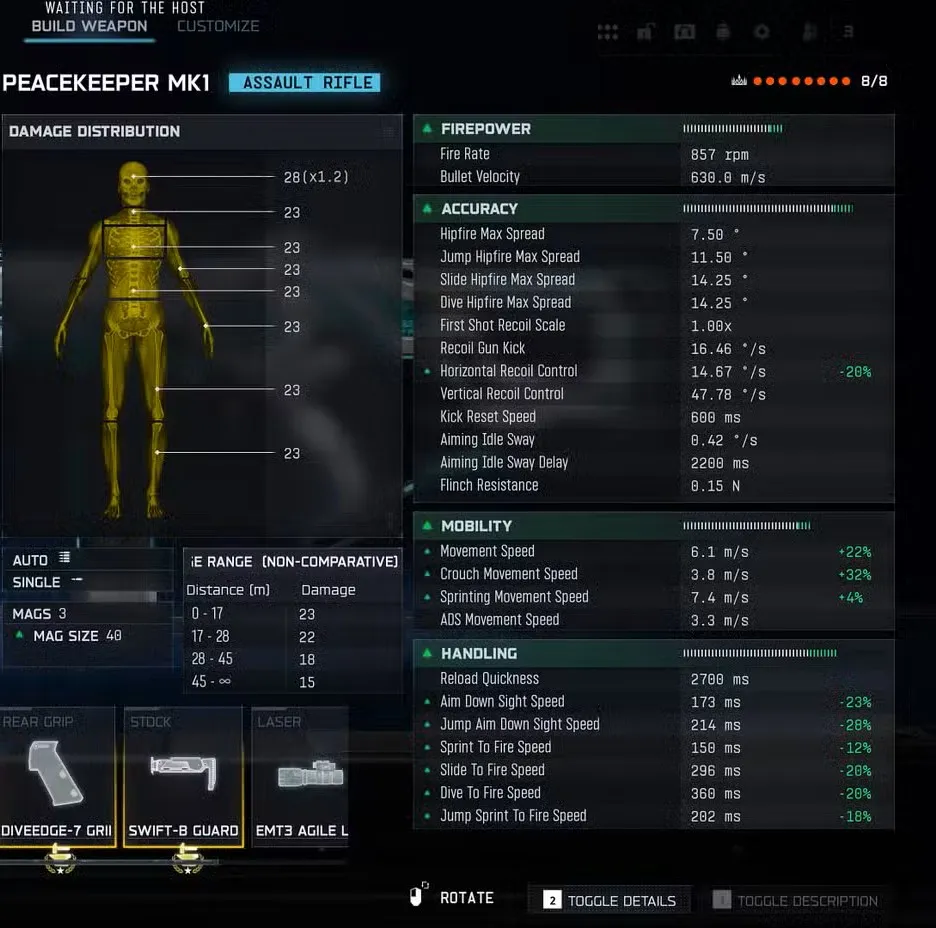
Enhanced Performance Breakdown
With the recommended loadout, you’re stacking these improvements:
Stealth & Concealment
- Suppressed firing – Stay off enemy minimaps
- Flanking advantage – Approach without radar detection
Handling & Mobility
- Lightning ADS speed – Competitive with SMGs
- Improved sprint-to-fire – Challenge sprinters instantly
- Enhanced slide/dive-to-fire – Aggressive movement options
- Increased movement speed – Faster rotations and flanks
- Better strafe speed – Win ADS duels through movement
Accuracy & Control
- Reduced horizontal recoil – Tighter bullet grouping
- Improved recoil stabilization – Steadier sustained fire
- Extended damage range – Push effective distance from 15m→20m+
Sustainability
- Larger magazine capacity – Multi-kill potential without reloads
- Improved hipfire mobility – Close-quarters backup option
Real-world impact:
You’re essentially running an Assault Rifle with SMG handling characteristics while maintaining superior range and accuracy compared to actual SMGs. This hybrid identity makes the Peacekeeper uniquely effective in Black Ops 7’s movement-heavy meta.
Optimal Playstyle & Map Positioning
Close-Quarters Dominance
The Peacekeeper excels in tight indoor environments and confined spaces:
Best map types:
- Small maps: Babylon, Skyline, Protocol
- Indoor sections: Any map with building interiors, corridors, or tight passages
- Objective points: Hardpoint hills, Control zones, Domination flags
Engagement strategy:
- Pre-aim common angles – Your ADS speed allows reactive shooting, but pre-aiming is still optimal
- Use slide/dive mechanics – The enhanced slide-to-fire speed makes you unpredictable
- Aggressive flanking – Suppressed fire lets you attack from unexpected angles
- Objective pressure – Your mobility and CQB power make you perfect for point contesting
Medium-Range Adaptation
With the barrel attachment extending your range, you can compete at medium distances:
Effective tactics:
- Burst fire – Tap-fire at 20+ meters to maintain accuracy
- Strafe during sprays – Your movement speed makes you harder to hit
- Pre-engage weakened targets – Let teammates soften enemies at range
- Retreat from snipers – Don’t challenge long sightlines
Maps with mixed ranges:
- Vault (control indoor areas, avoid open courtyards)
- Red Card (dominate stadium interior, avoid field sightlines)
- Hacienda (focus on building-to-building combat)
What to Avoid
❌ Long-range duels with Tactical Rifles/Snipers
You will lose. Disengage immediately and reposition to your effective range.
❌ Holding static positions
Your mobility is wasted when posted up. Keep moving, keep flanking.
❌ Extended sightlines
The damage falloff and recoil pattern punish long-range engagements. Choose routes with cover and close-quarters options.
Recommended Complete Loadout
Perks
Slot 1: Ghost or Ninja
Stay hidden from radar and sound detection while moving—essential for aggressive flankers.
Slot 2: Fast Hands or Dexterity
Faster weapon swaps and equipment usage complement your high-tempo playstyle.
Slot 3: Gung-Ho or Double Time
Maintain momentum with shooting while sprinting or extended tactical sprint duration.
Equipment
Lethal: Semtex or Frag
Quick-throwing lethals for clearing objectives or finishing weakened enemies.
Tactical: Stun Grenades or Flash Bangs
Pre-throw into rooms before aggressive pushes to secure easy eliminations.
Field Upgrade
Trophy System – Objective defense when holding points
Spring Mine – Flank protection when playing aggressively
War Cry – Movement speed boost for team pushes (if available)
Wildcard Considerations
Gunfighter: Maximum handling optimization (covered above)
Perk Greed: Additional tactical advantages if you prefer standard loadout
Overkill: Pair with sniper for map coverage (not recommended—contradicts Peacekeeper’s identity)
Combat Strategies & Advanced Techniques
Movement Optimization
The Peacekeeper rewards aggressive movement mechanics:
Slide canceling:
Chain slides into ADS for unpredictable entries into rooms. Your slide-to-fire speed makes this extremely effective.
Jump shotting:
The improved jumping ADS speed means you can challenge headglitches and surprise enemies from unexpected angles.
Tactical sprinting:
Use sprint bursts to rotate between objectives quickly, then ADS immediately upon arrival—your sprint-to-fire speed handles it.
Recoil Control Mastery
Even with the Lateral Precision Grip, some recoil remains:
Close range (0-10m):
Center mass sprays work fine. The recoil doesn’t matter when you’re landing most shots anyway.
Medium range (10-20m):
Pull down slightly to compensate for vertical climb. The horizontal bounce is minimized but not eliminated—short bursts help.
Extended range (20m+):
Tap-fire or short 3-5 round bursts. Full-auto sprays become unreliable. Consider disengaging if the target isn’t weak.
Positioning Awareness
Power positions for the Peacekeeper:
- Entrances to objective areas (catch enemies pushing in)
- Flank routes adjacent to main combat zones (attack distracted enemies)
- Building interiors with multiple exits (maintain mobility options)
Avoid these positions:
- Open fields or long lanes (you’ll get picked by range weapons)
- Elevated positions overlooking distances (waste your mobility advantage)
- Static camping spots (contradicts your loadout’s strengths)
Weapon Comparison: Why Choose Peacekeeper?
vs. M15 MOD 0
M15 MOD 0 advantages:
- Better range and damage falloff
- Prestige attachment (FMJ) provides suppression + range
Peacekeeper advantages:
- Faster handling and mobility
- Better close-quarters TTK
- More forgiving for aggressive players
Verdict: Choose M15 MOD 0 for balanced versatility. Choose Peacekeeper for pure aggression.
vs. M8A1
M8A1 advantages:
- Higher burst damage potential
- Superior long-range effectiveness
- Better for precise, methodical play
Peacekeeper advantages:
- Continuous fire (no burst delays)
- Superior mobility and handling
- More forgiving for tracking moving targets
Verdict: Choose M8A1 for strategic positioning. Choose Peacekeeper for run-and-gun chaos.
vs. SMGs (General Comparison)
SMG advantages:
- Even faster mobility in most cases
- Often better hipfire accuracy
- Lower recoil on some models
Peacekeeper advantages:
- Better effective range than any SMG
- More consistent accuracy at medium distances
- Larger magazines (with extension)
Verdict: Peacekeeper sits between aggressive ARs and SMGs—choose it when you want AR range with SMG handling.
Grinding Tips: Camo Challenges
Working toward weapon prestige and camos with the Peacekeeper?
Headshots:
The reduced recoil makes headshot farming relatively easy. Aim upper chest and let the vertical climb secure the headshots. Small maps like Babylon provide constant close-range opportunities.
Longshots:
This is where the Peacekeeper struggles. Equip maximum range attachments (barrel, muzzle) and post up on longer sightlines. Tap-fire only. Check our longshot guide for optimal locations.
Point Blanks:
The Peacekeeper’s mobility makes point blank challenges easier than most ARs. Remove the optic, add a laser, and aggressively slide into enemies on small maps.
Hipfire kills:
Not terrible thanks to decent hipfire stats. Play hardcore modes where damage doesn’t matter as much, or use smaller maps and aggressive positioning.
Game Mode Recommendations
Best Modes for Peacekeeper
Hardpoint ⭐⭐⭐⭐⭐
Perfect. Constant close-quarters objective fighting plays directly into your strengths. Rotate early, secure hills, and rack up eliminations.
Domination ⭐⭐⭐⭐
Flag captures happen in specific locations, usually with cover nearby. Control these zones and defend aggressively.
Control ⭐⭐⭐⭐
Attack and defense both involve close-quarters objective play. Your mobility helps you flank defenders or collapse on attackers.
Team Deathmatch ⭐⭐⭐
Viable but map-dependent. Stick to close-quarters areas and avoid open maps. You’ll do fine but won’t dominate like in objective modes.
Search & Destroy ⭐⭐⭐
Your mobility is useful for quick rotations and flanks, but the one-life nature means you can’t leverage your aggressive playstyle as freely. Consider a more versatile AR for SnD.
Worst Modes for Peacekeeper
Ground War ⭐
Large-scale combat with extended sightlines doesn’t suit the Peacekeeper’s limited range. Use a different weapon entirely.
Any mode on large, open maps ⭐⭐
Self-explanatory. You need cover, objectives, and close-quarters combat to thrive.
Ranked Play Viability
Current ranked ruleset status: Check official Call of Duty competitive rules for Peacekeeper availability.
If allowed in ranked:
Strengths for competitive:
- Mobility for fast rotations between objectives
- Suppressed fire for sneaky flanks and picks
- Strong in hill/point control scenarios
Weaknesses for competitive:
- Limited range makes you vulnerable on certain maps
- Competitive players punish aggressive plays more consistently
- Team coordination can negate flanking effectiveness
Ranked recommendation:
Viable but not top-tier. Consider running it on specific maps/modes where close-quarters control is critical (Hardpoint on small maps). Have a backup AR loadout for range-heavy maps.
Settings Optimization
Beyond attachments, optimize your game settings for maximum Peacekeeper performance:
Sensitivity: Slightly higher than normal to enable quick flicks and tracking during aggressive plays. Test in private matches.
FOV: Higher FOV (100-110) helps with situational awareness during flanking routes and close-quarters combat.
Aim assist settings: Ensure standard or precision aim assist is enabled for consistent target tracking.
For comprehensive settings optimization, check our complete settings guide.
Common Mistakes to Avoid
❌ Challenging long-range engagements
Disengage immediately if enemies are 25+ meters away. Reposition to your effective range.
❌ Playing too passively
The Peacekeeper rewards aggression. If you’re holding angles and playing defensively, use a different AR.
❌ Ignoring the magazine upgrade
Extended mags aren’t optional—they’re mandatory for consistent multi-kill potential.
❌ Forgetting your suppressor advantage
Use flanking routes. You’re invisible on radar—exploit it.
❌ Trying to compete with snipers
Accept your range limitations. Don’t peek sniper lanes hoping to somehow win.
Alternative Situations & Adjustments
Hardcore Modes
The Peacekeeper becomes even stronger in Hardcore:
Why it excels:
- TTK doesn’t matter—everything kills in 1-2 shots
- Your mobility advantage becomes even more pronounced
- Suppressed fire is more valuable when radar awareness is limited
Loadout changes:
- Remove the barrel (range doesn’t matter in HC)
- Add maximum mobility attachments
- Focus purely on speed and handling
For Beginners
New to aggressive AR play? Try this simplified approach:
Keep: Muzzle, Underbarrel, Magazine
Remove: Optic (use irons)
Add: Rear Grip for easier handling
This gives you the core functionality (suppression, recoil control, magazine size) while simplifying your learning curve.
For Objective Players
If you exclusively play Hardpoint/Control:
Prioritize:
- Trophy System field upgrade (block enemy equipment)
- Engineer perk (see enemy equipment through walls)
- Tacticals for pre-clearing hills (Stuns/Flashes)
Your weapon loadout remains the same, but equipment shifts toward objective security.
Final Verdict
The Peacekeeper MK1 isn’t trying to be the best all-around assault rifle—it’s aiming to be the best aggressive close-quarters AR, and in that role, it succeeds brilliantly.
This loadout is ideal for:
- Run-and-gun players who value mobility over range
- Objective-focused teammates who fight on points
- Players who thrive in chaotic close-quarters combat
- Anyone who wants AR versatility with SMG handling
You should look elsewhere if:
- You prefer methodical, positioning-based gameplay
- You primarily play large maps with long sightlines
- You want a single weapon that works everywhere
- You’re uncomfortable with aggressive, high-risk playstyles
The bottom line: Master the Peacekeeper’s effective range, embrace aggressive movement, and you’ll have a weapon that feels unfair in the scenarios it’s designed for. Just remember—don’t force it into fights it can’t win.
Level Up Your Multiplayer Game
Master Black Ops 7 multiplayer with these essential guides:
Loadout Optimization:
Progression:
Skill Development:
Perks & Specialties:
Zombies Content:
Join the Black Ops 7 community on Reddit or Discord to share your Peacekeeper builds and aggressive gameplay clips.
For official updates and competitive news, visit the Call of Duty: Black Ops 7 website or check the Wikipedia page.
Final tip: The Peacekeeper rewards players who understand their effective range and commit to aggressive positioning. Don’t second-guess your loadout—trust the mobility, embrace the chaos, and dominate the close-quarters fights that define Black Ops 7’s multiplayer experience.


