Mr. Peeks has become a beloved recurring character in Black Ops Zombies’ Dark Aether storyline, and his latest appearance in Ashes of the Damned brings one of the map’s most entertaining side quests. After completing this easter egg multiple times while helping squadmates unlock their calling cards, I’ve learned that while the concept is simple—throw axes at targets—the execution requires some precision and map knowledge.
This guide will walk you through every step of unlocking the Bullseye calling card, including exact locations, throwing techniques, and optimization tips for completing this challenge as efficiently as possible.
Mr. Peeks Easter Egg Overview
Easter Egg Name: Bullseye (unofficial community name)
Location: Blackwater Lake
Difficulty: Easy
Time Required: 5-10 minutes
Repeatable: Yes (calling card unlocks once, but can replay for rewards)
Rewards:
- 🎯 Bullseye Dark Ops Calling Card (one-time unlock)
- 💰 Large Essence drop from Mr. Peeks (~3,000-5,000 Essence)
- ⭐ 3,000 XP toward player progression
- 🎁 Random loot drops (Salvage, armor plates, equipment)
Why complete it:
Beyond the exclusive calling card for completionists, the substantial Essence reward makes this easter egg worthwhile during early-game progression. Completing this around Round 5-8 can fund multiple Perk purchases or armor upgrades.
Prerequisites: What You Need
1. Map Progression to Blackwater Lake
Blackwater Lake sits northwest of the spawn area (Janus Towers Plaza), requiring you to progress through the map and unlock connecting routes.
Access requirements:
- Activate Ol’ Tessie (the driveable vehicle)
- Progress past Vandorn Farm
- Open the route toward Blackwater Lake
- Sufficient Essence to purchase Blackwater Lake entry doors
If you’re unfamiliar with early map progression, check our complete Ashes of the Damned walkthrough for optimal routing.
2. Recommended Round Window
Optimal completion: Round 5-10
Why this timing:
- Zombie density is manageable while searching for targets
- Essence reward has maximum impact on your progression
- Early enough that you’re not distracted by high-round survival pressure
- Late enough that you’ve unlocked necessary map areas
You can complete this later, but the risk-reward balance favors early completion.
3. Suggested Loadout Preparation
While not strictly required, these items make completion easier:
Weapons: Any primary weapon for zombie control (doesn’t affect axe throwing)
Armor: Tier 2 minimum for safety while searching
Perks: Quick Revive helpful but not mandatory
Equipment: Not needed—the easter egg provides Combat Axes
For loadout optimization, see our guides on best multiplayer builds and Zombies strategies.
Step-by-Step Guide: Completing the Mr. Peeks Easter Egg
Step 1: Navigate to Blackwater Lake
Location: Northwest of Janus Towers Plaza (spawn area)
Navigation route:
Option A – Via Ol’ Tessie (Recommended):
- Drive Ol’ Tessie from your current location
- Head northwest from spawn or west from Vandorn Farm
- Follow the road through the Lost Cabins area
- Arrive at Blackwater Lake entrance
Option B – On Foot:
- Navigate northwest from spawn through connecting paths
- Purchase necessary doors along the route
- Reach Blackwater Lake (slower and riskier)
Door costs:
Be prepared to spend approximately 1,750-2,500 Essence on doors if this is your first time accessing the area.
Pro tip: If following our walkthrough’s recommended route, you’ll naturally pass through Blackwater Lake around Round 12-14 to grab Speed Cola. Consider completing the Mr. Peeks easter egg during that visit to maximize efficiency.
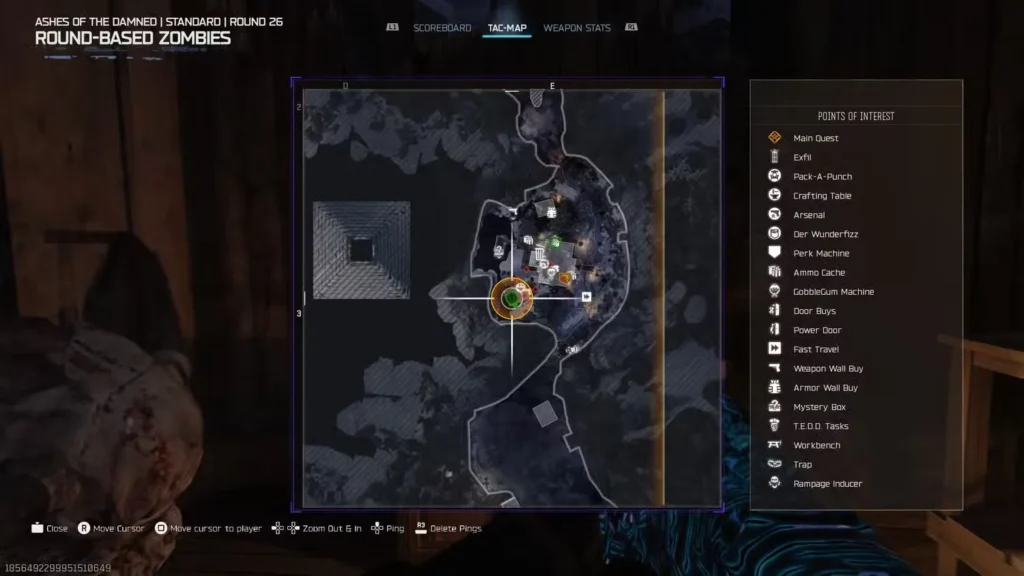
Step 2: Locate and Enter the Toolshed
Building location: Toolshed/Cabin at Blackwater Lake
Once you arrive at Blackwater Lake:
- Identify the Toolshed/Cabin building (wooden structure near the water)
- Purchase entry if you haven’t already (1,750 Essence typically)
- Enter the building
Landmark identification:
The Toolshed is the primary building at Blackwater Lake. It’s distinct from the Power Pump structure and houses Speed Cola upstairs. You can’t miss it—it’s the only enterable building in this area.
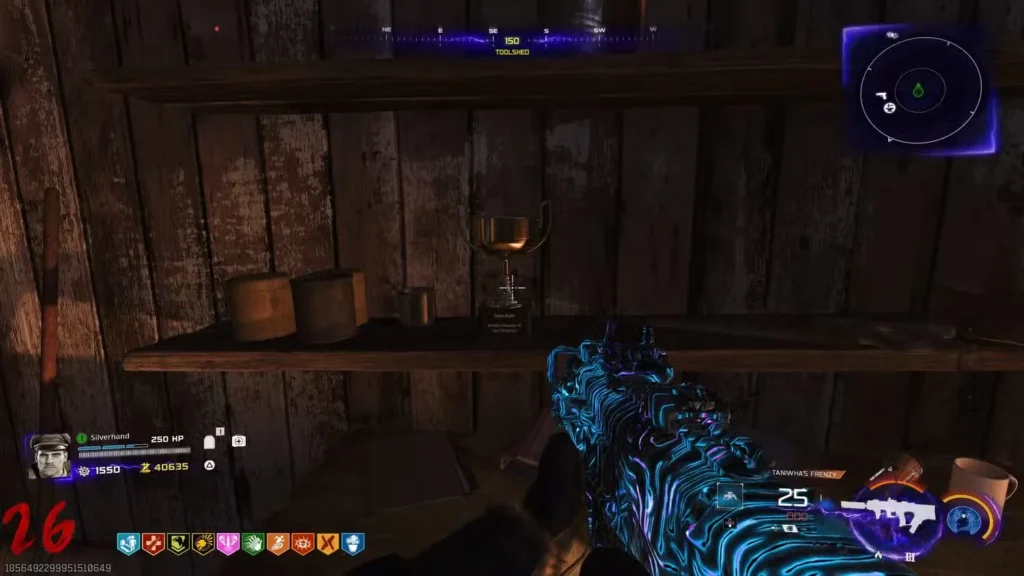
Step 3: Interact with the Golden Trophy
Trophy location: Inside the Toolshed, on the south wall shelf
What to look for:
- Small golden trophy sitting on a wooden shelf
- Located on the south-facing wall (opposite the entrance if you entered from the north)
- Metallic sheen makes it stand out against the rustic interior
Activation:
- Approach the trophy until you see an interaction prompt
- Hold the reload button to interact
- Listen for Mr. Peeks’ signature laugh (audio confirmation)
Audio cue importance:
The laugh indicates successful activation. If you don’t hear it, you might be interacting with the wrong object. The trophy should be clearly visible—if you’re struggling to find it, check all shelf locations on interior walls.
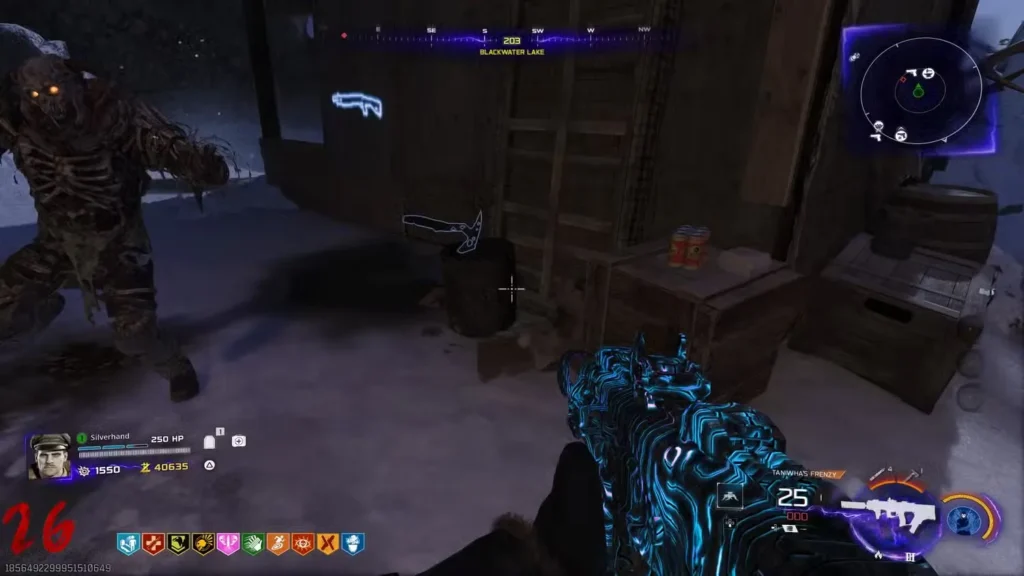
Step 4: Retrieve the Combat Axe
Axe location: Outside the Toolshed, embedded in a tree log on the west wall
After hearing Mr. Peeks’ laugh:
- Exit the Toolshed
- Face the west wall of the building (left side if you entered from the main path)
- Locate the tree log/stump with the Combat Axe sticking out
- Pick up the Combat Axe (automatic pickup when approached)
Visual confirmation:
The Combat Axe glows slightly and is clearly visible against the wood. It’s impossible to miss once you’re looking at the correct wall.
What happens:
Upon picking up the axe, multiple glowing purple targets spawn throughout Blackwater Lake. These are your throwing targets.
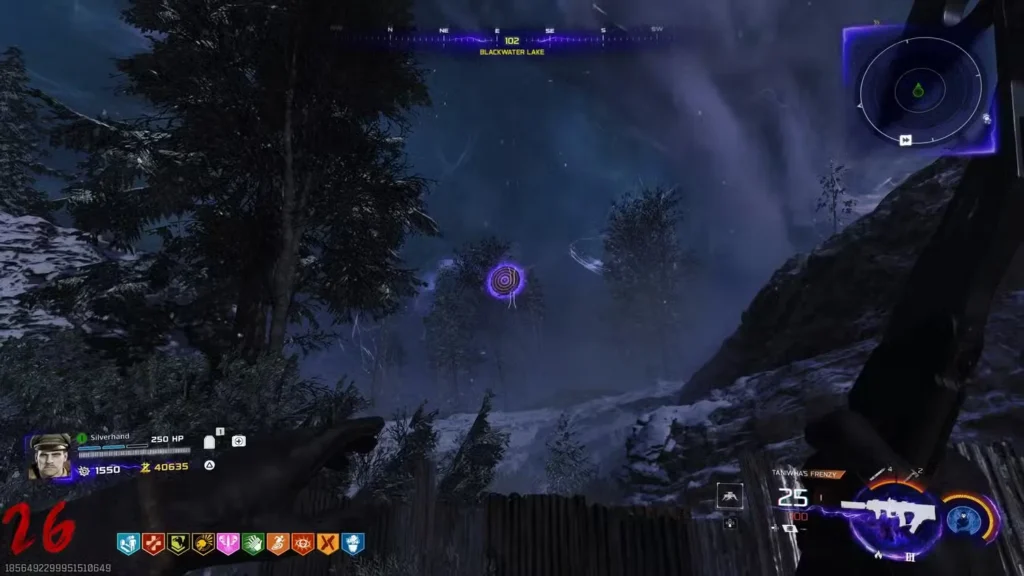
Step 5: Find and Hit All Glowing Purple Targets
Objective: Throw the Combat Axe at every glowing purple target in Blackwater Lake
Target characteristics:
- Appearance: Floating, glowing purple bullseye designs
- Behavior: Stationary (they don’t move)
- Location: Scattered throughout Blackwater Lake area
- Quantity: Approximately 6-8 targets (exact number varies)
Target Locations Breakdown
The targets spawn in relatively consistent positions around Blackwater Lake:
Target Zone 1 – Near the Cabin/Toolshed:
- Check both sides of the building exterior
- Look near the dock/waterfront area
- Scan tree lines adjacent to the structure
Target Zone 2 – Around the Lake Perimeter:
- Follow the shoreline checking for floating targets
- Some targets hover over water (throw from shore)
- Check elevated positions on rocks or small hills
Target Zone 3 – Power Pump Area:
- Near the Power Pump structure (if activated)
- Along the northern section of Blackwater Lake
- Check behind environmental objects
Pro tip: Don’t rush. Methodically circle Blackwater Lake’s perimeter, checking all angles. The targets are glowing and obvious once you’re looking in the right direction, but easy to miss if you’re sprinting past them.
Step 6: Axe Throwing Mechanics
How to throw:
- Aim: Use standard aim mechanics (ADS optional but recommended for precision)
- Throw: Press your lethal equipment button (typically right bumper/R1/G)
- Trajectory: The axe flies in a straight line—account for distance
Important mechanics:
✅ Missing is forgiving:
If you miss a target, you don’t lose the axe permanently. Walk to the fence near the targets and interact with it to replenish your Combat Axe supply. This mechanic exists specifically so you can practice throwing without penalty.
✅ Zombie interference:
Zombies will spawn and attack during this challenge. You can:
- Kill them with your primary weapon (axe throwing isn’t required for combat)
- Train them away from your target area
- Use Field Upgrades for crowd control
✅ Aiming tips:
- Close range targets: Point and throw—precision isn’t critical
- Distant targets: Aim slightly high to account for axe drop
- Moving while throwing: Stand still for best accuracy
Throwing strategy:
Start with the easiest/closest targets to build confidence, then work outward to more distant ones. If you’re struggling with a particular target, skip it temporarily and come back after hitting others—sometimes a different angle makes it easier.
Step 7: Complete All Targets and Spawn Mr. Peeks
Completion indicator:
After hitting the final glowing purple target, Mr. Peeks will immediately spawn in the Blackwater Lake area.
Mr. Peeks appearance:
- Distinctive character model (teddy bear appearance)
- Spawns near your current position
- Drops rewards upon appearance
- May trigger dialogue/audio cues
What to do:
- Approach Mr. Peeks to collect your rewards
- Pick up dropped items (Essence, Salvage, equipment)
- Check notifications for calling card unlock confirmation
Reward collection:
The Essence drops as physical pickups on the ground around Mr. Peeks. Make sure to collect everything—you’ve earned it.
Step 8: Verify Rewards and Calling Card Unlock
Immediate rewards:
- 3,000 XP added to your progression (check XP bar)
- Essence drops (~3,000-5,000 total from Mr. Peeks)
- Bullseye Dark Ops Calling Card (one-time unlock)
- Random bonus loot (Salvage, armor plates, ammo drops)
Calling Card verification:
- Check in-match notifications for “Dark Ops Calling Card Unlocked”
- Post-match: Navigate to Calling Cards menu
- Locate Bullseye in your collection (Dark Ops category)
- Equip if desired to showcase your completion
XP application:
The 3,000 XP applies immediately to your player level progression. If you’re leveling up efficiently, this easter egg provides a nice boost equivalent to several round completions.
Optimization Tips for Faster Completion
Route Efficiency
Integrate with map progression:
Don’t make a special trip to Blackwater Lake solely for this easter egg. Complete it naturally when you’re already in the area for:
- Speed Cola Perk purchase
- Blackwater Lake power activation
- Training route setup
Solo vs. Squad Strategies
Solo advantages:
- Complete at your own pace
- All Essence rewards go to you
- No coordination required
- Can focus entirely on target hunting
Squad advantages:
- Teammates can handle zombie control while you throw axes
- Multiple eyes help locate targets faster
- Revive safety if you go down
- Share the fun experience
Squad coordination tip:
Designate one player to focus on axe throwing while others manage zombie trains. Switch roles if the primary thrower struggles with certain targets.
Target Hunting Efficiency
Systematic approach:
- Start at the Toolshed where you got the axe
- Circle clockwise around Blackwater Lake perimeter
- Check all vertical angles (targets can be at different heights)
- Mark mentally which areas you’ve thoroughly searched
Don’t backtrack unnecessarily:
Once you’ve cleared a section, trust your search and move on. The targets are obvious enough that you won’t miss them if you’re looking carefully.
Troubleshooting Common Issues
“I can’t find the golden trophy”
Solution:
The trophy is inside the Toolshed/Cabin on the south wall shelf. If you’re looking at Speed Cola upstairs, go back downstairs and check the opposite wall from the main entrance.
“The Combat Axe isn’t appearing”
Possible causes:
- Wrong wall: The axe spawns on the west exterior wall, not inside the building
- Didn’t interact with trophy: Make sure you heard Mr. Peeks’ laugh
- Already picked it up: Check your equipment—you might already have it
Solution: Exit the Toolshed, face west (left if you entered from the main path), and look for the glowing axe in a log.
“I can’t find all the targets”
Solution:
Targets spawn throughout Blackwater Lake. Methodically search:
- Around the entire lake perimeter
- Near the Toolshed/Cabin exterior
- Around the Power Pump area
- Along the shoreline and docks
- Behind rocks and environmental objects
Walk slowly and rotate your camera to check all angles.
“I ran out of axes”
Solution:
Walk to any fence near target locations and interact with it to replenish your Combat Axe supply. You have unlimited attempts.
“Zombies keep interrupting my throws”
Solutions:
- Clear zombies before attempting target hits
- Train zombies away from target areas
- Use Field Upgrades like Aether Shroud for temporary safety
- Have squadmates manage zombie control
- Purchase Perks like Jugger-Nog for survivability
“Mr. Peeks won’t spawn”
Requirement check:
- Did you hit ALL purple targets? (easy to miss one)
- Are you still in Blackwater Lake area? (don’t leave mid-challenge)
- Did you pick up the Combat Axe? (required to start target spawning)
Solution: Double-check the entire Blackwater Lake area for any remaining glowing purple targets you might have missed.
Strategic Value Analysis
Is This Easter Egg Worth Completing?
Time investment: 5-10 minutes
Essence cost: ~2,000-3,500 (door purchases if first visit)
Difficulty: Very easy
Repeatability: Yes (rewards each time except calling card)
For calling card collectors:
Absolutely worth it. Easy Dark Ops calling card that most players can complete within their first serious attempt.
For Essence farmers:
The 3,000-5,000 Essence reward justifies the time investment, especially during early-game progression. That’s enough to purchase a Perk or fund significant armor upgrades.
For XP grinders:
3,000 XP is equivalent to several round completions. If you’re leveling efficiently, this provides a solid boost.
For casual players:
Provides a fun diversion from standard survival gameplay while delivering practical benefits. Even if you’re not achievement hunting, the free Essence helps you survive longer.
Mr. Peeks Lore & Easter Egg History
For players invested in Black Ops Zombies storytelling, Mr. Peeks represents more than just a side quest character.
Character background:
Mr. Peeks has appeared across multiple Dark Aether storyline maps, often associated with mini-games and hidden challenges. His teddy bear-like appearance contrasts with the horror setting, creating memorable moments.
Easter egg tradition:
The developers consistently include Mr. Peeks encounters as optional content that rewards exploration and completion with exclusive calling cards and loot. Completing his challenges has become a tradition for dedicated Zombies fans.
Bullseye theme:
The axe-throwing competition fits Mr. Peeks’ playful personality—he’s challenging players to a skill-based mini-game rather than pure combat. These lighter moments provide welcome relief from the intensity of high-round survival.
Related Easter Eggs & Secrets in Ashes of the Damned
Mr. Peeks isn’t the only hidden content in Ashes of the Damned:
Other secrets:
- Good Soldiers Trophy – Dempsey-specific easter egg with Legendary weapon rewards
- Musical easter eggs – Various interactable objects triggering soundtrack changes
- Intel collectibles – Hidden documents providing Dark Aether lore
- T.E.D.D. Tasks – Challenge-based rewards system
Main Easter Egg quest:
The Bullseye easter egg is separate from Ashes of the Damned’s full main quest. If you’re interested in the complete storyline experience, that requires additional steps beyond this guide’s scope.
Quick Reference: Bullseye Easter Egg Checklist
Pre-match:
- ☐ Plan to visit Blackwater Lake during Round 5-10
- ☐ Ensure sufficient Essence for door purchases
Step-by-step execution:
- ☐ Navigate to Blackwater Lake (northwest of spawn)
- ☐ Enter the Toolshed/Cabin building
- ☐ Find golden trophy on south wall shelf
- ☐ Hold reload button to interact with trophy
- ☐ Listen for Mr. Peeks’ laugh (audio confirmation)
- ☐ Exit Toolshed and go to west exterior wall
- ☐ Pick up Combat Axe from tree log
- ☐ Systematically search Blackwater Lake for glowing purple targets
- ☐ Throw Combat Axe at each target (replenish at fence if needed)
- ☐ Continue until all targets are hit
- ☐ Mr. Peeks spawns with rewards
- ☐ Collect Essence, Salvage, and loot drops
- ☐ Verify Bullseye calling card unlock
Rewards received:
- ☐ 3,000 XP toward player progression
- ☐ ~3,000-5,000 Essence drops
- ☐ Bullseye Dark Ops Calling Card (one-time)
- ☐ Random bonus loot (Salvage, equipment, ammo)
Expand Your Zombies Knowledge
Ashes of the Damned guides:
- Complete Map Walkthrough
- All Perk Locations
- Pack-a-Punch Setup Guide
- Best Training Spots Ranked
- All Wall Buy Locations
Easter egg & secrets:
Optimization strategies:
Combat & survival:
- How to Kill Zursa Bears
- Best Lethal Equipment
- Best Tactical Equipment
- Zombies Beginner Tips & Tricks
Multiplayer loadouts:
Join the Black Ops 7 community on Reddit or Discord to share your Mr. Peeks easter egg completions and calling card collections.
For official game updates and easter egg hints, visit the Call of Duty: Black Ops 7 website or check the Wikipedia page.
Final Thoughts: The Mr. Peeks axe throwing easter egg represents the lighter side of Black Ops Zombies—a skill-based mini-game that rewards exploration without punishing difficulty. Whether you’re chasing the Bullseye calling card or just want free Essence during your Blackwater Lake visit, this easter egg delivers fun and practical benefits in equal measure. Load into Ashes of the Damned, head to Blackwater Lake, and show Mr. Peeks your axe-throwing skills!