Safehouses in Borderlands 4 serve as essential hubs for navigation, commerce, and progression throughout Kairos. Each of the 12 Safehouses requires both a Datapad and Console activation to unlock, transforming them into fast travel stations with vendor access and contract selection capabilities.
This comprehensive guide covers every Safehouse location across all regions, with detailed instructions for finding both required components and overcoming any environmental challenges you’ll encounter.
Understanding Safehouse Mechanics
Activation Requirements:
- Datapad collection – Often hidden or requiring platforming to reach
- Console activation – Located within or near the Safehouse structure
- Sequential process – Must collect Datapad before Console becomes accessible
Safehouse Benefits:
- Fast travel stations for efficient map traversal
- Vendor access for equipment purchases and sales
- Contract selection for side mission management
- Safe resting areas free from enemy interference
- Inventory management through nearby amenities
Strategic Importance:
Safehouses become increasingly valuable as you progress through Borderlands 4, providing crucial waypoints for Lost Capsule transportation and efficient collectible farming routes.
The Fadefields Region Safehouses
Shut-Eye Keep Safehouse
Location: The Howl, The Fadefields Difficulty: Moderate (Platforming Required)

Datapad Collection:
- Approach the Order station to the right of the Safehouse
- Activate the lever to gain upward access
- Follow the linear path through the garden area
- Enter the Safehouse and face the left side of the north wall
- Look up for grapple point and use grapple hook to ascend
- Collect Datapad from the elevated position
Console Activation:
- Return to ground level within the Safehouse
- Locate Command Console on the south wall
- Activate to complete Safehouse setup
Someday Rise Safehouse
Location: Idolator’s Noose, The Fadefields
Difficulty: Moderate (Combat + Platforming)
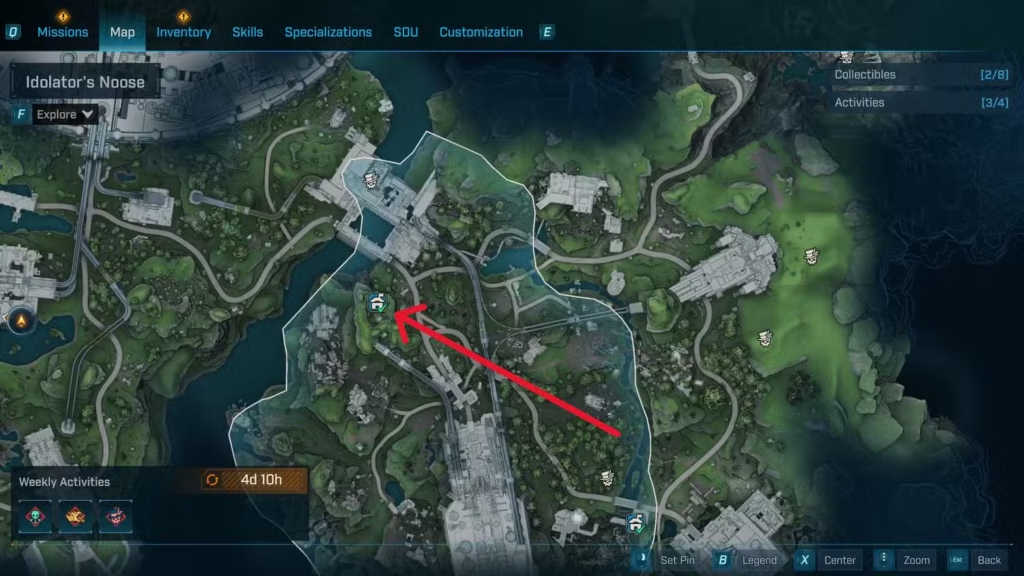
Datapad Collection:
- Follow the mountainside path around Someday Rise
- Climb the ledge and grapple across to reach the cliffside Safehouse
- Clear hostile Manglers in the area before exploring
- Look opposite the Safehouse to the left side
- Find small campsite with Datapad on a mattress
Console Activation:
- Enter the now-unlocked Safehouse
- Locate Command Console on the north wall
- Activate to establish fast travel point
Wyclef’s Reprieve Safehouse
Location: Idolator’s Noose, The Fadefields Difficulty: Easy to Moderate

Datapad Collection:
- Enter Wyclef’s Reprieve (door should open automatically)
- Alternative access: Go around the bend left and follow the path down if needed
- Jump down to cliffside area with crashed moon rock
- Collect Datapad from metal box beside the moon rock
Console Activation:
- Follow east path back up to Wyclef’s Reprieve
- Find Command Console on the south wall of the Safehouse
- Activate to complete setup process
Terminus Range Region Safehouses
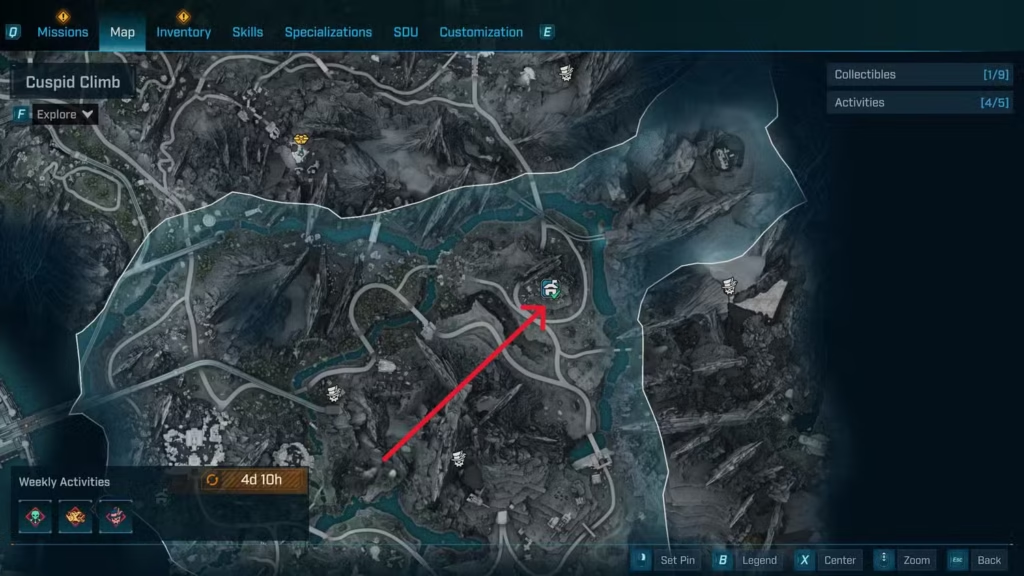
Grey Havenage Safehouse
Location: Cuspid Climb, Terminus Range Difficulty: Hard (Advanced Platforming)

Datapad Collection:
- Look southwest from Grey Havenage for grappleable platform
- Grapple up to the high platform position
- Use jetpack to glide across to middle platform
- Boost again to reach climbable surface
- Climb to the top and collect Datapad
Console Activation:
- Use ramp north of Datapad location
- Glide over to Grey Havenage Safehouse
- Enter now-open Safehouse and find Command Console
Heritage Opus Safehouse
Location: Cuspid Climb, Terminus Range Difficulty: Hard (Combat + Complex Navigation)
Datapad Collection:
- Loop right from Heritage Outpost to find climbable wall
- Take immediate left after climbing
- Fight through Order forces in the area
- Continue climbing the spiral Safehouse structure with grapple hook
- Reach bell tower area
- Stand on boxes before bell tower
- Double jump and glide to bell tower roof
- Collect Datapad from rooftop
Console Activation:
- Enter building to the left of bell tower (now accessible)
- Walk up stairs to find Command Console
The Nightcap Safehouse
Location: Windspear, Terminus Range Difficulty: Moderate (Platforming Focus)

Datapad Collection:
- Find large crevice in mountain opening
- Jump up to platform inside the crevice
- Climb wall on the right side
- Reach top and use jetpack glide
- Jump to another platform containing Datapad
Console Activation:
- Enter opened Safehouse after Datapad collection
- Locate and activate Command Console inside
Snowy Wells Safehouse
Location: Stoneblood Forest, Terminus Range Difficulty: Hard (Extensive Climbing Required)

Datapad Collection:
- Look west side of mountain range for grapple points
- Grapple up and follow provided path
- Continue using grapple points to reach locked Safehouse
- Grapple left of main door
- Grapple the water tower
- Drop down and glide across to another building
- Collect Datapad from the building
Console Activation:
- Glide back to main Safehouse doors
- Follow door around left to exterior area
- Find Command Console outside the Safehouse
- Activate to unlock interior access
Carcadia Burn Region Safehouses
Makeshift Chalet Safehouse
Location: Lopside, Carcadia Burn Difficulty: Easy to Moderate
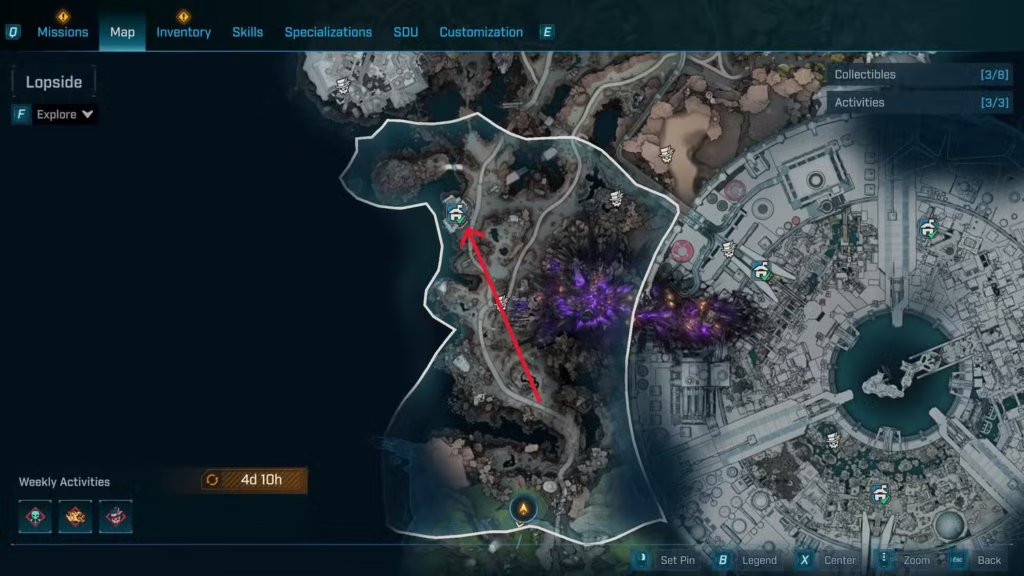
Datapad Collection:
- Go left side of Makeshift Chalet area
- Find steep drop down rocky cliffs
- Descend to bottom of cliff area
- Collect Datapad from bottom location
- Grapple back up to previous position
Console Activation:
- Find Command Console at southwest wall of Makeshift Chalet
- Console located outside the Safehouse structure
- Activate to complete setup
The Lowrise Safehouse
Location: Tonnage Peel, Carcadia Burn Difficulty: Moderate (Grappling Focus)

Datapad Collection:
- Use grapple hook on destroyed pipe to stand on top
- Follow around right using grapple hook navigation
- Continue grappling until reaching top of rock formation
- Head north from rock top
- Locate and collect Datapad
Console Activation:
- Head southwest from current platform position
- Find Command Console on the platform
- Activate to claim Safehouse
Wildhorn’s Beard Safehouse
Location: Ruined Sumplands, Carcadia Burn Difficulty: Easy (Combat Required)
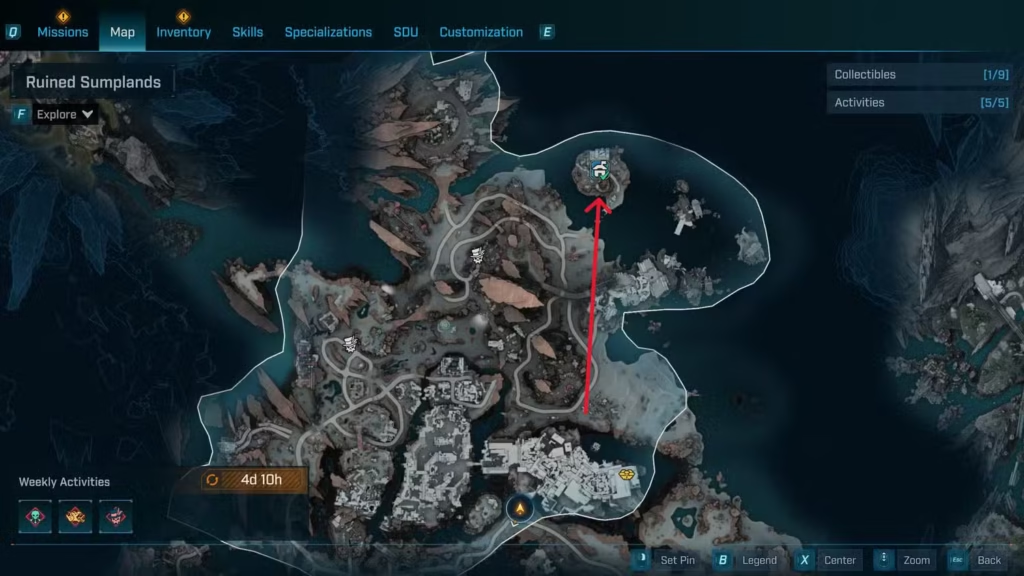
Datapad Collection:
- Loop behind the large rock formation
- Follow stairs upward to elevated area
- Find boat containing the Datapad
- Clear deadly Kratch enemies in the area
- Collect Datapad from boat
Console Activation:
- Head north of Wildhorn’s Beard
- Find Command Console within central Safehouse area
- Activate to establish fast travel point
Dominion City Region Safehouses
The Food Court Safehouse
Location: Terminus District, Dominion City Difficulty: Easy (Combat Required)
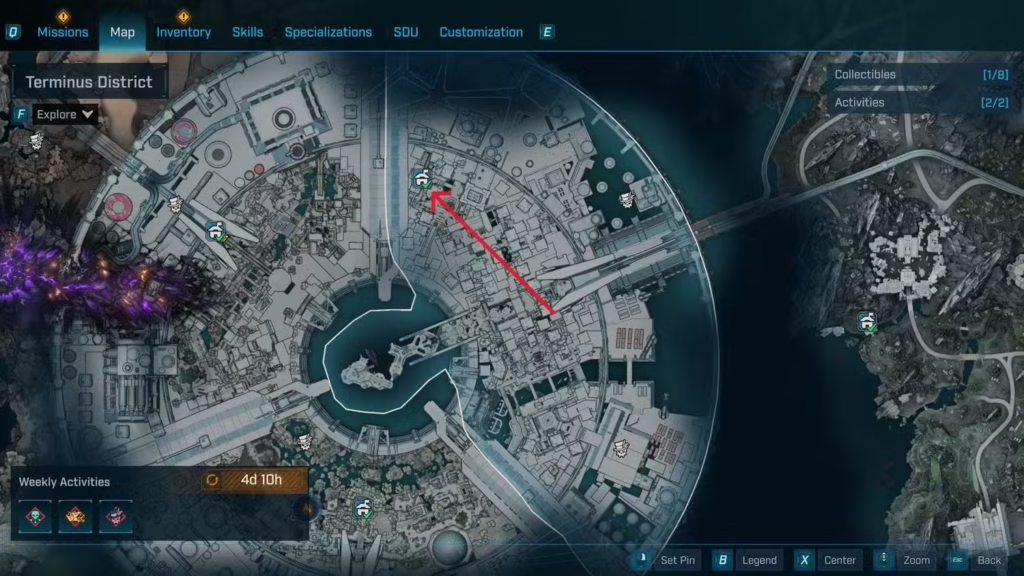
Datapad Collection:
- Head left to Food Court from Terminus District entrance
- Go northeast area of Food Court location
- Find trash heap with corpse and Datapad
- Collect Datapad while avoiding area hazards
Console Activation:
- With back to trash heap, look right
- Find Command Console in indicated direction
- Clear Rippers that have claimed the area
- Activate Console to secure Safehouse
Sumpview Falls Safehouse
Location: Fades District, Dominion City Difficulty: Easy
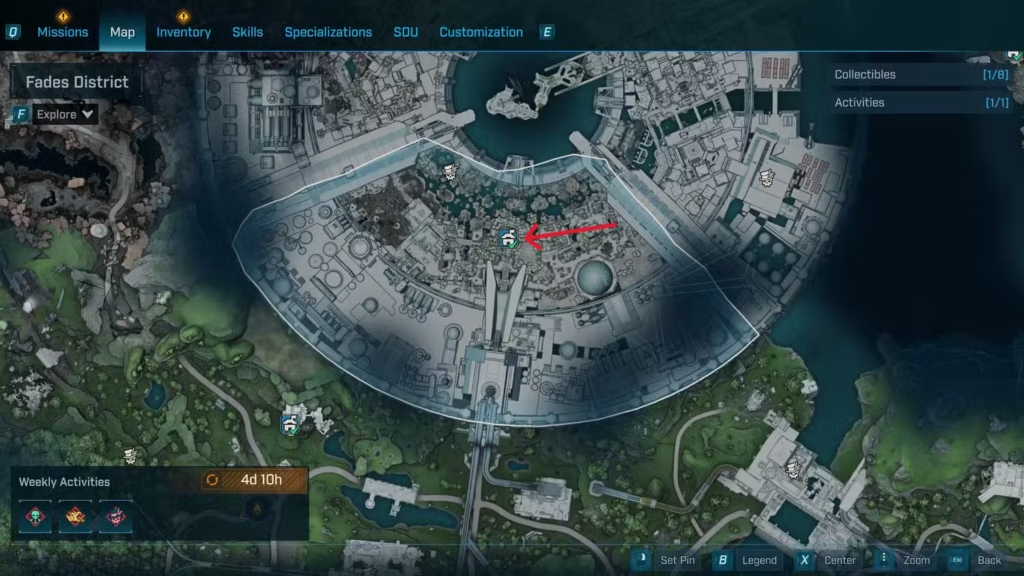
Datapad Collection:
- Drop down to Sumpview Falls in center of region
- Find ladder on east wall
- Climb ladder to discover Datapad location
- Collect Datapad from elevated position
Console Activation:
- Turn north from Datapad location
- Locate Command Console in indicated direction
- Activate to complete final Safehouse
Strategic Collection Tips
Preparation Strategies:
- Clear inventory space before extensive Safehouse runs
- Bring appropriate weapons for combat encounters
- Stock healing items for challenging platforming sections
- Plan routes efficiently to minimize backtracking
Platforming Optimization:
- Master grapple hook mechanics for complex traversals
- Practice jetpack gliding for precision jumps
- Learn climbing techniques for vertical challenges
- Use environmental cues for navigation assistance
Combat Readiness:
- Identify enemy types at each Safehouse location
- Prepare appropriate elemental weapons for encountered foes
- Clear areas systematically before attempting collection
- Use Safehouse areas as fallback positions during combat
For comprehensive navigation and movement tips, reference our Beginners Guide Essential Tips.
Integration with Other Game Systems
Fast Travel Network:
Activated Safehouses create an efficient fast travel network that supports:
- Lost Capsule collection by providing processing locations
- Collectible farming through strategic waypoints
- Story mission progression via convenient spawn points
- Vendor access for equipment management
Resource Management:
- Inventory management through vendor interactions
- Equipment upgrades via Safehouse commerce
- Contract selection for side mission planning
- Banking services where available
Character Progression:
- XP farming through combat encounters during collection
- Skill practice via environmental challenges
- Equipment testing in safe environments
- Build optimization through vendor access
Troubleshooting Common Issues
Datapad Collection Problems:
- Check elevation requirements – many require vertical movement
- Clear all enemies before attempting collection
- Verify grapple hook functionality in problematic areas
- Look for alternative paths if obvious routes seem blocked
Console Activation Issues:
- Ensure Datapad collection before attempting Console activation
- Check Console positioning – some are outside Safehouse structures
- Clear local enemies that might interfere with interaction
- Verify proper interaction prompts appear
Access Problems:
- Complete required story missions for locked areas
- Check for environmental obstacles blocking standard paths
- Use alternative entry points when main routes fail
- Restart area if technical issues prevent progress
Advanced Collection Strategies
Efficient Route Planning:
- Group nearby Safehouses for combined collection runs
- Coordinate with story missions to avoid duplicate travel
- Use existing fast travel points to minimize walking distances
- Plan for combat preparation at challenging locations
Co-op Considerations:
- Divide collection responsibilities among team members
- Use team abilities for enhanced platforming
- Coordinate combat strategies for difficult encounters
- Share fast travel benefits once Safehouses are activated
Endgame Benefits:
Fully activated Safehouse networks become essential for:
- Legendary farming efficiency through strategic positioning
- Endgame content access via convenient spawn points
- Resource management during extended gameplay sessions
- Build experimentation through vendor access
For more endgame optimization strategies, check our Endgame Guide Post Campaign Activities.
Final Thoughts: Building Your Network
Establishing all 12 Safehouses transforms your Borderlands 4 experience from a navigation challenge into a streamlined adventure. While some locations require significant effort to activate, the long-term benefits of comprehensive fast travel coverage far outweigh the initial investment.
The combination of strategic positioning, vendor access, and safe resting areas makes each Safehouse a valuable asset throughout your entire journey on Kairos. From early-game progression to endgame farming, these locations serve as the backbone of efficient gameplay.
Key Takeaways:
- 12 total Safehouses across all major regions
- Datapad + Console required for each activation
- Fast travel network essential for efficient gameplay
- Vendor access and contract management at each location
- Strategic positioning supports all gameplay activities
What’s Next: With your Safehouse network established, leverage these fast travel points for efficient exploration, collection, and progression throughout Borderlands 4.
Official Resources:
Related Collection Guides:
- Lost Capsules Guide SDU Tokens & Loot
- Fadefields Vault Symbols Locations Guide
- How to Drop Items & Inventory Management Guide
- Beginners Guide Essential Tips
Your comprehensive Safehouse network awaits – start building the foundation for efficient Kairos exploration today!