Nuclear Annihilation in 8 Seconds
Harlowe has rapidly become one of the most entertaining and devastatingly powerful Vault Hunters in Borderlands 4, and for good reason: her Chroma Accelerator action skill with the right build literally becomes a pocket nuclear bomb that erases bosses in seconds.
This isn’t hyperbole. With proper optimization, Harlowe can delete Ultimate Vault Hunter Rank 5 (UHV5) bosses faster than most characters can even break their shields. The secret? The Neutron Capture augment combined with radiation damage stacking and absurd fire rate multiplication.
What makes this build special is its simplicity. Unlike complex builds requiring precise timing or resource management, Harlowe’s one-shot strategy is brutally straightforward: activate action skill, fire weapon, watch everything die. And you don’t even need the infamous Penetrator Augment to make it work (though it certainly doesn’t hurt).
Let’s break down how to build the most explosive Gravitar in the game.
Why This Build Dominates
The Core Mechanic: Neutron Capture
The entire build revolves around one augment: Neutron Capture
What it does:
- All damage your Unstable Energy Pocket deals gets stored
- When it explodes, a portion of stored damage transfers to your gun
- For 8 seconds, you deal massive bonus Radiation damage
Why it’s broken: The damage transfer creates an exponential scaling loop. Your action skill nukes enemies, storing damage, then that stored damage amplifies your weapon damage, which lets you finish off what survives (nothing survives).
The Damage Multiplication Chain
Action Skill Damage Buffs (Field-Ready Prototype, Practical Applications, Specializations)
↓
Radiation Damage Amplification (Poisoned Sun, Chain Reactor, Demon Core)
↓
Neutron Capture Damage Storage
↓
Massive Weapon Damage Bonus for 8 seconds
↓
Vladof Fire Rate Multiplication (Cyclotron, Bright Future, War Paint Repkit)
↓
Everything Dies
Why It Works Better Than Other Builds
Simplicity: Three-step execution (Repkit → Action Skill → Shoot)
Speed: Entire rotation takes under 10 seconds
Power: Scales to one-shot endgame content
Accessibility: Doesn’t require Penetrator Augment (nice to have, not essential)
Sustainability: Fast cooldown means constant nuke availability
Complete Chroma Accelerator Skill Tree
Core Skills (Maximum Priority)
1. Neutron Capture (Augment) – THE FOUNDATION
What it does: All damage from Unstable Energy Pocket is stored and transferred to your gun as Bonus Radiation Damage when it explodes
Why it’s essential: This IS the build. Without Neutron Capture, you’re just using a good action skill. With it, you’re using a weapon damage steroid that scales off action skill damage.
The 8-second window after explosion is when you become a god.
2. Field-Ready Prototype (5/5) – ACTION SKILL AMPLIFIER
What it does: Increases Action Skill Damage
Why it’s essential: More action skill damage → more stored damage → bigger weapon damage bonus from Neutron Capture. Direct scaling for your primary damage source.
3. Practical Applications (5/5) – MORE ACTION SKILL DAMAGE
What it does: Increases Skill Damage
Why it’s essential: Stack with Field-Ready Prototype for massive action skill damage. This isn’t redundant—it’s multiplicative stacking that turns your energy pocket into a tactical nuke.
4. Mechanical Brilliance (5/5) – STACKING AMPLIFICATION
What it does: Damaging enemies with a Skill grants stacking Skill Damage increases
Why it’s essential: Your action skill hits multiple enemies = multiple stacks = progressively higher damage = more Neutron Capture storage. The snowball effect is real.
5. Demon Core (Capstone) – THE MULTIPLIER
What it does:
- Energy Pocket shoots Radiation Darts at enemies while traveling
- Entangling enemies during active action skill automatically Irradiates them
Why it’s essential: Irradiated enemies take bonus Radiation damage from multiple skills. Automatic Irradiation means every enemy touched by your action skill becomes a vulnerable target for both the skill itself AND your weapon damage.
Synergy is everything here.
Radiation Damage Amplification
6. Poisoned Sun (5/5) – RADIATION BOOST
What it does: Increases Radiation Damage and Irradiation Chance
Why it’s essential: Your action skill deals Radiation damage. Your Neutron Capture weapon bonus is Radiation damage. This buffs both simultaneously.
Double-dipping damage amplification.
7. Chain Reactor (3/3) – ENTANGLED ENEMY BONUS
What it does: Bonus Radiation Damage to Entangled enemies
Why it’s essential: Your action skill Entangles enemies. You’re then shooting them with Radiation-buffed weapons. Free damage multiplier against every enemy you’re targeting.
8. Fissile Launcher (2/3) – CROWD CONTROL
What it does: Damaging Irradiated or Entangled enemies shoots Radiation Darts at other enemies
Why it’s useful: Helps with add control and spreads Radiation damage. Only 2 points because other skills offer better returns, but the crowd control helps in mobbing situations.
Fire Rate Multiplication
9. Cyclotron (5/5) – BASE FIRE RATE
What it does: Increases Fire Rate
Why it’s essential: The 8-second Neutron Capture window is short. Maximum fire rate means you’re dumping as many bullets as possible during that window for maximum damage output.
More bullets per second = more total damage.
10. Bright Future (4/5) – ACTION SKILL FIRE RATE
What it does: Triggering Action Skills grants increased Fire Rate
Why it’s essential: Stacks with Cyclotron for multiplicative fire rate increases. You’re already using your action skill constantly—might as well get free fire rate from it.
Supporting Skills
11. Make Extraordinary (5/5) – CRITICAL HIT SCALING
What it does: Skill Critical Hit Chance increases every time you Entangle an enemy (stacks)
Why it’s useful: With A Honed Mind specialization giving action skills crit capability, this creates stupid-high crit chance. More crits = more damage = more Neutron Capture storage.
12. Fuzzy Math (5/5) – STATUS EFFECT CHANCE
What it does: Increases Status Effect Chance
Why it’s useful: Higher Irradiation application rate means more enemies taking bonus Radiation damage. Helps Poisoned Sun proc more consistently.
13. Periodic Table Flip (4/5) – ELEMENTAL AMPLIFICATION
What it does: Increases Elemental Damage, Status Effect Application Chance, and Cryo Effectiveness
Why it’s useful: Radiation is elemental damage. More elemental damage = bigger action skill = bigger Neutron Capture transfer. The status application also helps Irradiation procs.
14. Ripple Effect (1/1) – CHAIN ENTANGLEMENT
What it does: Kill Skill – Killing Entangled enemies automatically Entangles another nearby enemy
Why it’s useful: Creates chain reactions in mobbing scenarios. One kill spreads Entanglement, which spreads Irradiation, which spreads death. Domino effect.
How to Execute the Build (Combat Rotation)
The beauty of this build is its simplicity. Here’s the exact sequence:
Against Bosses
Step 1: Use War Paint Repkit
- Activates fire rate boost
- Triggers “Now With Caffeine” specialization (cooldown reduction)
- Movement speed bonus for positioning
Step 2: Activate Chroma Accelerator (Action Skill)
- Unstable Energy Pocket deploys and locks onto target
- Deals massive damage as it travels
- Stores all that damage via Neutron Capture
- Explodes on contact, Irradiating and Entangling the boss
- Transfers stored damage to your weapon as Radiation bonus
Step 3: Fire Vladof Assault Rifle
- You now have 8 seconds of nuclear weapon damage
- High fire rate AR dumps maximum bullets in minimum time
- Every shot benefits from Neutron Capture damage transfer
- Boss melts in seconds
Step 4: Repeat
- Skeptic Class Mod refunds action skill on hits
- Cooldown is already fast thanks to specializations
- By the time 8-second window ends, action skill is ready again
Total time from activation to boss death: ~10 seconds average
Against Mobbing
Step 1: Deploy Action Skill Into Group
- Energy Pocket travels through enemies (Demon Core Radiation Darts)
- Explodes in center of group (Irradiation + Entanglement)
- Ripple Effect chains Entanglement on kills
Step 2: Fire Into Crowd
- Neutron Capture weapon bonus active
- Fissile Launcher spreads Radiation Darts
- Chain Reactor bonus on all Entangled enemies
Step 3: Watch Chain Reactions
- Kills trigger Ripple Effect (more Entanglement)
- More Entanglement = more Irradiation (Demon Core)
- Crowd evaporates in seconds
Best Weapons for Chroma Accelerator Build
Primary Weapon Requirement: Vladof Assault Rifle with Extra Barrel
Why Vladof specifically?
✅ Highest fire rate in the game – More bullets during 8-second window
✅ Extra Barrel Alt-Fire – Secondary firing mode with even higher fire rate
✅ Large magazine capacity – Less reloading during damage window
✅ Sustained DPS monsters – Exactly what Neutron Capture needs
The Extra Barrel attachment is non-negotiable. It transforms already fast Vladof ARs into bullet hurricanes.
Top Weapon Choices
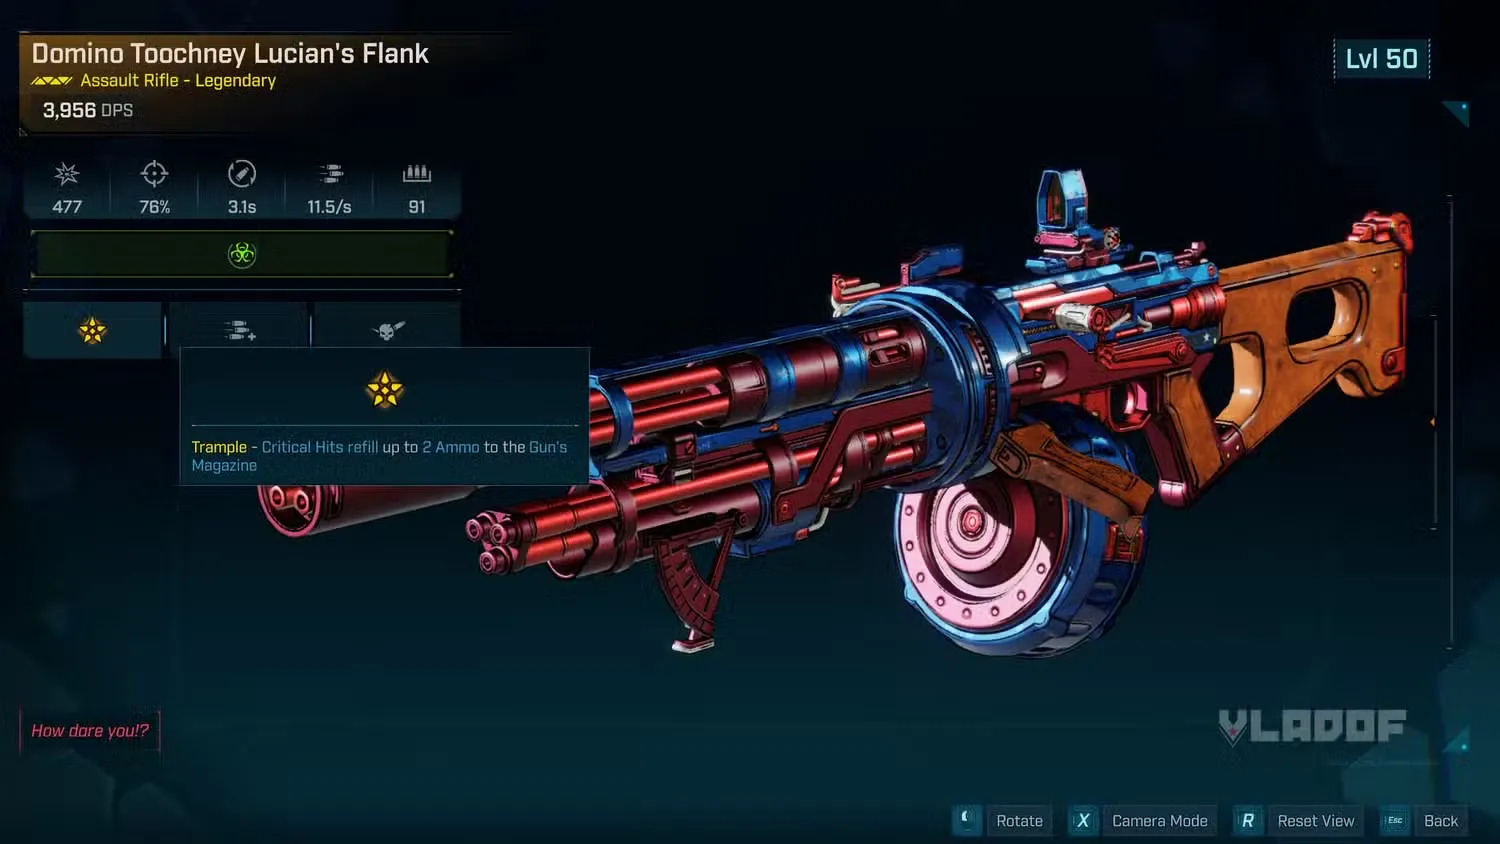
1. Lucian’s Flank – INFINITE AMMO OPTION
How to farm: Meathead Riders at The Old Scrape (Ripper Drill Site), Cuspid Climb, Terminus Range
Special Perk: Trample – Critical Hits refill up to 2 ammo to magazine
Why it’s amazing:
- Vladof AR with Extra Barrel attachment
- Returns ammo on crits (basically infinite ammo)
- High base fire rate amplified by Extra Barrel
- With Make Extraordinary’s crit chance stacking, you’re constantly refilling
- Never reload during your 8-second window
Best use: Boss encounters where sustained fire without reloading is crucial
Perfect synergy with this build. High crit chance + ammo refund = uninterrupted DPS during Neutron Capture window.
2. Aegon’s Dream – ELEMENTAL CHAOS
How to farm: Horace at Horace’s Oversight, Hungering Plain, Fadefields
Special Perk: Prophetic – Alternates Incendiary and Cryo damage per shot
Why it’s amazing:
- Vladof AR with Extra Barrel attachment
- Alternating fire/ice creates constant status effects
- High fire rate ensures rapid element application
- Large magazine capacity
- Versatile against all enemy types
Best use: General-purpose legendary that works everywhere
Dual element application adds extra damage on top of your Radiation bonus. Not as specialized as Lucian’s Flank but more versatile.
For detailed weapon stats and alternative farming targets, check our best legendary assault rifles guide.
The Extra Barrel Secret
What Extra Barrel actually does:
- Adds secondary firing barrel to weapon
- Alt-Fire mode shoots from both barrels simultaneously
- Effectively doubles your fire rate
- Doubles your ammo consumption (manage carefully)
Why it’s critical for this build: Remember, you only have 8 seconds of Neutron Capture weapon bonus. The more bullets you fire in that window, the more total damage you deal. Extra Barrel maximizes bullet output = maximizes damage output.
Essential Gear: War Paint Repkit
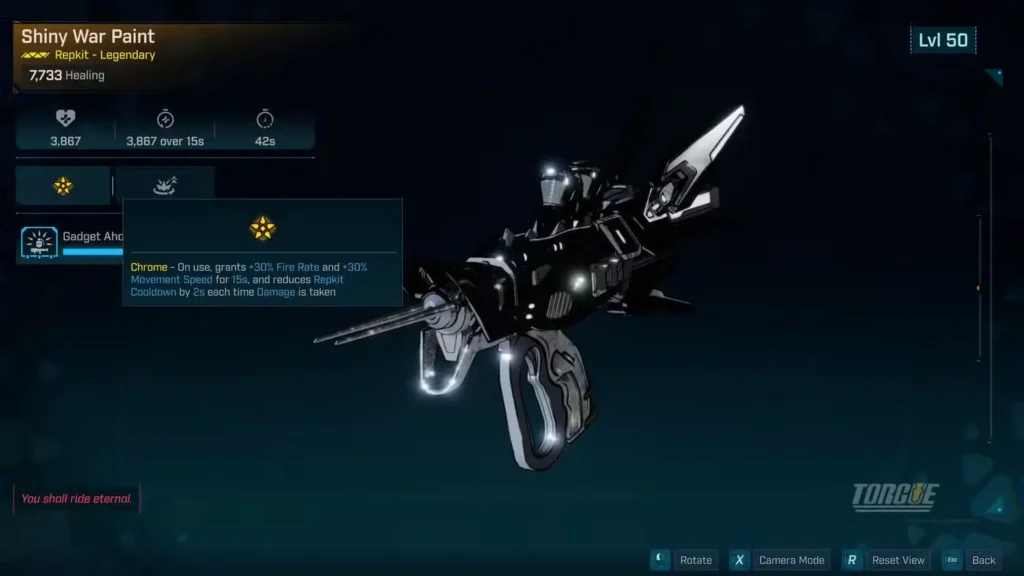
Shiny War Paint Repkit – THE ENABLER
How to farm: Meathead Riders at The Old Scrape (Ripper Drill Site), Cuspid Climb, Terminus Range
Why you absolutely need this:
Fire Rate Boost – Multiplicative with Cyclotron and Bright Future
Movement Speed – Better positioning for action skill deployment
Healing – Bonus sustain (not the main reason but nice to have)
Cooldown Reduction Trigger – Activates “Now With Caffeine” specialization
The rotation literally starts with this Repkit. It’s the first step of your combat sequence because it amplifies everything that follows.
This is non-negotiable for optimization.
Best Class Mod: Skeptic
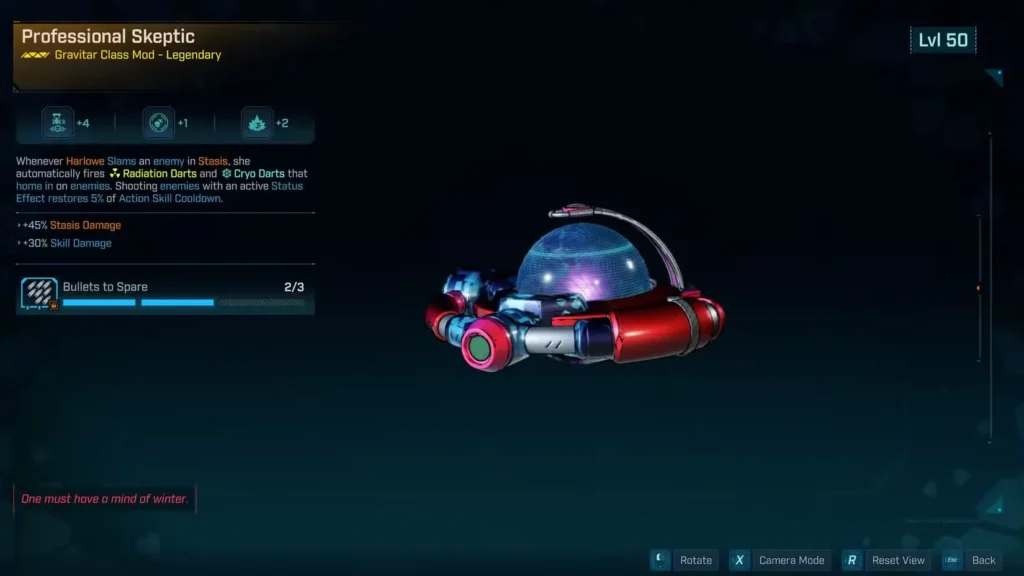
Skeptic Class Mod – THE GAME CHANGER
How to farm: Callis (the Ripper Queen) at Moon-Called Throne, Fallen Crown, Carcadia Burn
Special Effect: Shooting enemies with active Status Effect restores Action Skill cooldown
Why it’s the best:
Near-infinite Action Skill uptime:
- Use action skill (Irradiates + Entangles enemies)
- Shoot Irradiated/Entangled enemies
- Action Skill cooldown refunds
- Action Skill is ready again before 8-second window ends
The result? You can chain Neutron Capture windows back-to-back, essentially maintaining permanent weapon damage bonuses.
Skill bonuses don’t matter. The unique effect is what makes this class mod build-defining.
Best Shield: Firewerks (Optional)
Firewerks Shield – CROWD CONTROL BONUS
How to farm: Splashzone at Riptide Grotto, Coastal Bonescape, Fadefields
Special Effect: Launches automatic missiles at enemies on kill
Why it’s recommended:
- Helps with add control in mobbing
- Free damage without input
- Missiles proc while you focus on boss
Honest assessment: Any high-capacity shield works. Firewerks just adds visual flair and convenience. Prioritize shields with damage bonuses or survivability stats if you prefer.
For more shield options, check our best legendary shields guide.
Best Enhancements
Priority Enhancements
1. Vladof Box Magazine Enhancement (HIGH PRIORITY)
What it does:
- Increases Fire Rate for Vladof weapons
- Increases Magazine Size
Why it’s essential: More bullets per magazine + faster firing = maximum damage during 8-second window. Perfect synergy.
2. Vladof Bullet Hose Enhancement (HIGH PRIORITY)
What it does: Chance to add extra projectile per shot on Vladof weapons
Why it’s essential: Free bonus bullets means even higher DPS without additional ammo consumption. Multiplicative scaling with fire rate buffs.
3. Any Skill Damage Enhancement (MEDIUM PRIORITY)
Boosts Action Skill damage → stronger Neutron Capture transfer → better weapon damage bonus
4. Fire Rate Enhancement (MEDIUM PRIORITY)
Universal fire rate buffs stack with everything else you’re already running
Ordinance: Penetrator Augment (Optional)
Throwing Knife with Damage Amp Payload + Penetrator Augment
Why it’s overkill (but fun):
- Penetrator makes all damage critical for 5 seconds
- Damage Amp increases damage enemy takes
- Combined with Neutron Capture window = absurd damage
Execution with Penetrator:
- Throw Penetrator knife (5-second crit window)
- Use War Paint Repkit
- Activate Action Skill
- Fire weapon (guaranteed crits + Neutron Capture bonus)
Reality check: This makes an already broken build even more broken. Not required for success but satisfying when you want maximum overkill.
Check our Penetrator Augment farming guide if interested.
Best Specializations for Harlowe
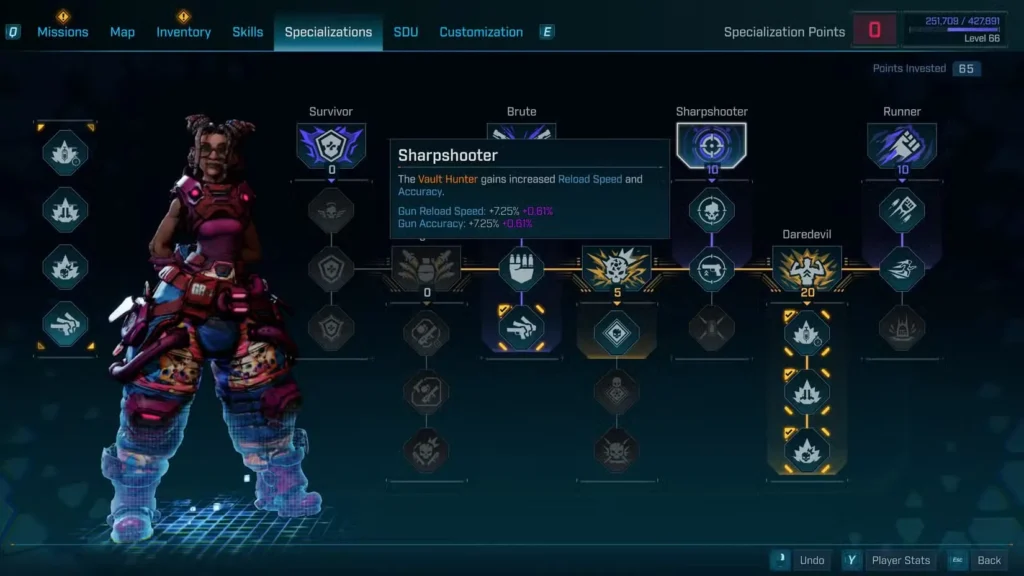
Recommended Distribution
Sharpshooter (10 points) → Unlock path
Runner (10 points) → Unlock Daredevil
Daredevil (20+ points) → Primary investment
Brute (20 points) → Secondary investment
Survivor (20+ points) → Tertiary investment
Remaining points → Continue Daredevil
Key Specialization Perks
Now With Caffeine (Runner)
- Effect: 25% Action Skill Cooldown Reduction when activating Repkit
- Why essential: War Paint Repkit in your rotation already; free cooldown reduction
I Am A Gun (Sharpshooter)
- Effect: Action Skill Damage benefits from 50% of Gun Damage increases
- Why essential: All your gun damage buffs now also boost action skill damage → stronger Neutron Capture
A Honed Mind (Daredevil)
- Effect: 5% Action Skill Critical Hit Chance + 50% Action Skill Crit Damage
- Why essential: Makes action skill crit-capable; synergizes with Make Extraordinary for ridiculous crit scaling
Riddle You This (Survivor)
- Effect: Gain stacking Gun Damage buff (up to 50 stacks, +1% per stack)
- Why essential: 50% Gun Damage at max stacks = 25% more Action Skill Damage (via I Am A Gun) + higher base weapon damage
The stack maintenance (6-second window) is easy during combat.
Best Firmware Sets
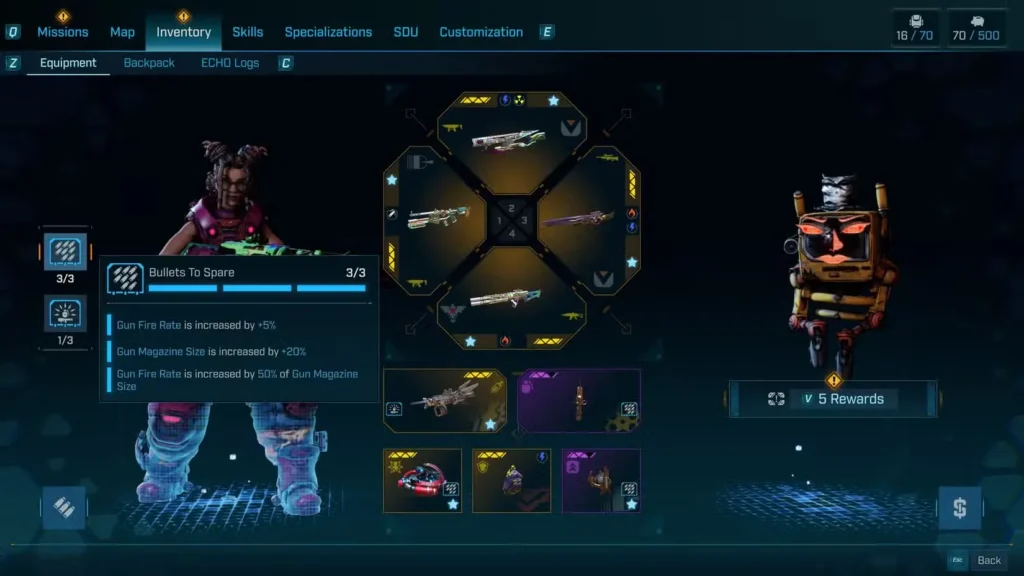
Bullets To Spare (3 pieces equipped)
Bonuses per piece:
- Gun Fire Rate +5%
- Gun Magazine Size +20%
- Gun Fire Rate increases by 50% of Magazine Size
With 3 pieces:
- +15% Fire Rate (base)
- +60% Magazine Size
- +30% Fire Rate (from magazine scaling)
- Total: +45% Fire Rate minimum
Why it’s essential: Maximum fire rate = maximum bullets during 8-second Neutron Capture window. This is the entire point of the build.
GOOFJC (2 pieces equipped)
Bonuses per piece:
- Action Skill Cooldown Rate +10%
- Action Skill Damage +15%
With 2 pieces:
- +20% Cooldown Rate
- +30% Action Skill Damage
Why it’s essential: Faster action skill = more frequent nukes. Higher action skill damage = stronger Neutron Capture transfers.
Why This Combination?
Bullets To Spare maximizes weapon damage output during Neutron Capture windows
GOOFJC maximizes action skill frequency and strength
Together, they create the perfect feedback loop for this build’s playstyle.
Build Progression Guide
Early Game (Level 1-25)
Priority Skills:
- Get Neutron Capture augment ASAP
- Field-Ready Prototype (5/5)
- Cyclotron (5/5)
- Poisoned Sun (start investing)
Weapon: Any Vladof AR you find
Mid Game (Level 25-45)
Priority Skills:
- Complete Poisoned Sun (5/5)
- Practical Applications (5/5)
- Start Demon Core path
- Begin Mechanical Brilliance
Gear: Farm Lucian’s Flank or Aegon’s Dream
End Game (Level 45+)
Priority:
- Max all core skills
- Get Demon Core capstone
- Farm Skeptic Class Mod
- Farm War Paint Repkit
- Optimize Firmware sets
- Get Vladof Enhancements
Why This Beats Other Harlowe Builds
Versus Tank Builds:
- Higher DPS (one-shot potential vs sustained damage)
- Faster clear times
- Better action skill utilization
Versus Hybrid Builds:
- More focused damage output
- Simpler execution
- Better scaling into endgame
Versus Other Action Skill Builds:
- Neutron Capture damage transfer is unique
- 8-second weapon bonus windows are game-changing
- Near-infinite uptime with Skeptic Class Mod
Comparison to Other Top Builds
vs. Vex Bleed Build
Vex strengths: Consistent DOT, lifesteal sustain, elemental versatility
Harlowe strengths: Higher burst damage, simpler execution, better against bosses
Winner: Depends on preference. Both are top-tier. See our complete Vex Bleed build guide for comparison.
Common Mistakes to Avoid
❌ Not using War Paint Repkit first – Miss fire rate buff and cooldown reduction
❌ Shooting before Action Skill explodes – Neutron Capture hasn’t transferred yet
❌ Forgetting Extra Barrel Alt-Fire – Leaving massive DPS on the table
❌ Using non-Vladof ARs – Lower fire rate = less 8-second window damage
❌ Not optimizing Firmware – Missing huge fire rate and action skill bonuses
❌ Standing still – Movement is survival, even with high DPS
UHV5 Boss Strategies
General Approach
Before engagement:
- Full ammo
- Action Skill ready
- War Paint Repkit charged
During fight:
- Position for clear action skill travel path
- Repkit activation
- Action Skill deployment
- Engage Extra Barrel Alt-Fire immediately
- Dump magazine during 8-second window
- Repeat (Skeptic refunds cooldown)
Average kill time on UHV5 bosses: 10-20 seconds depending on health pool
Gear Farming Priority List
Must Farm:
- ✅ Lucian’s Flank OR Aegon’s Dream (weapon foundation)
- ✅ War Paint Repkit (rotation essential)
- ✅ Skeptic Class Mod (cooldown management)
- ✅ Vladof Enhancements (fire rate scaling)
- ✅ Bullets To Spare Firmware (3 pieces)
- ✅ GOOFJC Firmware (2 pieces)
Optional:
- Firewerks Shield (crowd control convenience)
- Penetrator Augment knife (overkill but fun)
Final Thoughts
Harlowe’s Chroma Accelerator build with Neutron Capture is the perfect example of “simple to execute, devastating in results.” You’re not managing complex rotation timings, tracking multiple DOT effects, or juggling resource pools. You’re pressing three buttons in sequence and watching health bars disappear.
The build scales beautifully into endgame content, maintains near-100% action skill uptime with proper gear, and provides instant gratification through massive burst damage. It’s accessible for newer players while remaining optimal for veterans.
Is it as broken as Vex’s Bleed build? Debatable. But it’s definitely more satisfying when you want to feel like a walking nuclear reactor.
Build it, optimize it, and enjoy deleting bosses in seconds. This is Harlowe at her absolute peak.
Get Borderlands 4:
Related Build & Farming Guides:


