Vault Symbols in Borderlands 4 are essential collectibles that reward you with valuable SDU Tokens for expanding your ammo and inventory capacity. The Fadefields region contains multiple sub-areas packed with these symbols, some hidden in obvious spots while others require creative exploration and puzzle-solving skills.
This comprehensive guide covers every single Vault Symbol location in the Fadefields, including the tricky ones that aren’t immediately obvious from the map markers. Whether you’re aiming for 100% completion or just want to maximize your storage capacity, here’s everything you need to know.
Why Vault Symbols Matter in Borderlands 4
Before diving into locations, let’s establish why these collectibles are worth your time:
SDU Token Rewards:
- Expand inventory space for more weapon storage
- Increase ammo capacity for sustained combat
- Boost equipment slots for better build optimization
- Maximize carrying potential for loot farming sessions
Completion Benefits:
- Achievement/Trophy progress for completionist players
- Enhanced gameplay experience through increased storage
- Better resource management for endgame content
- Quality of life improvements for inventory management
For more information about optimizing your storage systems, check out our SDU Tokens Complete Collection Guide.
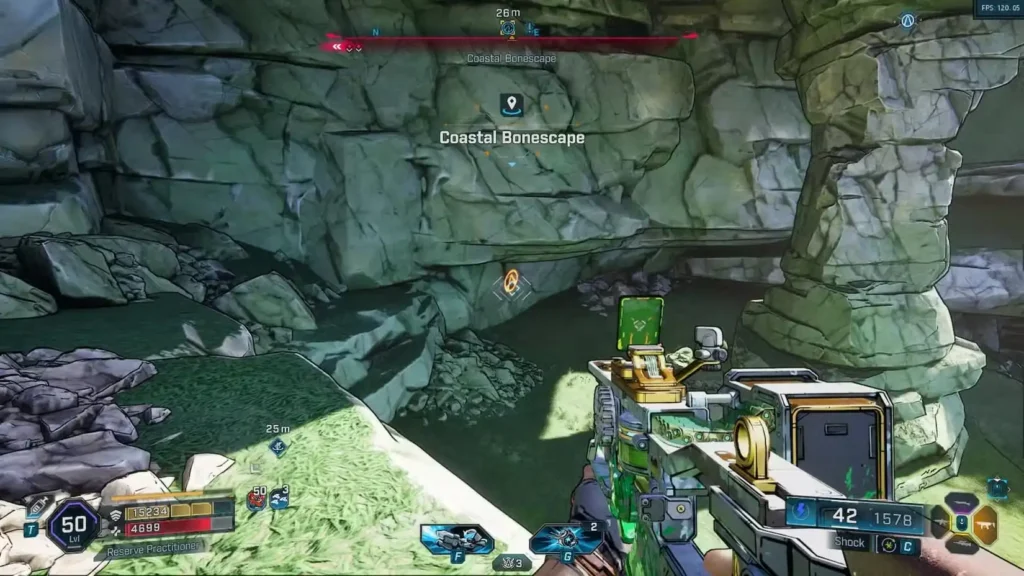
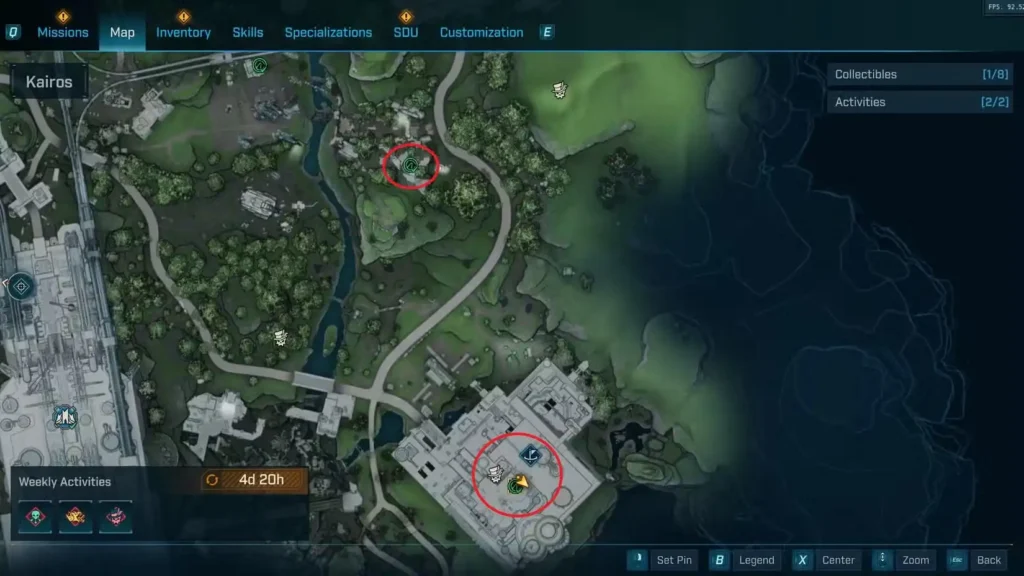
Coastal Bonescape Vault Symbols (3 Total)
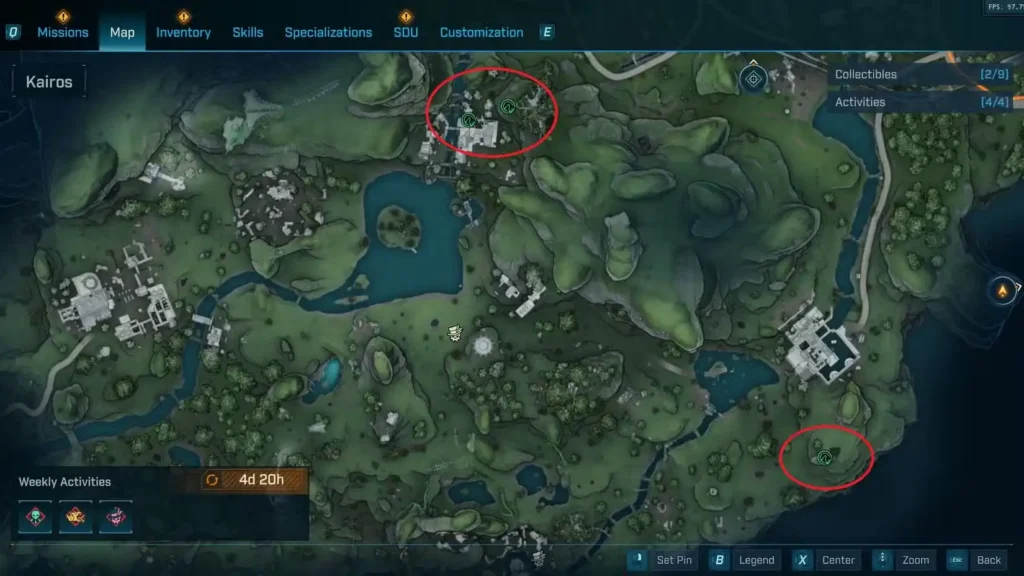
The Coastal Bonescape serves as Borderlands 4’s true starting area and contains three Vault Symbols. Two are clustered near each other, while the third requires traveling to the eastern edge of the region.
Vault Symbol 1: Plungeford Interior
Location: Inside the tall house in Plungeford Difficulty: Easy to Moderate
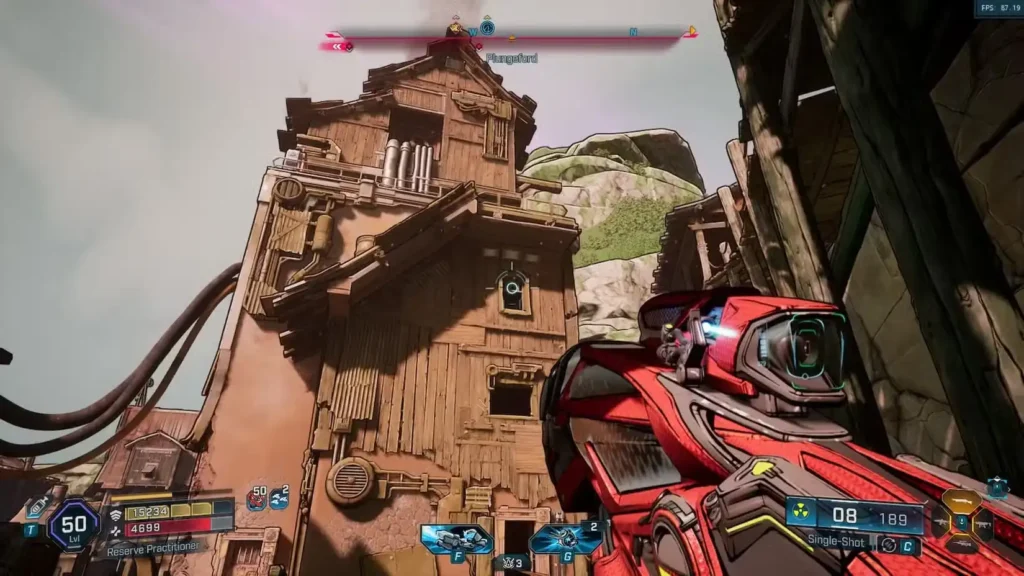
Detailed Directions:
- Travel to Plungeford (same area as the Meat is Murder quest conclusion)
- Locate the tall house visible in the area
- Enter through cracks and holes in the walls – don’t expect a front door
- Navigate to the upper floor using available paths
- Find the symbol carved into the wall
Navigation Tips: The building damage creates multiple entry points. Look for the most accessible opening and work your way up through the structure’s interior.
Vault Symbol 2: Plungeford Exit
Location: Rocky outcrop near Plungeford’s exit to the Howl Difficulty: Easy
Detailed Directions:
- Exit Plungeford heading toward the Howl transition area
- Look for the rocky outcrop immediately outside the settlement
- Consult your map for the exact Vault Symbol marker
- Approach the rocks – the symbol should be clearly visible
Pro tip: This is one of the most straightforward symbols in the region. If you can’t spot it immediately, check your map position to ensure you’re at the right outcrop.
Vault Symbol 3: Eastern Cliff House
Location: Rooftop near Waterstop POI on eastern cliff Difficulty: Moderate (Combat Required)
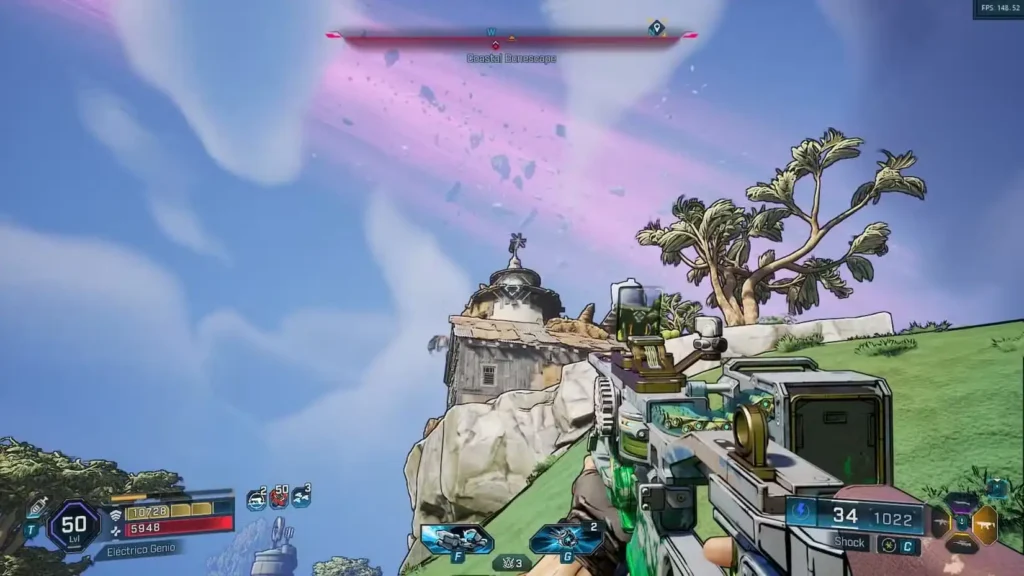
Detailed Directions:
- Travel east to the cliff area near Waterstop POI
- Clear out Kratches infesting the area
- Locate the house positioned on the cliff edge
- Climb to the rooftop using available paths
- Find the symbol facing toward the cliff
Combat Warning: The Kratches here can be aggressive. Clear them out completely before attempting to climb, as fighting on rooftops can be dangerous.
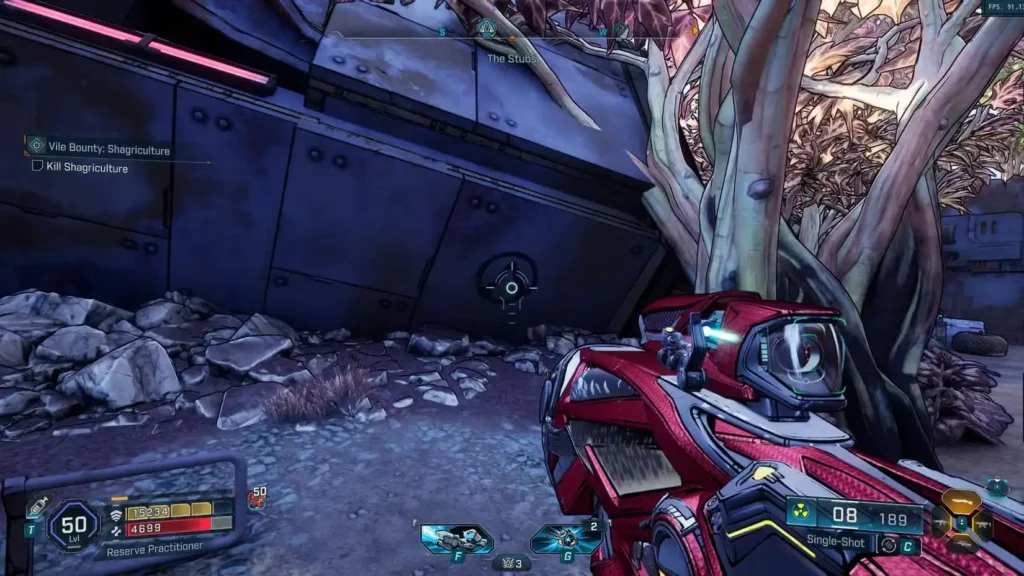
The Howl Vault Symbol (1 Total)
The Howl contains only one Vault Symbol, but its location requires knowledge of the Outbounders’ hidden base layout.
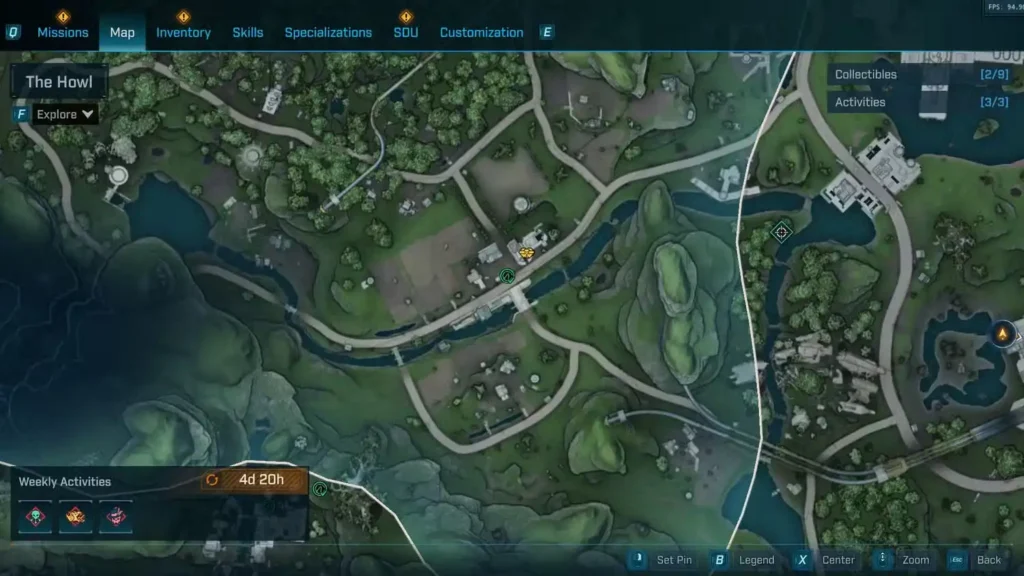
Vault Symbol 1: Outbounders Base Hidden Ledge
Location: Underneath Outbounders’ base in the Launchpad Difficulty: Moderate (Navigation Required)
Detailed Directions:
- Enter the hidden base from the bridge entrance
- Before descending the main stairs to the base proper
- Look right for a ledge that’s easy to miss
- Follow the path along this secondary route
- Tag the symbol carved into the wall
Navigation Note: This symbol is easily missed because most players focus on the main path down to the base. The ledge appears just before the official entrance stairs.
Hungering Plains Vault Symbols (2 Total)
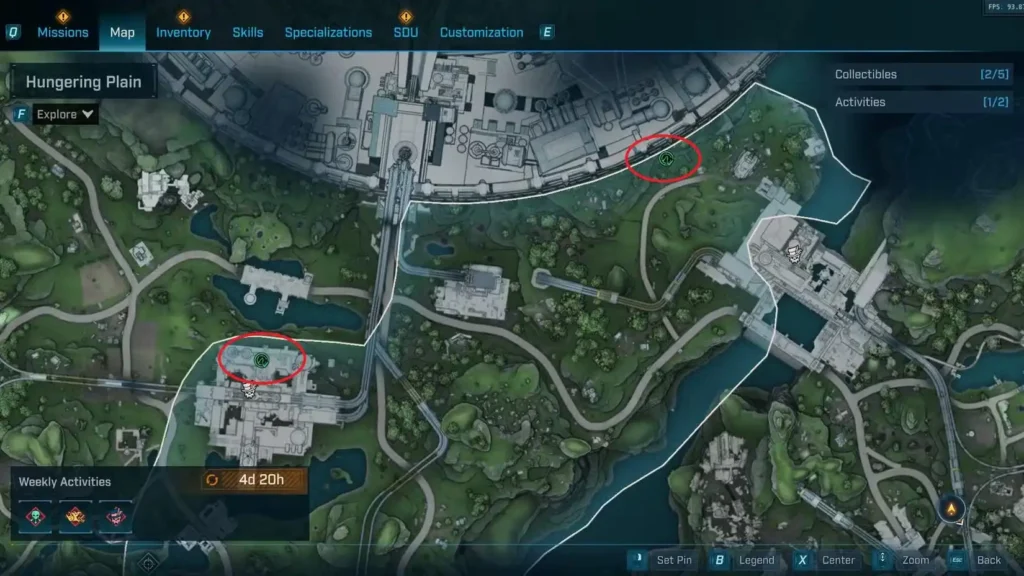
The Hungering Plains offers two symbols with varying difficulty levels. One requires basic exploration, while the other involves infiltrating a heavily defended Order facility.
Vault Symbol 1: Border Wall Ruins
Location: Ruined house near Fadefields/Dominion City wall Difficulty: Easy

Detailed Directions:
- Head to the wall dividing Fadefields from Timekeeper’s Dominion City
- Locate the ruined house near this border area
- Use double jump to reach the second floor
- Find the symbol on the upper level
Accessibility Tip: This symbol primarily tests your jumping skills. Make sure you have adequate jump height before attempting.
Vault Symbol 2: Horace’s Oversight Interior
Location: Inside Horace’s Oversight Order base Difficulty: Hard (Combat + Puzzle Required)

Detailed Directions:
- Fight through Horace’s Oversight during or after the campaign
- Clear the compound of Order forces
- Look for the doorway marked by two triangular lights above it
- Enter that specific room
- Pull the vent cover on the wall opposite the entrance
- Navigate through the vent system
- Tag the symbol in the hidden room
Combat Strategy: This base is heavily defended. Consider bringing appropriate gear for Order enemies and ensure you have adequate healing items before attempting infiltration.
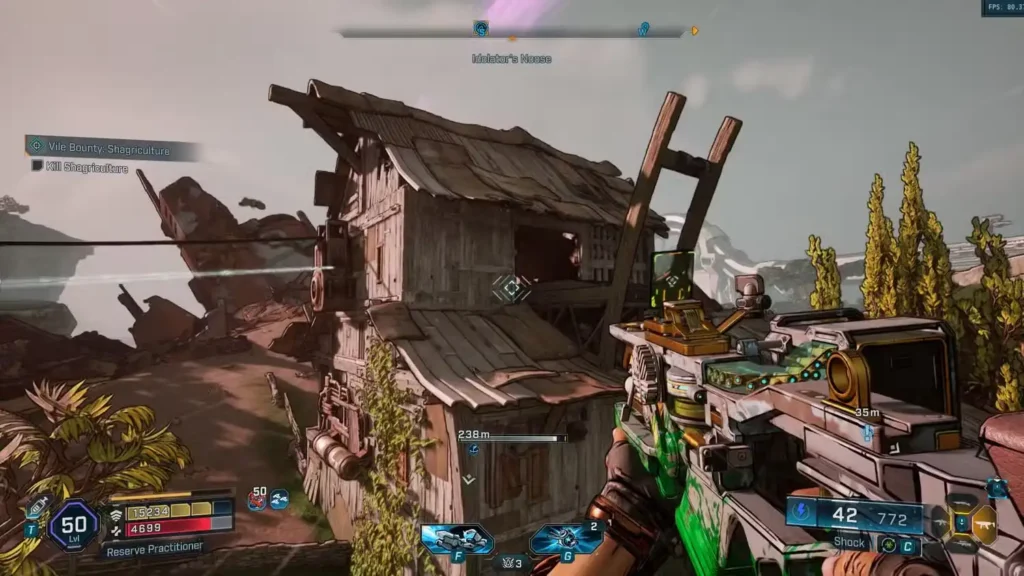
Idolator’s Noose Vault Symbols (3 Total)
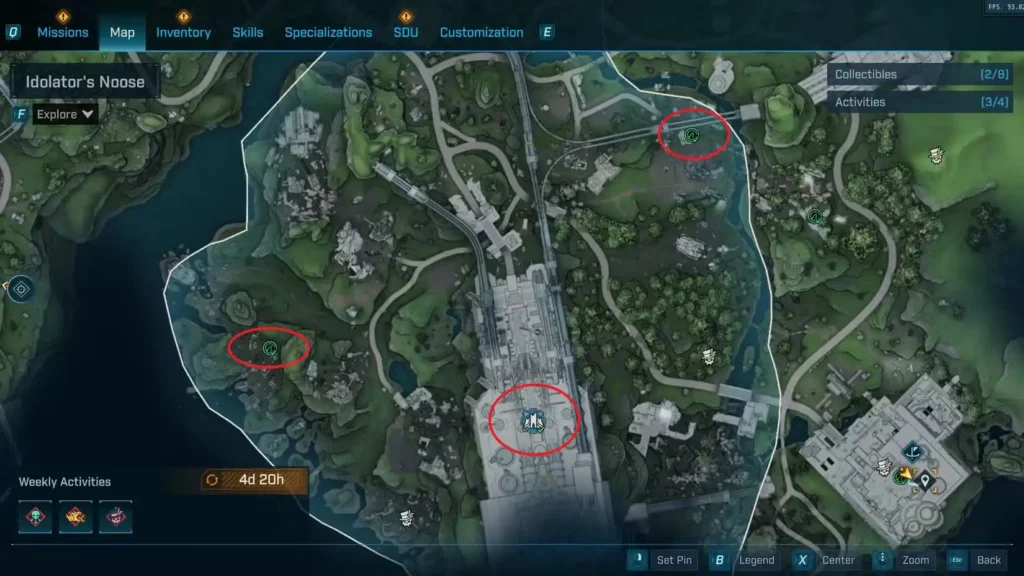
Idolator’s Noose technically contains three symbols, though the map only shows two. The third is hidden within Fortress Indomita dungeon.
Vault Symbol 1: Western Tall House
Location: Far west of Fortress Indomita Difficulty: Easy to Moderate
Detailed Directions:
- Travel far west from Fortress Indomita
- Consult the provided map for exact positioning
- Locate another tall house (similar to previous locations)
- Enter the building
- Navigate to the attic area
- Find the symbol on the wall
Pattern Recognition: By now you’ll notice Borderlands 4’s love of placing symbols in tall house attics. This follows the established pattern.
Vault Symbol 2: Deep Seven Silo Village
Location: Village south of Deep Seven Silo Difficulty: Easy (Peaceful Area)
Detailed Directions:
- Travel south from Deep Seven Silo
- Enter the village (inhabitants are non-hostile)
- Find the tall house with accessible upper levels
- Climb onto the roof using available paths
- Enter through the large window
- Locate the symbol in the attic space
Peaceful Zone Advantage: Unlike most areas, this village contains friendly NPCs. You can explore freely without combat concerns.
Vault Symbol 3: Fortress Indomita Interior
Location: Inside Fortress Indomita dungeon Difficulty: Hard (Boss Area Required)
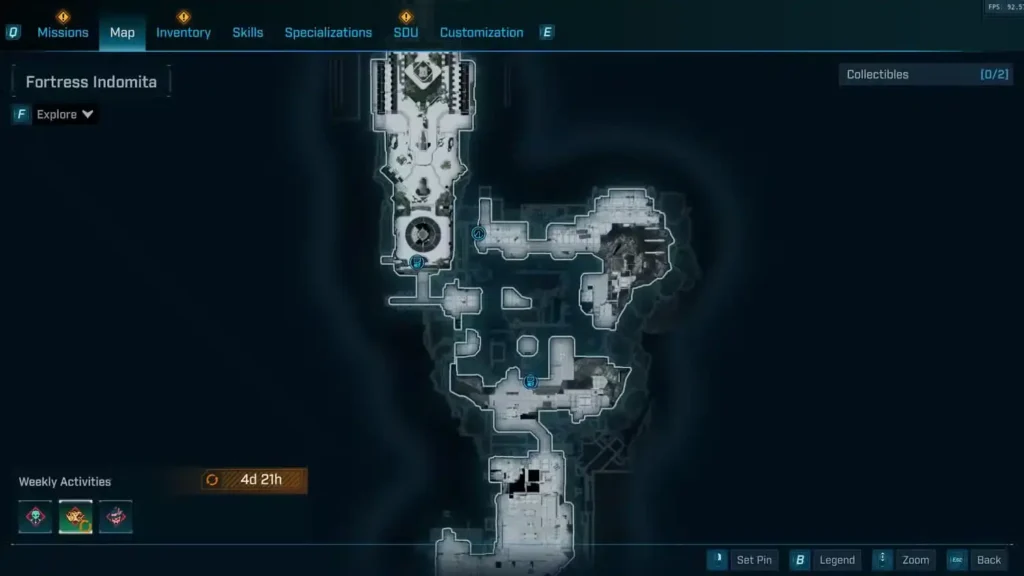
Detailed Directions:
- Complete Indomitus Sol boss fight (or fast travel if already beaten)
- Navigate to the hangar area with the central chasm
- Locate the vent cover near a checkpoint
- Remove the cover and enter the vent system
- Follow the path through the ventilation
- Access the control room
- Tag the symbol inside
Post-Boss Advantage: If you’ve already defeated Indomitus Sol, you can fast travel directly to the fortress interior, bypassing all exterior defenses.
Dissected Plateau Vault Symbols (2 Total)
The Dissected Plateau contains two symbols, with one located near a story location and another hidden deep within an Order processing facility.
Vault Symbol 1: Zadra’s Backup Plan Surface
Location: Above Zadra’s Backup Plan facility Difficulty: Easy (Story Location Access)
Detailed Directions:
- Fast travel to Zadra’s Backup Plan
- Take the cargo elevator to reach the surface level
- Climb to the hilltop containing ship wreckage
- Examine the broken hull pieces near a tree
- Find the symbol etched into the hull metal
Proximity Note: This symbol is conveniently located near the Fadefields Vault itself, making it easy to collect both objectives in one trip.
Vault Symbol 2: Order Processing Base
Location: Inside Order base with Oppressor boss Difficulty: Very Hard (Complex Infiltration Required)
Detailed Directions:
- Enter the Order base through wide side entrances
- Reach the courtyard/processing area
- Cover yourself in Wildhorn guts (required for progression)
- Pull the lever at the roofed checkpoint to apply guts
- Follow the tracks while covered in guts
- Wait for scanner to complete scan process
- Get pulled into facility interior via transport system
- Jump off before reaching crusher (critical timing!)
- Head west after landing safely
- Climb the metal grate wall
- Follow vent path to its conclusion
- Drop from vent system
- Enter room to your right behind red mirror
- Tag the symbol on the wall
Critical Safety Warning: The crusher will kill you instantly if you don’t jump off in time. Be ready to act quickly when transported into the facility.
Advanced Collection Strategies
Optimal Route Planning:
- Group nearby symbols for efficient collection
- Coordinate with story missions to avoid repeat visits
- Prepare for combat zones with appropriate gear
- Save difficult symbols for when properly leveled
Combat Preparation:
For symbols in dangerous areas, consider:
- Appropriate level gear for the region
- Healing items for sustained fights
- Ammo reserves for extended combat
- Escape routes if situations become overwhelming
Navigation Tools:
- Use fast travel liberally to minimize backtracking
- Reference the in-game map constantly for positioning
- Take screenshots of complex routes for future reference
- Mark areas you plan to return to later
For additional inventory management tips when collecting multiple symbols, reference our How to Drop Items & Inventory Management Guide.
Integration with Other Collectibles
Combine Collection Runs:
While hunting Vault Symbols, also look for:
- Other SDU Token sources in the same areas
- Legendary weapon farming opportunities near symbols
- Mission objectives that overlap with symbol locations
- Bank locations for storing collected loot
Story Mission Synergy:
Many symbols are located in or near story mission areas:
- Complete related missions first for easier access
- Use mission progression to unlock restricted areas
- Coordinate symbol collection with natural story flow
Troubleshooting Common Issues
Symbol Not Appearing:
- Check exact positioning against map markers
- Verify you’re in correct sub-region of Fadefields
- Look for environmental clues like specific buildings
- Restart the area if technical issues occur
Access Problems:
- Ensure story prerequisites are met for locked areas
- Check for required equipment like grappling hooks
- Verify enemy clearance in combat zones
- Look for alternative entry points if main routes are blocked
Navigation Confusion:
- Use multiple reference points beyond just map markers
- Take note of distinctive landmarks near each symbol
- Screenshot successful routes for future characters
- Ask community for specific guidance if stuck
Maximizing Your SDU Investment
Once you’ve collected these Vault Symbols and earned SDU Tokens:
Priority Upgrades:
- Weapon storage for diverse loadouts
- Ammo capacity for your most-used weapon types
- General inventory for improved loot management
- Class mod storage for build experimentation
Strategic Planning:
- Focus on your playstyle when choosing upgrades
- Consider endgame needs over immediate convenience
- Balance different upgrade types for overall improvement
For comprehensive guidance on SDU optimization, check our Bank Locations Storage Guide for additional storage strategies.
Completion and Beyond
Achievement/Trophy Progress:
Collecting all Fadefields Vault Symbols contributes significantly to:
- Regional completion statistics
- Overall collectible achievements
- Perfectionist gameplay goals
- Community recognition for thorough exploration
Endgame Benefits:
The storage increases from these symbols become particularly valuable during:
- Legendary farming sessions requiring maximum inventory space
- Build experimentation with diverse equipment needs
- Co-op play where loot sharing requires flexible storage
- Ultimate Vault Hunter modes with increased loot variety
For more information about endgame activities that benefit from expanded storage, explore our Endgame Guide Post Campaign Activities.
Final Thoughts: Complete Your Collection
The Fadefields Vault Symbols represent some of Borderlands 4’s most rewarding collectibles, offering both immediate gameplay benefits and long-term progression advantages. While some symbols require basic exploration skills, others demand combat prowess and puzzle-solving abilities that make their discovery genuinely satisfying.
Key Takeaways:
- 11 total symbols across all Fadefields sub-regions
- Varying difficulty levels from simple collection to complex infiltration
- Valuable SDU Token rewards for storage expansion
- Integration opportunities with story missions and other objectives
Whether you’re a completionist seeking 100% exploration or a practical player looking to maximize storage capacity, these Vault Symbols offer excellent value for the time invested in finding them.
What’s Next: With your Fadefields symbols collected, consider exploring other regions’ collectibles and optimizing your expanded storage through our related guides:
Official Resources:
Related Collection Guides:
- SDU Tokens Complete Collection Guide
- Bank Locations Storage Guide
- How to Drop Items & Inventory Management Guide
- Golden Keys Complete Guide
Happy hunting, and enjoy your expanded storage capacity for all the legendary loot you’re about to collect!