Safehouses are the lifeblood of efficient traversal in Borderlands 4, providing fast travel points, storage access, and respawn locations across the massive open world of Kairos. Shut-Eye Keep is one of the more cleverly hidden safehouses in the Fadefields region, and its Datapad location has stumped more than a few players.
Unlike some safehouses where the Datapad is sitting out in the open, Shut-Eye Keep’s activation terminal is tucked away in a spot that requires vertical thinking—literally. If you’ve been running around the main floor scratching your head wondering where the heck this Datapad could be, you’re not alone. The solution involves an elevator, some platforming, and looking up when your instinct tells you to look around.
This guide provides a complete walkthrough for unlocking the Shut-Eye Keep safehouse, including the exact Datapad location, how to reach it, and why activating this particular safehouse is worth your time. Let’s get that fast travel point operational!
Why Unlock Shut-Eye Keep Safehouse?
Before we get into the how, let’s talk about the why. Safehouses aren’t just convenient—they’re essential for efficient gameplay in Borderlands 4’s expanded open world.
Benefits of Activating Shut-Eye Keep:
1. Fast Travel Access
Once unlocked, Shut-Eye Keep becomes a permanent fast travel destination. The Fadefields is a massive region, and having multiple fast travel points saves enormous amounts of time during:
- Side quest completion
- Collectible hunting (ECHO Logs, Lost Capsules, Vault Symbols)
- Boss farming runs
- Returning to vendors and services
2. Respawn Point
If you die while exploring nearby areas, you’ll respawn at the nearest activated safehouse rather than being sent back to a distant location. This is especially useful during:
- Challenging world boss encounters
- Auger Mine explorations
- High-level enemy zones
3. Vending Machines
Most safehouses include vending machines for ammo, health, and gear. Shut-Eye Keep is no exception, providing:
- Ammunition refills
- Shield/grenade purchases
- Emergency gear upgrades if your current loadout isn’t cutting it
4. Bank/Storage Access
Access your Bank storage to manage your growing legendary collection without traveling to a major hub.
5. Mission Convenience
Several side quests and activities in the Fadefields region are located near Shut-Eye Keep. Having it activated streamlines quest completion and reduces backtracking.
Bottom line: Shut-Eye Keep’s location in the Fadefields makes it strategically valuable. The region is sprawling, and this safehouse fills a crucial gap in fast travel coverage. Unlock it early and thank yourself later.
Where is Shut-Eye Keep?
Region: Fadefields (specifically in the Hungering Plain or adjacent area)
Landmark: Large fortified building with Order military presence
Map marker: Should appear on your map as you explore the region
Shut-Eye Keep is a substantial structure—you can’t miss it once you’re in the general vicinity. It’s a military-style fortification occupied by Order troops, making it both a combat zone and a future safehouse once cleared and activated.
Getting there:
If you’re early in the game and haven’t explored this area yet, follow the main story questline through Fadefields. You’ll naturally pass near or through Shut-Eye Keep during your campaign progression. For those returning specifically to unlock it, use your nearest fast travel point and check your vehicle options to cover ground quickly.
Step-by-Step: How to Find the Shut-Eye Keep Datapad
This is where players typically get stuck. The Datapad isn’t in an obvious location, and the Command Console is equally hidden. Follow these directions carefully, and you’ll have it unlocked in under five minutes.
Step 1: Approach Shut-Eye Keep from the East
When you arrive at Shut-Eye Keep, circle around to the eastern side of the main building. You’re looking for a smaller entrance or outpost area that’s separate from the main fortification.
What you’ll encounter:
- Order troops – There will be enemy soldiers in this area
- Small structures – Look for auxiliary buildings attached to the main keep
Combat note: You can choose to fight or ignore the Order troops here. If you’re underleveled or just want to get the safehouse unlocked quickly, it’s possible to sprint past most enemies. However, clearing them out makes the platforming section less chaotic. If you need combat tips, check our best solo class guide for character recommendations.
Step 2: Enter the Small Room with a Lever
On the eastern side of Shut-Eye Keep, you’ll find a small room that looks relatively unremarkable. Inside this room is a lever or switch mechanism.
What makes this room special:
It’s actually an elevator, though it’s not immediately obvious. The design is more utilitarian than the high-tech elevators you might expect.
How to identify it:
- Small enclosed space (barely room for 1-2 characters)
- Lever/switch on the wall
- No other exits besides the entrance
Found it? Great. Now activate that lever.
Step 3: Ride the Elevator to the Top of Shut-Eye Keep
Pull the lever and the room will begin ascending. This elevator takes you all the way to the upper floors of Shut-Eye Keep—specifically, to areas you couldn’t access from the ground level.
During the ride:
- Watch for enemy spawns (some Order troops may be on upper levels)
- Prepare your weapons if you’re planning to clear the area
- Get ready for some light platforming once you reach the top
The elevator ride is relatively short—maybe 5-10 seconds depending on the structure’s height.
Step 4: Navigate Through the Main Room
Once the elevator stops, you’ll step out into a main room or central area of the upper keep. This is where navigation gets specific, so pay attention to directions.
From the elevator exit:
- Move forward through the main room
- Exit through the doorway on your left
- You should now be in a corridor or transitional space
Orientation tip: If you’re getting turned around, look for environmental cues like banners, furniture placement, or lighting to orient yourself. The “left” exit should be fairly obvious once you’re standing in the main room.
Step 5: Go Up the Stairs
After exiting the main room through the left doorway, you’ll encounter a staircase leading upward. Climb these stairs to reach the next level.
What to expect:
- The stairs may have Order troops positioned along them
- There might be loot containers or minor enemies scattered about
- You’re getting close to the Datapad location
Continue upward until you reach the top of the staircase.
Step 6: Take the Next Left
At the top of the stairs, turn left again into what should be a large room. This is your destination chamber—the Datapad is here, but you need to look in the right place.
Room description:
- Spacious interior (larger than the previous rooms)
- Likely contains some furniture, equipment, or Order military decorations
- High ceiling (this is important!)
If you’ve reached a large room after going left twice (once from the main room, once at the top of the stairs), you’re in the right place.
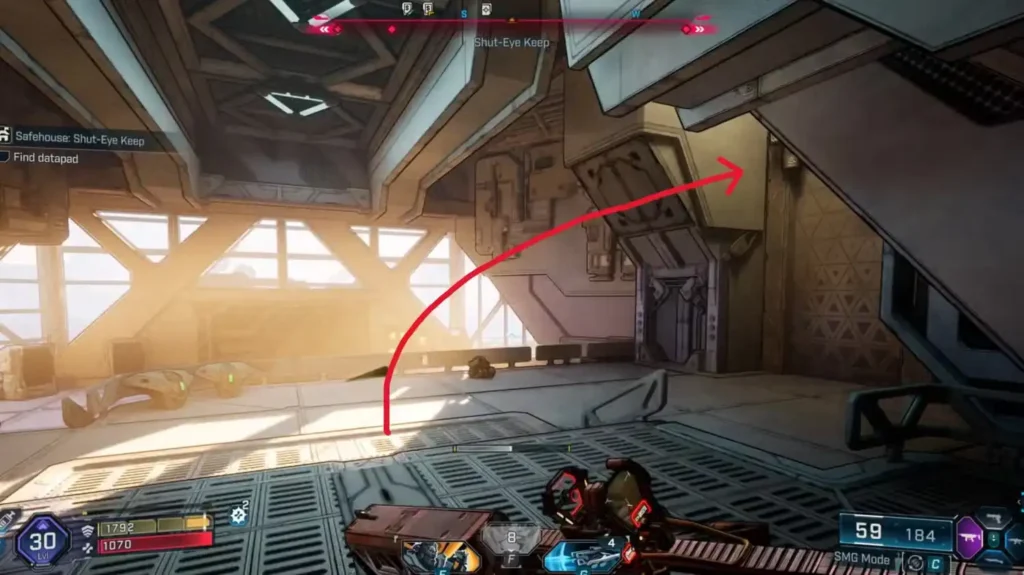
Step 7: Look UP for a Grapple Point
Here’s where most players go wrong: they’re looking around the room at ground level when they should be looking UP.
The secret:
The Datapad is on an upper ledge or platform that’s accessible via a grapple point on the ceiling or upper wall.
How to spot it:
- Tilt your camera upward and scan the ceiling area
- Look for the glowing grapple point indicator (usually blue/white)
- The grapple point is positioned to pull you up to a higher platform
Once you’ve located the grapple point, aim at it and activate your grapple hook to launch yourself upward.
Movement reminder: If you’re still getting used to Borderlands 4’s movement mechanics (double jump, glide, grapple), this is a good opportunity to practice. The grapple should pull you directly to the upper platform where the Datapad is located.
Step 8: Grab the Datapad
You’ve reached the upper platform! The Datapad should be sitting on a desk, console, or similar surface right in front of you.
Interact with the Datapad to pick it up. You’ll receive a notification that you’ve acquired the Shut-Eye Keep Datapad, and your objective will update.
Why it’s so well-hidden:
Gearbox deliberately placed this Datapad in a vertical space that requires players to think three-dimensionally. Most players are trained to search rooms horizontally, so looking up for grapple points isn’t instinctive. It’s clever level design that rewards exploration and use of movement mechanics.
Step 9: Return to the Command Console
With the Datapad in hand, you need to activate the Command Console to officially unlock the safehouse.
Where’s the Command Console?
Good news—it’s back in the same large room where you found the Datapad. Jump down from the upper platform (you can drop safely from this height) and look around the main floor.
The Command Console is typically positioned:
- Near the center of the room
- Close to the railing or the area beneath where you grabbed the Datapad
- Clearly marked with interactive prompts once you’re near it
Activate the Command Console by interacting with it. This will:
- Unlock Shut-Eye Keep as a safehouse
- Add it to your fast travel network
- Activate local services (vending machines, respawn point, etc.)
Congratulations! Shut-Eye Keep is now fully operational.
Visual Walkthrough Summary
If you’re a visual learner, here’s a condensed checklist version:
Quick route:
- ✅ Go to eastern side of Shut-Eye Keep
- ✅ Find small room with lever (elevator)
- ✅ Ride elevator to top
- ✅ Exit main room through LEFT doorway
- ✅ Climb stairs
- ✅ Turn LEFT into large room
- ✅ Look UP for grapple point
- ✅ Grapple to upper platform
- ✅ Grab Datapad
- ✅ Drop down and activate Command Console
Time required: 3-5 minutes once you know the route
Difficulty: Easy (minimal combat required, straightforward platforming)
Common Mistakes & Troubleshooting
Problem: “I can’t find the elevator!”
Solution: Make sure you’re on the eastern side of Shut-Eye Keep, not the main entrance. The elevator room is small and attached to the exterior wall. Look for a separate structure with Order troops nearby.
Problem: “The Datapad isn’t where you said it would be!”
Solution: Double-check that you took the correct lefts after exiting the elevator. The route is: main room → left → stairs → left → large room. If you took a different path, you’re in the wrong room.
Problem: “I don’t see a grapple point!”
Solution: Look up! The grapple point is above you, not at eye level. Adjust your camera angle to scan the ceiling and upper walls of the large room.
Problem: “The Command Console won’t activate!”
Solution: Make sure you’ve actually picked up the Datapad first. The console requires the Datapad to function. If you have the Datapad and it still won’t work, try reloading the area or restarting the game.
Problem: “There are too many enemies!”
Solution: You can sprint past most Order troops if you’re just trying to unlock the safehouse quickly. Alternatively, come back when you’re a higher level or bring better gear. Check our difficulty settings guide if you’re struggling with combat encounters.
Other Fadefields Safehouses
Shut-Eye Keep is just one of several safehouses scattered throughout the Fadefields region. Here are others worth unlocking:
Notable safehouses in Fadefields:
- Wyclef’s Reprieve (Dissected Plateau) – Central location for late-game Fadefields content
- The Launchpad (The Howl) – Major hub with vendors and quest givers
- Various smaller outposts across Coastal Bonescape, Hungering Plain, and Idolator’s Noose
Completion tip: Unlocking all safehouses in a region contributes to your completion percentage and makes collectible hunting significantly more efficient. If you’re working toward 100% completion, prioritize safehouse unlocks early.
Why Fadefields Fast Travel Matters
The Fadefields is massive—it’s the starting region of Borderlands 4, and Gearbox packed it with content. Having multiple fast travel points isn’t just convenient; it’s practically essential for efficient gameplay.
Activities that benefit from fast travel:
- Side quest chains – Many quests require traveling between distant locations (complete story mission list)
- Boss farming – Quickly return to boss spawn points for legendary loot farming
- Collectible runs – Jump between regions to collect Vault Symbols, SDU tokens, and ECHO Logs
- Order Bunkers – Efficiently farm Order Bunker locations for endgame gear
- Event participation – Quickly travel to limited-time events or Maurice’s Black Market
Without adequate fast travel coverage, you’ll spend significant time running or driving across the map. Shut-Eye Keep’s position makes it a valuable middle-ground waypoint for the Fadefields’ more remote areas.
Additional Safehouse Tips
While we’re on the topic of safehouses, here are some general tips that apply to all safehouse unlocks in Borderlands 4 on PlayStation and other platforms:
Always Activate Safehouses Immediately
When you discover a new safehouse, take the 2-3 minutes to unlock it right away. Don’t tell yourself “I’ll come back later.” You’ll forget, and you’ll regret it when you need a fast travel point in that area.
Check for Hidden Datapads
Shut-Eye Keep isn’t the only safehouse with a creatively hidden Datapad. Some require:
- Solving environmental puzzles
- Completing nearby Silos or challenges
- Finding alternate entrances or paths
- Using movement abilities in non-obvious ways
If you can’t find a Datapad, try:
- Looking UP (vertical spaces)
- Looking DOWN (underneath structures)
- Checking behind or inside objects
- Using grapple points to access out-of-reach areas
Safehouses Unlock Services Gradually
Some safehouses start with basic functionality (fast travel + respawn) and unlock additional features like Banks or Lost Loot Machines as you progress through the story. Don’t panic if a safehouse seems bare-bones at first.
Use Safehouses as Gear Management Hubs
With Bank storage accessible at most safehouses, you can use them as impromptu inventory management stations. After a long farming session, fast travel to the nearest safehouse and organize your loot before continuing.
Shut-Eye Keep in Context: Fadefields Completion
If you’re working toward completing everything the Fadefields has to offer, unlocking Shut-Eye Keep is one piece of a larger puzzle. Here’s what else you should be hunting in this region:
Fadefields completion checklist:
- ✅ All safehouse unlocks (including Shut-Eye Keep)
- ✅ All ECHO Log locations (31 total)
- ✅ All Vault Symbol locations
- ✅ All Lost Capsules (SDU tokens)
- ✅ All side quest completions (mission list)
- ✅ All world boss encounters
- ✅ Regional challenges and achievements
Estimated time for 100% Fadefields: 10-15 hours depending on your level and efficiency
Having Shut-Eye Keep unlocked shaves considerable time off this completion goal by providing strategic fast travel access to remote corners of the region.
Thoughts
The Shut-Eye Keep Datapad is a perfect example of Borderlands 4’s approach to exploration—rewarding players who use all available movement mechanics and think beyond the horizontal plane. Once you know to look up for that grapple point, the solution seems obvious, but getting there the first time can be genuinely puzzling.
What I appreciate about this particular safehouse unlock is that it teaches players a valuable lesson: always check vertical spaces. This mentality pays dividends throughout the rest of the game, especially when hunting for collectibles, secret areas, and hidden loot caches.
Now that you’ve unlocked Shut-Eye Keep, you have significantly better fast travel coverage across the Fadefields. Use it liberally for quest chains, farming runs, and exploration sessions. The time you save by having this waypoint active will add up quickly, especially during endgame content when you’re bouncing between activities.
And if you encounter friends struggling to find this Datapad, you can now smile knowingly and tell them the secret: look up.
Need more safehouse locations? Check out our guide to all safehouse locations and unlocks, or browse our complete beginner’s guide for essential gameplay tips. Happy vault hunting!