Building a powerful Hero in Dragon Quest 1 HD-2D Remake isn’t just about grinding levels and buying better gear. Throughout your quest to defeat the Dragonlord, you’ll discover hidden Special Scrolls containing unique spells and abilities that won’t be learned through normal leveling—and missing these can make late-game encounters significantly harder.
After extensively exploring Alefgard and tracking down every learnable skill, I’ve compiled this complete guide to both the natural progression abilities your Hero gains through leveling and the special techniques hidden in scrolls throughout the world. Whether you’re a completionist hunting every power or just want to know which scrolls are essential, this guide has everything you need.
Understanding Dragon Quest 1’s Power System
Unlike many modern RPGs where you choose skill trees or allocate points, Dragon Quest 1 follows a more traditional approach with two distinct progression paths:
Automatic Level-Up Skills:
- Learned automatically at specific levels
- No choices required—every Hero gets them
- Covers your essential combat and utility spells
- Includes major powers like Heal, Zoom, and devastating attacks
Special Scroll Abilities:
- Found hidden throughout Alefgard in chests, bookshelves, and containers
- Completely missable if you don’t explore thoroughly
- Often provide specialized or situational powers
- Some are game-changers; others are niche utilities
The smart approach? Focus on leveling naturally while systematically collecting scrolls as you explore each new area. This ensures you’re never lacking the tools needed for upcoming challenges.
Complete Level-Up Skills List (Levels 1-40)
Your Hero starts with a couple of basic abilities and continuously learns new powers as he levels up by defeating monsters and gaining experience. Here’s every skill you’ll unlock naturally, organized by level:
Starting Abilities (Level 1)
Cattle Prod – 7 MP
- Specialized strike dealing heavy damage to beast-family monsters
- Your first “family-killer” ability
- When to use: Great against Chimaeras, Hell Hounds, and other beast-type enemies
Cop Out – 2 MP
- Potentially deflects enemy attacks onto other enemies
- Tactical ability that can turn enemy damage against themselves
- When to use: Against grouped enemies or when outnumbered
Early Game Powers (Levels 3-10)
Level 3 – Heal – 3 MP
- Restores at least 30 HP
- Your primary healing spell for the early game
- Essential ability: Keep this hotkeyed—you’ll use it constantly
Level 4 – Sizz – 4 MP
- Singes a group of enemies with blazing fire
- Your first multi-target damage spell
- When to use: Against groups of weaker enemies to end battles quickly
Level 6 – Flame Slash – 6 MP
- Slashes an enemy with a white-hot weapon
- Strong single-target fire damage
- Strategy tip: More MP-efficient than Sizz against single tough enemies
Level 6 – Snooze – 3 MP
- Puts a group of enemies to sleep
- Incredibly useful crowd control
- Pro tip: Sleep isn’t guaranteed, but when it works, it can save difficult battles
Level 8 – Zap – 6 MP
- Calls down lightning on a single enemy
- Powerful single-target spell
- When to use: Against enemies resistant to fire but weak to lightning
Level 8 – Peep – 0 MP
- Appraises items and reveals treasure chest contents
- Prevents mimics and trapped chests from surprising you
- Always use this before opening suspicious chests!
Level 10 – Fizzle – 5 MP
- Prevents a group of enemies from using magic
- Game-changing against spellcasting enemies
- Critical for: Mages, Wizards, and magic-using bosses
Level 10 – Dodgy Dance – 4 MP
- Fancy footwork increases your evasion
- Defensive buff that stacks with equipment
- Strategy: Use at battle start against physical attackers
Mid-Game Progression (Levels 12-18)
Level 12 – Evac – 0 MP
- Instantly exit dungeons, towers, and caves
- Free emergency escape tool
- Lifesaver: Use when dangerously low on resources deep in dungeons
Level 12 – Dragon Slash – 7 MP
- Brutal blow causing heavy damage to dragons
- Another family-killer ability
- Essential for: Dragon encounters (obviously) and late-game dragon bosses
Level 13 – Zoom – 2 MP
- Return instantly to previously visited locations
- The fast travel spell you’ve been waiting for!
- Read our complete fast travel guide for advanced Zoom strategies
Level 14 – Sizzle – 8 MP
- Burns entire enemy groups with a blazing fire wall
- Upgraded version of Sizz with better damage
- When to use: Replaces Sizz for group encounters once learned
Level 15 – Holy Protection – 4 MP
- Generates holy aura causing weaker monsters to avoid you
- Reduces random encounter rate
- Perfect for: Backtracking through low-level areas without constant battles
Level 16 – Defending Champion – 2 MP
- Significantly reduces damage from all attacks
- Powerful defensive buff
- Boss strategy: Cast this early in tough fights for serious damage reduction
Level 17 – Midheal – 6 MP
- Restores at least 75 HP
- Upgraded healing spell
- Replaces Heal for serious recovery once learned
Level 18 – Gust Slash – 8 MP
- Slashes enemy with gale-force weapon
- Wind-element attack
- Useful against: Enemies resistant to fire and lightning
Advanced Powers (Levels 21-40)
Level 21 – Zapple – 10 MP
- Fearsome lightning on single enemy
- Upgraded version of Zap
- High damage single-target option for tough encounters
Level 24 – Lightning Slash – 8 MP
- Crackling lightning-infused weapon slash
- Combines physical and lightning damage
- Strategy: Great against enemies with high magic defense but physical vulnerability
Level 27 – Falcon Slash – 10 MP
- Double-slicing attack faster than a falcon
- Hits twice in one turn
- DPS king: One of the best damage-per-MP abilities in the game
Level 30 – Kasizz – 16 MP
- Scorches groups with underworld flames
- Extremely powerful group fire spell
- End-game AoE powerhouse
Level 32 – Insulatle – 8 MP
- Barrier protecting from breath attacks
- Defensive spell for specific enemy types
- Critical for: Dragon fights with breath weapons
Level 35 – Kazap – 30 MP
- Powerful thunderbolts rain on all enemies
- Massive group lightning damage
- High MP cost but devastating against grouped enemies
Level 40 – Gigaslash – 38 MP
- Secret sword technique with blazing lightning bolts hitting all enemies
- Your ultimate ability
- Boss killer: Save your MP for this devastating finisher
Every Special Scroll Location in Dragon Quest 1 HD-2D Remake
Now for the treasure hunt! These scrolls are scattered across Alefgard in towns, dungeons, and hidden locations. I’ve organized them by area to help you collect them efficiently as you explore.
Towns & Villages
Tantegel Castle – Snoop Scroll
- Location: Open the locked blue door to find a room full of chests
- Ability: Lets you know if treasure or goodies are nearby (2 MP)
- Why it’s useful: Helps you find hidden items you might otherwise miss
- How to get: You’ll need a key to access this area—typically found through story progression
Galenholm – Safe Passage Scroll
- Location: Examine the bookshelf in the Old Man’s home
- Ability: Float unharmed over hazardous surfaces (2 MP)
- Why it’s useful: Traverse damage tiles and poison floors without taking damage
- Pro tip: Essential for certain late-game areas with extensive hazard tiles
Rimuldar – Magic Barrier Scroll
- Location: House in the northwest section of town
- Ability: Builds barrier providing protection from enemy spells (6 MP)
- Why it’s useful: Critical defensive spell against magic-heavy enemies
- When to collect: Mid-game when you start encountering dangerous spellcasters
Cantlin – Three Scrolls
- Location 1: Second-floor bookshelf in the western home – Moreheal Scroll
- Restores at least 164 HP (10 MP)
- Your strongest single-target healing spell
- Absolutely essential for late-game survival
- Location 2: Second-floor dresser, western home – Attack Attacker Scroll
- Heavy hit reducing enemy attack power (6 MP)
- Debuffs dangerous physical enemies
- Strategy: Use early in boss fights to reduce incoming damage
Damdara – Demon Demeaner Scroll
- Location: Barrel in the western building
- Ability: Heavy damage to demon-family monsters (7 MP)
- Why it’s useful: Another family-killer for demon encounters
- When to use: Against demon-type enemies in late-game areas
Special Locations
Faerie Village – Two Scrolls
- Location 1: Inn Chest – Crackle Scroll
- Rips into enemy groups with sharp icicles (9 MP)
- Ice-element group attack
- Useful against fire-resistant enemies
- Location 2: Western house bookshelves – Snub Scroll
- Builds barrier protecting from spells (6 MP)
- Alternative spell protection option
- Similar to Magic Barrier but with different mechanics
Citadel of the Monarch of Medals – Reheal Scroll
- Location: Red chest on ground floor
- Ability: Gradually restores HP over time (6 MP)
- Why it’s useful: Passive healing during extended battles
- Strategy: Cast early in long fights for sustained recovery
Weeping Isle – Kacrack Scroll
- Location: Exterior area, red chest
- Ability: Skewers all enemies with sharp icicle hail (12 MP)
- Why it’s useful: Powerful ice-element group attack
- When to collect: Mid-to-late game when exploring the island
Dungeon Locations
Shrine of Rain – Crack Scroll
- Location: First floor chest
- Ability: Pierces single enemy with razor-sharp icicles (3 MP)
- Why it’s useful: Your first ice-element attack
- Early game essential: Adds elemental variety to your arsenal
Grave of Galen – Three Scrolls
- Location 1: B1, chest in top section – Whistle Scroll
- Attracts attention of nearby monsters
- Niche use: Forces encounters when you need to grind specific enemies
- Location 2: B3, red chest in top-left corner – Kacrackle Slash Scroll
- Slashes enemy with bitterly cold weapon (10 MP)
- Ice-element weapon attack
- Strong against ice-weak enemies
Cave of the Dwarves – Three Scrolls
- Location 1: B1, northeast chest – Miracle Slash Scroll
- Mysterious attack hurting enemies while healing user (10 MP)
- Unique mechanic: Damage AND healing in one action
- Boss strategy: Efficient resource management during tough fights
- Location 2: B2, chest – Undead Doer Scroll
- Sanctified strike dealing heavy damage to undead (7 MP)
- Family-killer for undead enemies
- Essential for: Skeleton, Zombie, and Ghost encounters
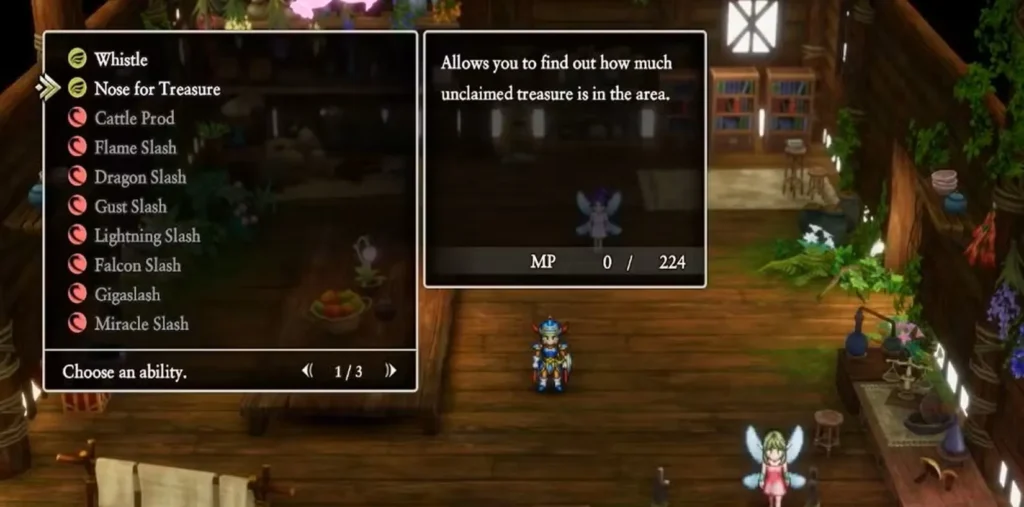
Craggy Cave – Two Scrolls
- Location 1: B1, chest – Nose for Treasure Scroll
- Shows how much unclaimed treasure is in an area
- Completionist tool: Ensures you don’t miss any chests
- Location 2: B2, chest – Muster Strength Scroll
- Builds up energy to bolster next attack (3 MP)
- Tactical use: Set up massive damage on following turn
Wierdwood – Focus Pocus Scroll
- Location: Second part of area, red chest
- Ability: Restores MP after each turn for a while (8 MP)
- Why it’s useful: Extended MP regeneration during battles
- Best for: Long boss fights where MP management is critical
Erdrick’s Hollow – Sandstorm Scroll
- Location: B1, inside chest
- Ability: Conjures sandstorm reducing enemy group accuracy (3 MP)
- Why it’s useful: Makes physical attackers miss more often
- Strategy: Stack with evasion buffs for extreme defense
Special Unlock – Wild Side Scroll
How to Get: Give ten Mini Medals to the Monarch of Medals
- Ability: Act twice per turn for a while (30 MP)
- Why it’s amazing: Literally doubles your action economy
- Boss destroyer: This spell can trivialize difficult encounters
- Collection tip: Mini Medals are scattered throughout the world—check our full review for more on the Medal system
Essential Scrolls vs. Optional Ones
Not all scrolls are created equal. Here’s my honest assessment after using every ability:
Must-Have Scrolls (Collect ASAP):
✅ Moreheal (Cantlin) – Your best healing spell ✅ Magic Barrier (Rimuldar) – Critical spell defense ✅ Miracle Slash (Cave of Dwarves) – Damage + healing efficiency ✅ Wild Side (Medal Reward) – Game-changing double actions ✅ Kacrack (Weeping Isle) – Powerful ice damage for variety
Situationally Useful:
⚠️ Safe Passage (Galenholm) – Only needed for hazard-heavy areas ⚠️ Nose for Treasure (Craggy Cave) – Helpful for completionists ⚠️ Whistle (Grave of Galen) – Rarely needed unless grinding specific monsters ⚠️ Family-killer scrolls (various) – Strong but situational based on enemy types
Skippable (Low Priority):
❌ Snub (Faerie Village) – Redundant with Magic Barrier ❌ Snoop (Tantegel) – Nice but not essential ❌ Attack Attacker (Cantlin) – Useful but not critical
Building Your Optimal Skill Loadout
With so many abilities available, knowing which to keep assigned for quick access matters. Remember, managing your active inventory is crucial since you can’t access everything mid-battle.
Early Game Loadout (Levels 1-12):
- Heal (primary recovery)
- Sizz (group damage)
- Flame Slash (single-target damage)
- Snooze (crowd control)
- Cattle Prod (beast encounters)
Mid Game Loadout (Levels 13-25):
- Midheal (better healing)
- Sizzle (upgraded group fire)
- Falcon Slash (high DPS)
- Magic Barrier (spell defense)
- Zoom (fast travel)
- Dragon Slash (dragon encounters)
Late Game Loadout (Levels 26-40):
- Moreheal (maximum healing)
- Miracle Slash (efficient damage + heal)
- Gigaslash (ultimate attack)
- Wild Side (when available)
- Kazap (group devastation)
- Defending Champion (damage reduction)
- Insulatle (breath defense)
MP Management Tip: Keep a balance of low-cost utility spells and high-cost damage dealers. Don’t fill your loadout with only expensive spells or you’ll burn through MP too quickly.
Power Progression Strategy
Here’s how to efficiently build your Hero’s power throughout the game:
Phase 1: Levels 1-10 (Tutorial Phase)
Focus: Learn the combat system and basic spell usage
- Prioritize collecting scrolls in starting areas (Tantegel, Galenholm)
- Master when to use Heal vs. taking damage
- Experiment with Sizz for group encounters
- Save gold for equipment upgrades
Phase 2: Levels 11-20 (Mid-Game Push)
Focus: Expand your spell arsenal and tackle harder dungeons
- Unlock Zoom at 13 for efficient travel (master it with our guide)
- Collect Moreheal scroll in Cantlin
- Farm Mini Medals when possible
- Balance grinding with exploration for scroll collection
Phase 3: Levels 21-30 (Power Spike)
Focus: Acquire game-changing abilities
- Falcon Slash at 27 becomes your DPS workhorse
- Collect Wild Side scroll (10 Mini Medals)
- Kasizz at 30 handles group encounters easily
- Focus on dungeon exploration for remaining scrolls
Phase 4: Levels 31-40 (End-Game Dominance)
Focus: Maximize power for final challenges
- Gigaslash at 40 is your ultimate weapon
- Ensure all essential scrolls collected
- Optimize spell loadout for boss encounters
- Stock up on MP restoration items
Combat Synergies: Combining Skills Effectively
Understanding which abilities work well together elevates your combat effectiveness:
Defensive Stacking:
- Defending Champion + Magic Barrier = Protected from physical AND magical damage
- Dodgy Dance + Sandstorm = Extreme evasion against physical attackers
- Insulatle + Defending Champion = Boss survival kit
Offensive Combos:
- Muster Strength → Gigaslash = Devastating damage on next turn
- Wild Side → Falcon Slash twice = Four attacks in one turn!
- Fizzle → Physical attacks = Shut down magic then beat down helpless casters
Efficient Resource Management:
- Miracle Slash = Damage while recovering HP (saves healing MP)
- Focus Pocus early in fights = Regenerate MP throughout battle
- Reheal + Defending Champion = Passive healing while reducing damage taken
Enemy-Specific Strategies:
- Against Dragons: Dragon Slash, Insulatle (breath defense), Kazap
- Against Demons: Demon Demeaner, Fizzle (many demons cast spells)
- Against Beasts: Cattle Prod, physical attacks
- Against Undead: Undead Doer, Holy Protection (prevents encounters)
Don’t Miss These Scroll-Hunting Tips
After hunting down every scroll in the game, here are lessons learned:
🔍 Always Examine Everything:
- Bookshelves often hide scrolls (Cantlin, Galenholm, Faerie Village)
- Barrels and dressers can contain scrolls (Damdara, Cantlin)
- Red chests usually contain rare items including scrolls
🗺️ Systematic Dungeon Exploration:
- Clear every floor completely before advancing
- Use Nose for Treasure scroll to ensure you haven’t missed chests
- Mark dungeon maps mentally or physically to avoid missing branches
🎯 Prioritize Medal Collection:
- Wild Side requires 10 Mini Medals—start collecting early
- Medals are in towns, dungeons, and hidden spots throughout Alefgard
- The Citadel of the Monarch of Medals is where you cash them in
⏰ Timing Matters:
- Some areas become accessible only after story progression
- Don’t stress if you can’t reach certain scrolls immediately
- Revisit areas after gaining new abilities or keys
💾 Save Before Opening Suspicious Chests:
- Use Peep ability to check chest contents first
- Some chests contain monsters instead of items
- Red chests typically hold the best treasures
Common Mistakes to Avoid
Don’t make the same errors I did during my playthrough:
❌ Ignoring family-killer abilities – They seem niche but deal massive damage to specific enemy types
❌ Hoarding MP too conservatively – You have way more MP than you think; use your spells!
❌ Neglecting defensive spells – Defending Champion and Magic Barrier can trivialize hard fights
❌ Missing Cantlin scrolls – This town has THREE important scrolls; thoroughly explore both floors
❌ Not collecting Mini Medals – Wild Side is too good to miss; start medal hunting early
❌ Skipping Moreheal – This is your best healing spell; don’t continue without it
✅ Smart approach: Explore thoroughly, experiment with abilities, and don’t be afraid to use your MP in tough situations. Items can restore resources, but missed scrolls require backtracking.
End-Game Boss Preparation Checklist
Before facing the Dragonlord, ensure you have:
Essential Level-Up Skills:
- ✅ Level 40 (Gigaslash unlocked)
- ✅ Midheal or better healing
- ✅ Defending Champion
- ✅ Kazap or Kasizz for group damage
Must-Have Scrolls:
- ✅ Moreheal (Cantlin)
- ✅ Magic Barrier (Rimuldar)
- ✅ Miracle Slash (Cave of Dwarves)
- ✅ Wild Side if possible (10 Mini Medals)
Tactical Preparation:
- ✅ 99 Magic Water (MP restoration)
- ✅ Multiple Yggdrasil Leaves (revival)
- ✅ Best equipment equipped
- ✅ Full HP/MP before entering final area
Strategy Reference:
- ✅ Read our complete game review for boss strategies
- ✅ Understand item usage in combat
- ✅ Master fast travel for efficient preparation
Final Thoughts: Become the Ultimate Hero
Dragon Quest 1 HD-2D Remake gives you an impressive arsenal of abilities through both natural leveling and hidden scrolls. The key to mastering combat isn’t just collecting everything—it’s understanding when and how to use each power effectively.
My recommendation: Prioritize the essential scrolls (Moreheal, Magic Barrier, Miracle Slash, Wild Side) while casually collecting others as you explore. Don’t stress about getting every single scroll before progressing, but do make sure you’re not rushing past entire towns or dungeons without thoroughly exploring.
The level-up abilities provide your core toolkit, while scrolls add specialized options for specific challenges. Together, they create a versatile combat system that rewards both preparation and tactical thinking.
Now get out there, collect those scrolls, level up your Hero, and show the Dragonlord why messing with Alefgard was a terrible mistake!
Found a scroll location we missed? Have tips for using specific abilities effectively? Share your discoveries in the comments! And if you’re playing on Steam, let us know how your adventure is going!
Need more Dragon Quest 1 help? Check out our other guides: