Master Dying Light: The Beast’s early game with our complete weapon guide. Best ranged and melee options, locations, crafting tips, and upgrade strategies for new players.
Starting out in Dying Light: The Beast can feel overwhelming when you’re surrounded by infected and armed with nothing but a rusty pipe. Your weapon choices in the first few hours don’t just determine your survival – they shape your entire playstyle and set the foundation for late-game success.
After extensive testing with different weapon combinations and playstyles, I’ve identified the six essential weapons that’ll carry you through the early game and beyond. These aren’t just “good enough” options – they’re genuinely powerful tools that remain relevant throughout your entire journey.
The key insight many new players miss is that early weapon selection isn’t about finding the highest damage numbers. It’s about reliability, resource efficiency, and versatility. The weapons that look impressive on paper often break when you need them most, while the smart choices keep you alive when things get desperate.
Understanding Early Game Weapon Priorities
Before diving into specific weapons, let’s establish what makes an early game weapon truly valuable:
Essential Characteristics
- Resource efficiency – Can be maintained without bankrupting your crafting materials
- Reliability – Performs consistently across different enemy types and situations
- Upgrade potential – Grows with your character rather than becoming obsolete
- Strategic flexibility – Supports multiple playstyles and tactical approaches
Common Early Game Mistakes
Many players fall into these traps that severely limit their effectiveness:
- Hoarding rare weapons – Saving “good” weapons for later instead of using them to progress
- Ignoring ranged options – Focusing solely on melee combat limits tactical options
- Chasing damage numbers – High damage means nothing if the weapon breaks constantly
- Neglecting upgrades – Using weapons at base level instead of investing in improvements
The Ultimate Early Game Arsenal
1. Hunting Bow (Priority #1: Your Survival Lifeline)
Why It’s Essential: The Hunting Bow transforms Dying Light: The Beast from a frantic melee brawler into a tactical stealth experience. This isn’t just a ranged weapon – it’s a complete game-changer that opens up entirely new approaches to every encounter.
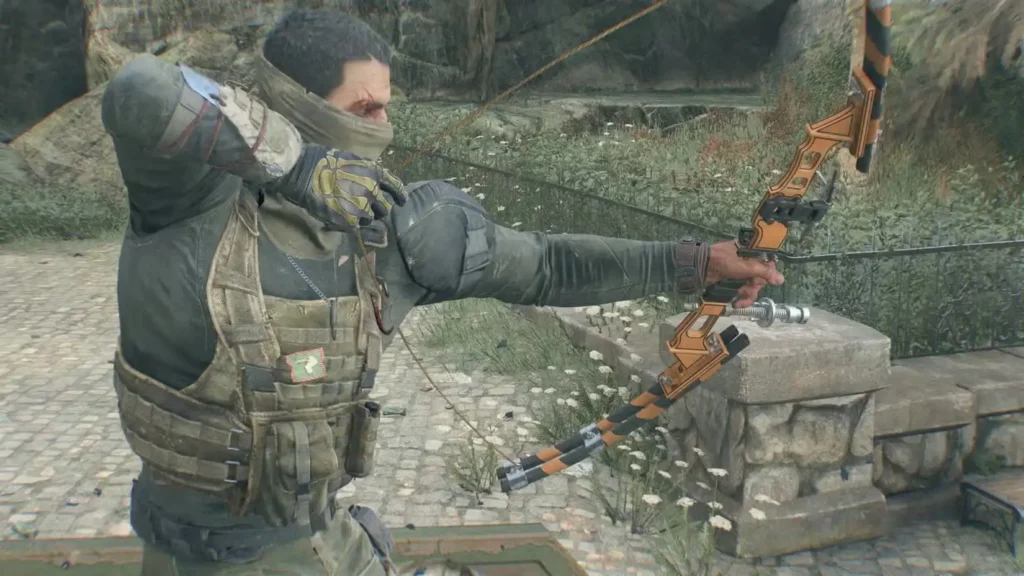
Combat Advantages:
- One-shot potential against Biters and smaller special infected
- Silent elimination – No noise to alert nearby zombies
- Safety distance – Engage threats before they become dangerous
- Ammunition flexibility – Regular, Fire, and Shock arrows for different situations
Resource Management:
- Crafting cost: 10 Scraps + 2 Feathers per set of arrows
- Scrap sources: Virtually everywhere in the game world
- Feather sources: Bird houses, Vanity Stores, Town Hall trader
Upgrade Strategy: Prioritize upgrading from Common to Rare immediately – this dramatically improves damage and reliability. The difference between a Common and Rare Hunting Bow is night and day for early game effectiveness.
Pro Tip: Master the bow’s trajectory early by practicing on stationary targets. The slight arc takes adjustment, but once you’ve got it down, you’ll rarely miss critical shots.
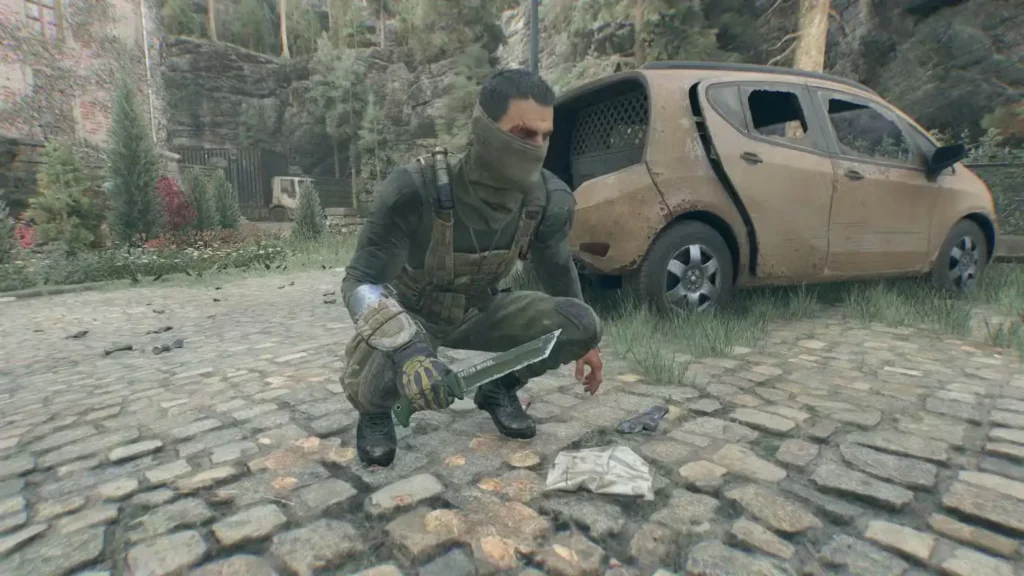
2. William’s Knife (Quest Reward: The Stealth Specialist)
Acquisition: Complete “What Lies Beyond the Pines” side quest Weapon Type: Unique Rare Knife with backstab specialization
Why It’s Game-Changing: This isn’t just another knife – it’s specifically designed for stealth gameplay with massive backstab damage multipliers. Combined with the bow, it creates a complete stealth arsenal that trivializes many early game encounters.
Strategic Applications:
- Dark Zone exploration – Silent takedowns prevent alerting entire areas
- Resource conservation – Stealth kills preserve weapon durability
- Emergency backup – Reliable close-quarters option when stealth fails
- Power attack utility – Can eliminate sleeping enemies in one hit
Skill Synergy: Invest in the Stealth Expert Survival Skill before attempting the quest. This skill is crucial not just for obtaining the knife, but for maximizing its effectiveness throughout the game.
Advanced Technique: Use the knife for “cleanup” kills after bow shots. If an arrow doesn’t quite finish an enemy, a quick backstab is often more efficient than drawing and firing again.
3. The Reaper (Town Hall Purchase: Crowd Control Mastery)
Vendor: Doug at Town Hall (daily inventory refresh) Weapon Type: Two-handed scythe with area damage
When to Buy: After establishing your bow/knife foundation but before tackling major crowd encounters.
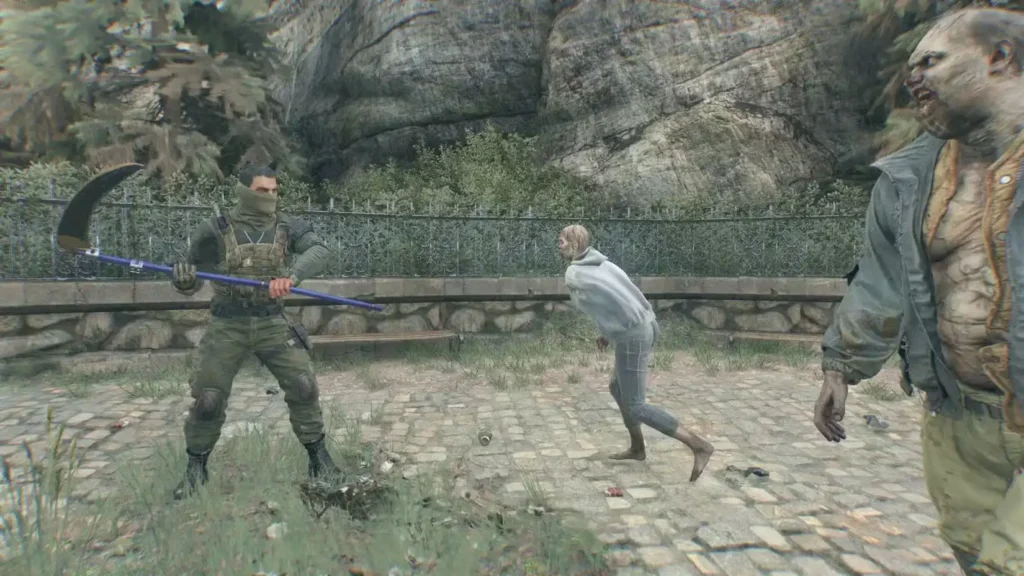
Combat Specialization: The Reaper excels in situations where stealth isn’t viable and you need to handle multiple infected simultaneously. Its sweeping attacks and critical strike bonuses make it devastating against groups.
Tactical Applications:
- Convoy clearing – Sweeps through multiple enemies per swing
- Emergency crowd control – When stealth plans go wrong
- Power attack specialization – High critical chance for massive damage spikes
- Stamina efficiency – Eliminates multiple threats per energy expenditure
Usage Strategy: Master the timing and range before committing to major fights. The Reaper requires precise positioning – too close and you’ll miss, too far and you’ll whiff entirely. Practice the power attack timing to maximize critical hits.
Economic Consideration: The Reaper represents a significant early game investment. Only purchase it when you have stable income and resource generation established.
4. Tonfa (Convoy Loot: The Reliable Workhorse)
Location: Military convoys, especially the one south of Town Hall Weapon Type: Police baton with stamina specialization
Why It’s Underrated: While other weapons focus on raw damage, the Tonfa prioritizes efficiency and sustainability. Its combination of low stamina cost and stamina damage makes it perfect for extended combat situations.

Mechanical Advantages:
- Low stamina consumption – More attacks per stamina bar
- Stamina damage – Renders enemies vulnerable faster
- Modification potential – Compatible with Slit and Slaughter mods
- Replacement availability – Multiple sources for consistent supply
Mod Optimization:
- Slit Mod: Adds bleeding damage to power attacks
- Slaughter Mod: Bleeding damage on critical hits
- Combined, these mods transform the Tonfa into a damage-over-time specialist
Best Use Cases:
- Extended combat encounters where stamina management is crucial
- Situations requiring multiple consecutive fights
- Players who prefer fast, aggressive combat styles
- Economic efficiency when resources are tight
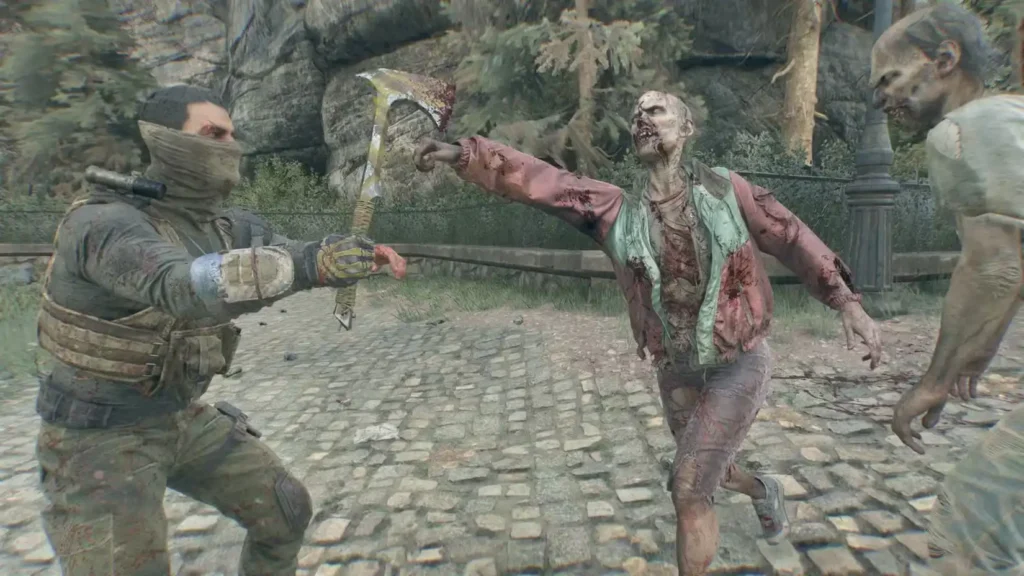
5. Old Hatchet (Starter Foundation: Never Underestimate the Basics)
Availability: Human enemy corpses, military convoys, police car trunks Weapon Type: Basic axe with stamina efficiency
Why It Remains Relevant: Don’t let the “starter weapon” label fool you – the Old Hatchet’s combination of reliability, availability, and efficiency makes it valuable throughout the early game.
Key Advantages:
- -5% stamina cost – Sustainable for extended use
- Diagonal power attack – Perfect range for anti-bite protection
- Economic efficiency – Cheap to replace when damaged
- Consistent availability – Never struggle to find replacements
Strategic Value: The Hatchet serves as your “insurance policy” – always available when other weapons break or aren’t suitable for the situation. Its power attack animation is specifically designed to hit enemies at the perfect range to prevent bites.
Upgrade Path: Look for the Camp Hatchet variant, which offers improved stats while maintaining the same core advantages.
6. Extinguisher (Craftable Option: The Budget Champion)
Blueprint Location: Library Tower Safe Spot (north of Town Hall) Weapon Type: Improvised mace with stamina damage focus
Economic Brilliance: In a game where weapon degradation can drain your resources quickly, the Extinguisher offers a craftable solution that doesn’t break the bank. It’s the perfect weapon for players who want reliability without resource anxiety.
Performance Metrics:
- Fast attack speed – Unusual for mace-type weapons
- +15% stamina damage – Enemies become vulnerable quickly
- Single power attack knockdowns – Efficient crowd control
- Cheap crafting cost – Sustainable replacement cycle
When to Prioritize:
- Before unlocking Efficient Crafting and Reinforcement Mods
- When other weapons are breaking faster than you can replace them
- Early game when every scrap of material matters
- Players who prefer crafted weapons over looted ones
Resource Strategy: Use the Extinguisher as your primary weapon while building up resources for more expensive options. Its efficiency allows you to save materials for crucial upgrades and specialized gear.
Weapon Combination Strategies
The Stealth Specialist Build
- Primary: Hunting Bow (silent elimination)
- Secondary: William’s Knife (stealth takedowns)
- Backup: Old Hatchet (emergency situations)
Best For: Players who prefer tactical, methodical approaches and enjoy the satisfaction of clearing areas without alerting enemies.
The Balanced Survivor Build
- Ranged: Hunting Bow (versatility)
- Melee: Tonfa (efficiency)
- Crowd Control: The Reaper (when stealth fails)
Best For: Players who want options for every situation and prefer adaptability over specialization.
The Resource-Conscious Build
- Primary: Extinguisher (sustainable crafting)
- Ranged: Hunting Bow (arrow efficiency)
- Backup: Old Hatchet (cheap replacement)
Best For: New players learning the game’s economy and resource management systems.
Weapon Maintenance and Upgrade Strategies
Prioritizing Upgrades
Immediate Priority (Week 1):
- Hunting Bow: Common → Rare (massive damage increase)
- William’s Knife: Focus on backstab damage improvements
- Any primary melee weapon: Basic durability improvements
Medium-Term Goals (Week 2-3):
- Hunting Bow: Rare → Epic (unlock special arrow types)
- Melee specialization based on playstyle preference
- Mod installations for secondary weapons
Resource Allocation Strategy
Don’t fall into the trap of upgrading everything equally. Focus your limited early game resources on one primary weapon from each category (ranged and melee) rather than spreading improvements thin across multiple options.
Smart Resource Management:
- Week 1: Establish hunting bow superiority
- Week 2: Develop one strong melee option
- Week 3: Add specialization and variety

Integration with Skills and Progression
Essential Early Skills for Weapon Effectiveness
- Stealth Expert – Required for William’s Knife quest and general effectiveness
- Efficient Crafting – Reduces crafting costs for arrows and replacements
- Reinforcement Mods – Dramatically improves weapon durability
For comprehensive skill planning, check our best early game skills guide to optimize your character development.
Synergy with Other Systems
Weapon choice impacts:
- Combat style – Stealth vs. aggressive approaches
- Resource economy – Crafting vs. looting focus
- Exploration strategy – Risk tolerance in dangerous areas
- Quest approach – Available tactics for mission completion
Common Weapon Mistakes and How to Avoid Them
The Damage Number Trap
Many players focus exclusively on damage statistics while ignoring practical considerations like durability, speed, and resource costs. A weapon that deals 200 damage but breaks after three fights is often less valuable than one dealing 150 damage that lasts all day.
The Hoarding Problem
Symptom: Keeping “good” weapons unused “for when you really need them” Reality: You need them now to progress efficiently and safely Solution: Use your best weapons regularly – the game provides replacement opportunities
The Specialization Rush
Mistake: Trying to unlock advanced weapons before mastering basics Better Approach: Perfect your use of early weapons before moving to complex options Benefit: Strong fundamentals make advanced weapons more effective
Economic Considerations and Resource Planning
Early Game Economy
Weapon choices significantly impact your resource economy. Smart early selections create positive feedback loops where better weapons lead to safer exploration, which leads to better resources, which leads to even better weapons.
Resource-Positive Weapons:
- Hunting Bow (arrow crafting is cheap)
- Extinguisher (craftable and efficient)
- Old Hatchet (minimal replacement cost)
Resource-Intensive Options:
- The Reaper (expensive purchase)
- Heavily modded weapons (requires rare materials)
- Frequent weapon replacement (poor durability choices)
For comprehensive economic strategies, see our money farming guide and resource farming tips.
Advanced Tactics and Pro Tips
Weapon Switching Psychology
Master the mental aspect of weapon switching. Many players stick with familiar weapons even when situations call for different tools. Practice consciously choosing the right weapon for each encounter rather than defaulting to comfort choices.
Range Management
Close Range (0-2 meters): Knives, fast melee weapons Medium Range (2-5 meters): Hatchets, batons, most melee weapons
Long Range (5+ meters): Hunting bow, throwing weapons
Stamina Conservation Techniques
Efficient Combat Patterns:
- Use bow to thin groups before melee engagement
- Employ backstab weapons for high-value targets
- Save power attacks for critical moments
- Learn enemy patterns to minimize defensive stamina use
Integration with Overall Progression
Week 1 Goals
- Acquire and upgrade Hunting Bow to Rare
- Complete “What Lies Beyond the Pines” for William’s Knife
- Establish reliable melee backup weapon
Week 2-3 Goals
- Expand arsenal with specialized weapons (Reaper, Tonfa)
- Master weapon switching and tactical flexibility
- Begin focusing on late-game weapon preparation
Long-Term Weapon Philosophy
These early game weapons aren’t just stepping stones – many remain viable throughout the entire game when properly upgraded and modified. The Hunting Bow, in particular, never becomes obsolete and often outperforms much more expensive options.
For broader progression planning, check our complete quest guide and leveling strategies.
The Bottom Line
Early weapon selection in Dying Light: The Beast sets the tone for your entire playthrough. The six weapons covered in this guide – Hunting Bow, William’s Knife, The Reaper, Tonfa, Old Hatchet, and Extinguisher – provide a complete foundation that scales with your progression and adapts to any playstyle.
The secret isn’t finding the single “best” weapon, but rather building a versatile arsenal where each tool has a specific purpose. Master these fundamentals, and you’ll find yourself confidently tackling challenges that overwhelm less prepared players.
Remember: the best weapon is the one you have when you need it, in good condition, with the skills to use it effectively. Focus on reliability and versatility over raw damage numbers, and you’ll dominate the early game while building toward late-game success.
Ready to gear up and start your weapon mastery journey? Start with the Hunting Bow, work toward William’s Knife, and build your arsenal based on your preferred playstyle. The infected won’t know what hit them.
📥 Get Dying Light: The Beast:
- Official Website
- Steam
- PlayStation
- Xbox
🎮 Master Your Arsenal:
Docket Codes