Master Manual Pages farming in Dying Light: The Beast. Complete guide to finding Beginner and Intermediate Manual Pages through Dark Zones, side quests, and efficient farming strategies.
Why Manual Pages Are Your Blueprint Upgrade Lifeline
Here’s the thing about crafted weapons in The Beast – they’re absolute monsters when fully upgraded, but there’s a new roadblock standing between you and weapon mastery: Manual Pages. These aren’t just another crafting material you can ignore; they’re the bottleneck that determines whether your favorite blueprint becomes a legendary zombie-slayer or stays mediocre.
Unlike previous Dying Light games where blueprint upgrades were more straightforward, The Beast introduces this scarcity-based system that makes every Manual Page feel precious. Think of them as the “rare earth elements” of weapon crafting – essential, limited, and worth going out of your way to collect.

The Two-Tier Manual Page System
Beginner Manual Pages
- Used for: Initial blueprint upgrades (Levels 1-3)
- Easier to find in early game content
- Lower risk farming locations
- Foundation for all weapon progression
Intermediate Manual Pages
- Used for: Advanced blueprint upgrades (Levels 4-6+)
- More challenging to obtain
- Higher risk, higher reward scenarios
- End-game weapon optimization
Understanding this distinction is crucial because you’ll want to balance your farming between both types based on your current weapon upgrade priorities.
Primary Source: Side Quest Rewards
Why Side Quests Should Be Your Priority
Side quests aren’t just story filler in The Beast – they’re your most reliable and risk-free source of Manual Pages. Here’s what makes them so valuable:
- Guaranteed rewards: No RNG involved like with loot containers
- Safe acquisition: Complete at your own pace without zombie pressure
- Scaling rewards: Harder quests typically give 2+ Manual Pages
- Story integration: You’re progressing multiple goals simultaneously
Pro Strategy: Don’t rush the main storyline. Every side quest you skip early means fewer guaranteed Manual Pages later when they become harder to find.
Quest Reward Optimization
Not all side quests are created equal when it comes to Manual Page rewards:
- Settlement-based quests often have the best Manual Page-to-time ratios
- Escort missions typically offer lower rewards (avoid if farming efficiently)
- Investigation quests frequently provide Intermediate Pages as bonuses
- Timed challenges may offer bonus Manual Pages for quick completion
Secondary Source: Dark Zone Mastery
Understanding Dark Zone Mechanics
Dark Zones return from previous games with a twist – they’re now renewable Manual Page goldmines if you know how to work them effectively. Here’s what’s changed:
Day vs. Night Strategy:
- Daytime runs: More zombies but better visibility for stealth
- Nighttime runs: Fewer infected but higher risk if discovered
- Weather impact: Fog and rain can mask your movement sounds
The Screamer Problem (And Solution)
Those white straitjacket zombies aren’t just atmosphere – they’re early warning systems that can turn a quiet loot run into a nightmare. Here’s your approach:
Stealth Takedown Strategy:
- Scout the area using binoculars or survivor sense
- Identify screamer patrol routes before entering
- Wait for isolation opportunities when screamers are alone
- Execute silent takedowns from behind (never from the sides)
- Hide bodies if possible to avoid detection by other zombies
Emergency Backup Plan: If a screamer spots you, immediately retreat and wait for the alert level to decrease. Don’t try to fight through the swarm – it wastes resources and time.
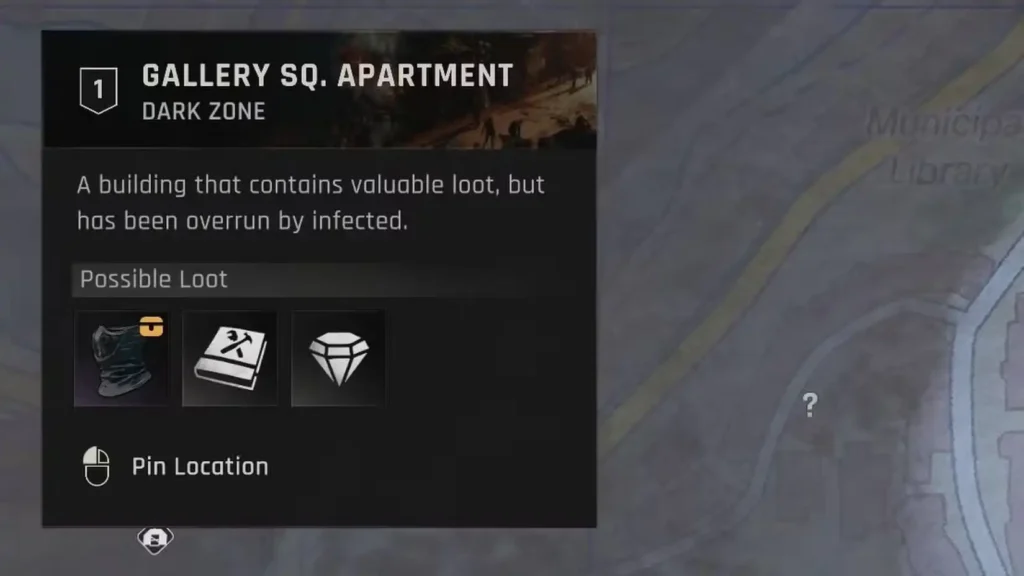
Reading Dark Zone Loot Indicators
The map icon system tells you everything you need to know before risking entry:
Icon Combinations to Look For:
- Book + Wrench + Hammer: Manual Pages confirmed
- Multiple resource icons: Higher chance of Intermediate Pages
- Skull difficulty rating: Corresponds to Page tier quality
Farming Tip: Bookmark Dark Zones with the book icon combo on your map. These become your regular farming circuit once side quests dry up.

Advanced Manual Page Farming Strategies
The Circuit Run Method
Instead of randomly hitting Dark Zones, establish a farming circuit:
- Map out 4-5 Manual Page Dark Zones in a compact area
- Plan an efficient route that minimizes travel time
- Clear them systematically in the same order each time
- Return after 2-3 in-game days for respawns
This method maximizes your Pages-per-hour while minimizing resource expenditure.
Resource Management During Runs
Manual Page farming can be resource-intensive if done poorly:
What to Bring:
- Silenced weapons or high-damage melee for quick kills
- Lockpicks for secured Manual Page containers
- Healing items (Dark Zones can be unpredictable)
- Light sources that don’t attract attention
What to Leave Behind:
- Noisy weapons that attract hordes
- Heavy armor that reduces stealth effectiveness
- Non-essential crafting materials (save inventory space)
Dark Zone Respawn Mechanics Explained
Here’s something the game doesn’t clearly communicate: Dark Zone refresh timers. Based on testing and community feedback:
- Loot respawns: Approximately 24-48 in-game hours
- Enemy respawns: Usually faster than loot (12-24 hours)
- Page availability: Tied to loot respawn, not enemy respawn
Farming Schedule: Hit each Dark Zone in your circuit every 2 real-world play sessions for optimal efficiency.
Early Game vs. Late Game Strategies
Hours 1-10: Side Quest Focus
- Prioritize: Every available side quest for guaranteed Pages
- Supplement: Only “easy” Dark Zones near safe zones
- Goal: Build a foundation of Beginner Pages for essential upgrades
Hours 10+: Dark Zone Circuit
- Primary: Established Dark Zone farming routes
- Secondary: New side quests as they unlock
- Goal: Stockpile Intermediate Pages for end-game weapons
Common Manual Page Mistakes
Mistake #1: Ignoring Low-Tier Quests
Even simple fetch quests often reward Manual Pages. Don’t skip them thinking they’re “beneath” your level – every Page counts.
Mistake #2: Fighting Through Dark Zones
Manual Pages are usually in the deepest, most secure parts of Dark Zones. Fighting your way through wastes resources and time. Stealth is always more efficient.
Mistake #3: Not Tracking Respawns
Players often revisit the same Dark Zones too early or forget about productive ones entirely. Keep notes or use map markers to track your farming circuit.
Mistake #4: Hoarding Pages
Don’t stockpile Manual Pages indefinitely. Use them strategically on your most-used weapons first, then branch out to specialized builds.
Blueprint Upgrade Priority Guide
With Manual Pages being scarce, upgrade strategically:
First Priority (Beginner Pages):
- Your primary melee weapon blueprint
- One reliable ranged weapon blueprint
- Essential utility items (medkits, lockpicks)
Second Priority (Intermediate Pages):
- Specialized weapon builds (stealth, heavy damage)
- Advanced utility blueprints
- Situational weapons for specific enemy types
The Bottom Line
Manual Pages represent The Beast’s way of making weapon progression feel earned rather than given. Unlike traditional loot systems where better gear just appears, this system rewards consistent effort and strategic planning.
The side quest → Dark Zone transition is your path to weapon mastery. Early game generosity through quest rewards gives way to the high-risk, high-reward excitement of Dark Zone infiltration. It’s a progression system that keeps crafting relevant throughout your entire playthrough.
Key Takeaway: Treat Manual Pages like the rare resource they are. Every side quest completed and every Dark Zone cleared gets you closer to wielding truly legendary weapons in Castor Woods.
Don’t sleep on this system – the difference between a basic crafted weapon and a fully upgraded blueprint can literally be life or death when facing The Beast’s toughest challenges.
Related Guides:
- Best Skills First – Early Game Guide
- Best Items to Upgrade First Priority
- Best Early Game Weapons Guide
- Scraps & Blades Farming Guide
- All Missions and Quests Complete List
Official Game Information:
Dying Light: The Beast Official Site
PlayStation Store