Master resource gathering in Dying Light: The Beast! Discover the best locations, farming strategies, and tips for collecting Scraps and Blades to keep your weapons in perfect condition.
TL;DR
Scraps and Blades are essential for weapon repairs in Dying Light: The Beast. Find them by looting zombie corpses, exploring Dark Zones (especially ones with screw/blade icons), or purchasing from merchants. Mega Store America is an excellent early-game farming spot. Always loot enemies after combat for steady resource income.
Your machete is getting dull, your baseball bat is splitting at the seams, and that zombie horde isn’t going to wait for you to find a replacement weapon. Welcome to the resource management reality of Dying Light: The Beast, where keeping your gear functional is just as important as knowing how to swing it.
Why Scraps and Blades Matter More Than You Think
Unlike some survival games where weapons break and disappear forever, Dying Light: The Beast gives you the power to maintain your favorite gear indefinitely – if you’re smart about resource management. Every swing, every zombie skull cracked, every desperate parry slowly degrades your weapons, but the right materials can bring them back to pristine condition.
Here’s what makes this system brilliant: Instead of forcing you to constantly hunt for new weapons, the game rewards players who invest time in exploration and resource gathering. A well-maintained machete you found in hour one can carry you through the entire campaign if you take care of it properly.
The Resource Breakdown: What You Actually Need
Scraps: The Universal Fix-All Think of Scraps as the duct tape of the zombie apocalypse. Nearly every weapon repair requires these metallic bits and pieces, from baseball bats to complex firearms. They’re your most important resource, period.
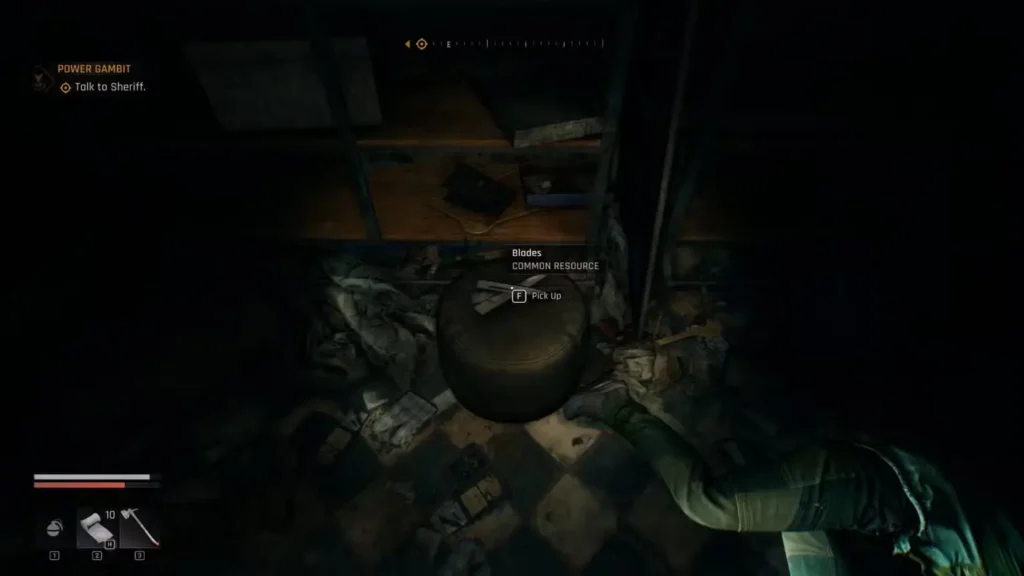
Blades: For the Sharp Stuff Blades specifically restore cutting weapons – machetes, axes, swords, and anything else with an edge. If your weapon slices rather than smashes, you’ll need both Scraps AND Blades for repairs.
The Math That Matters: Most weapon repairs cost 2-4 Scraps plus 1-2 Blades (for cutting weapons). A single successful looting run can net you enough materials for 10-15 repairs, which translates to hundreds of zombie encounters.
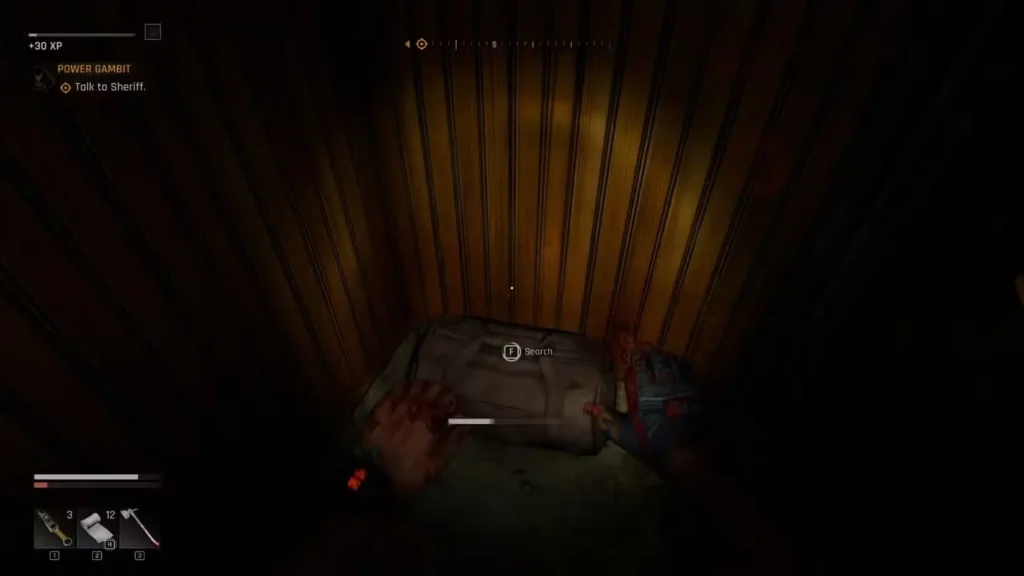
Master Strategy: Loot Every Single Body
This might sound obvious, but you’d be amazed how many players rush past fallen enemies without checking their pockets. Every zombie you kill is a potential resource goldmine.
The Looting Mindset Shift:
- Combat isn’t just about survival – it’s about investment in your future capabilities
- That 2-second delay to search a corpse pays dividends when your weapon is about to break during a crucial fight
- Dead enemies can’t hurt you, but a broken weapon definitely can
Pro Technique: Develop a post-combat routine. Clear the immediate area, catch your breath, then systematically loot every fallen enemy before moving on. It becomes second nature within a few hours of play.
Dark Zones: Your Resource Goldmines
Dark Zones represent some of the best risk-versus-reward scenarios in the entire game. These zombie-infested buildings scattered throughout Castor Woods aren’t just atmospheric set pieces – they’re treasure troves waiting to be plundered.
Reading the Zone Icons When you hover over a Dark Zone marker on your map, you’ll see preview icons showing what type of loot is inside:
- Screw icon = Heavy concentration of Scraps
- Blade icon = Multiple Blade resources
- Mixed icons = Variety of useful materials
Strategic Zone Selection: Don’t just hit every Dark Zone randomly. Plan your routes based on what you actually need. Low on Scraps? Target those screw icons. Cutting weapons getting dull? Hunt down the blade symbols.
Mega Store America: The Early Game Paradise
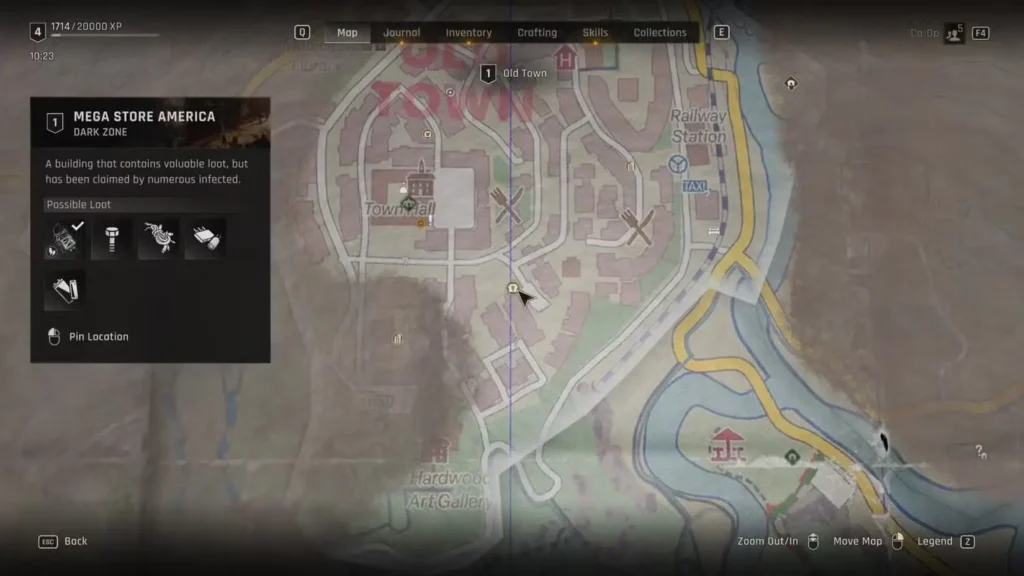
Located southeast of the town hall you visit during the main story, Mega Store America deserves special mention as possibly the best early-game farming location in the entire game.
Why This Location Dominates:
- Predictable layout makes looting efficient once you learn the floor plan
- High enemy density means lots of bodies to search
- Multiple container types – bags, backpacks, crates, and abandoned shopping areas
- Respawn-friendly for multiple farming runs
Farming Route Optimization: Start at the main entrance, work your way systematically through each section, prioritize high-value containers first, then clean up with enemy corpse looting. A complete run typically yields 15-25 Scraps and 8-15 Blades.

The Merchant Alternative (When Desperation Strikes)
Sometimes you need repairs RIGHT NOW and don’t have time for a looting expedition. The merchant at Old Town’s town hall (first floor) offers a direct cash-for-resources exchange.
When to Buy vs. When to Loot:
- Buy when: You’re in the middle of a challenging story mission and can’t afford weapon failure
- Buy when: You’re flush with cash from selling excess gear
- Loot when: You have time to explore and want maximum efficiency
- Loot when: You’re building long-term resource stockpiles
Price Reality Check: Merchants charge premium rates, but sometimes convenience trumps economy. A few hundred dollars spent on emergency repairs is better than losing progress because your weapon broke at the worst possible moment.
Advanced Farming Strategies
The Circuit Run Method Develop a standardized route through 3-4 high-yield locations, complete the circuit, then repeat. This approach maximizes time efficiency while ensuring steady resource income.
Container Priority System Not all loot sources are created equal:
- Zombie corpses (highest yield per time invested)
- Backpacks and duffel bags (reliable Scrap sources)
- Tool boxes and crates (decent mixed resources)
- Random scattered items (fill gaps in your route)
Inventory Management Tips
- Keep 20-30 Scraps and 15-20 Blades as your baseline stock
- Sell excess materials only when you’re consistently above these numbers
- Consider your playstyle – aggressive players need more repair materials
Resource Management Psychology
Here’s something most guides won’t tell you: successful resource gathering is as much about mindset as technique. Treat every exploration session as an investment in your character’s long-term survival capabilities.
The players who struggle with resource shortages are usually the ones who view looting as tedious busywork rather than strategic preparation. Shift that perspective, and suddenly every Dark Zone becomes an opportunity rather than a chore.

Team Coordination for Maximum Efficiency
If you’re playing co-op with friends, resource gathering becomes even more strategic. Coordinate your looting efforts – assign different players to different container types, share materials based on weapon preferences, and establish group policies for merchant purchases.
Squad Resource Strategies:
- Designate one player as the “quartermaster” who tracks group resource levels
- Rotate who handles corpse looting duties to prevent burnout
- Share rare materials while keeping common ones individual
- Plan group farming runs to high-yield locations
Long-Term Resource Planning
Think beyond your immediate repair needs. As you progress through the game, you’ll encounter tougher enemies that deal more weapon damage, meaning increased repair frequency. Building substantial resource stockpiles early pays huge dividends later.
The 50/30 Rule: Aim to maintain at least 50 Scraps and 30 Blades in your inventory once you’re past the early game. This buffer handles emergency repairs while keeping you prepared for extended combat sequences.
Final Thoughts: Make Resource Gathering Automatic
The most successful Dying Light: The Beast players don’t think about resource gathering as separate activity – it becomes integrated into everything else they do. Combat encounter? Loot the bodies. Exploring a new area? Check every container. Passing a Dark Zone? Quick detour for materials.
This integrated approach means you’ll rarely face the stress of weapon failure at critical moments, and you’ll spend less time on dedicated farming runs because resources accumulate naturally through regular gameplay.
Ready to keep your weapons in fighting shape? Start implementing these strategies immediately. Your future self (and your intact weapons) will thank you when you’re facing down hordes of infected with gear that’s ready for anything the zombie apocalypse throws at you.
Want to maximize your weapon potential even further? Don’t forget to grab free gear with our complete docket codes guide – those exclusive weapons will serve you well once you master the art of maintaining them!