Complete guide to progressing through Far Fields in Hollow Knight: Silksong. Learn how to get unstuck, find the Drifter’s Cloak, reach Greymoor, and collect the Mask Shard.
Break the Loop and Ascend to New Heights
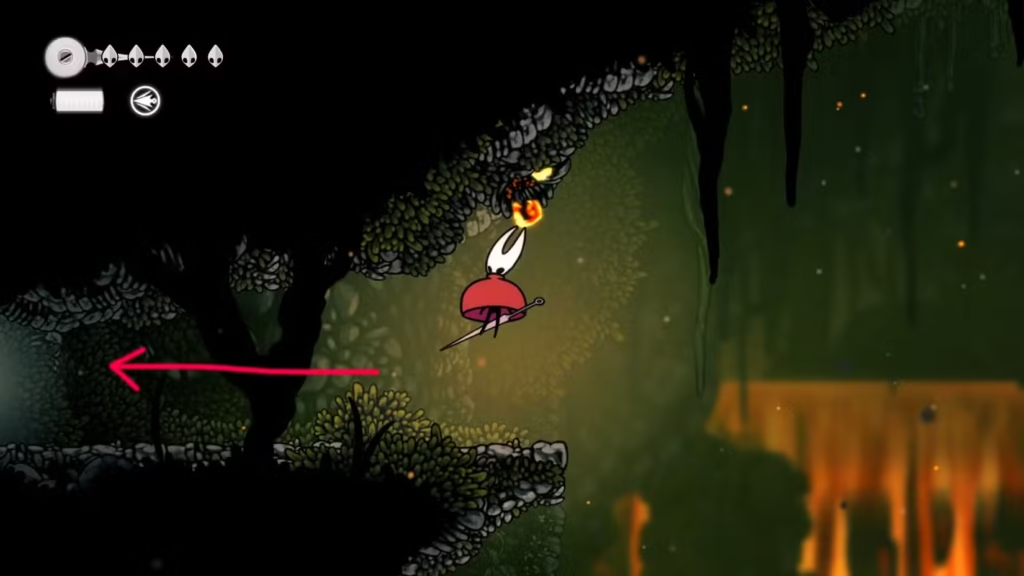
Far Fields is notorious for trapping players in an endless circular route where every path seems to lead back to where you started. This frustration is intentional – the area is designed as a progression gate that requires a specific ability to escape vertically.
Understanding the Drifter’s Cloak requirement, wind current mechanics, and proper progression sequence transforms Far Fields from a confusing maze into a straightforward vertical ascent to Greymoor and beyond.
This area becomes accessible through the post-Bell Beast progression paths that open up multiple new zones for exploration.
Understanding Far Fields Layout and Connections
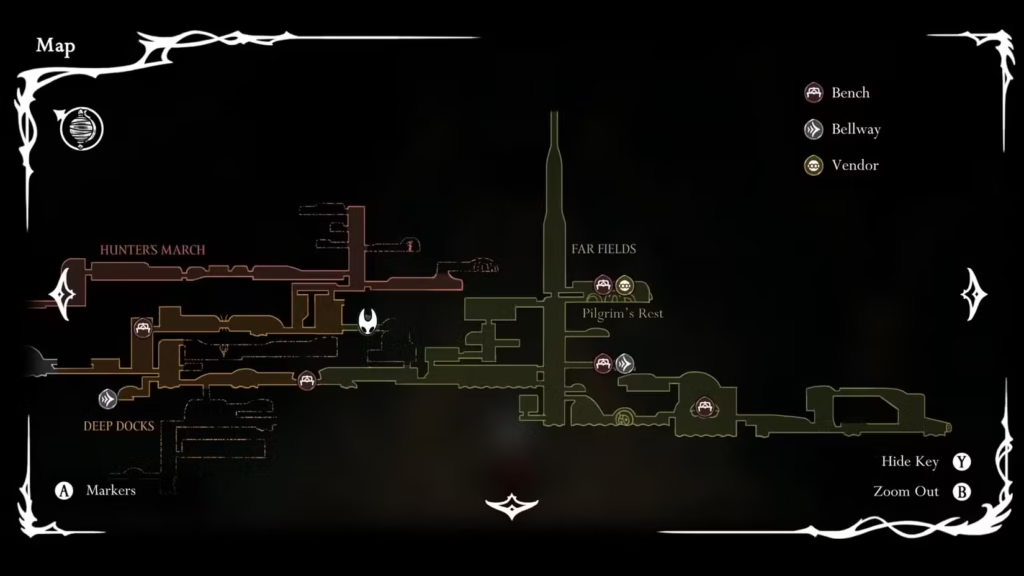
Area Positioning in Pharloom
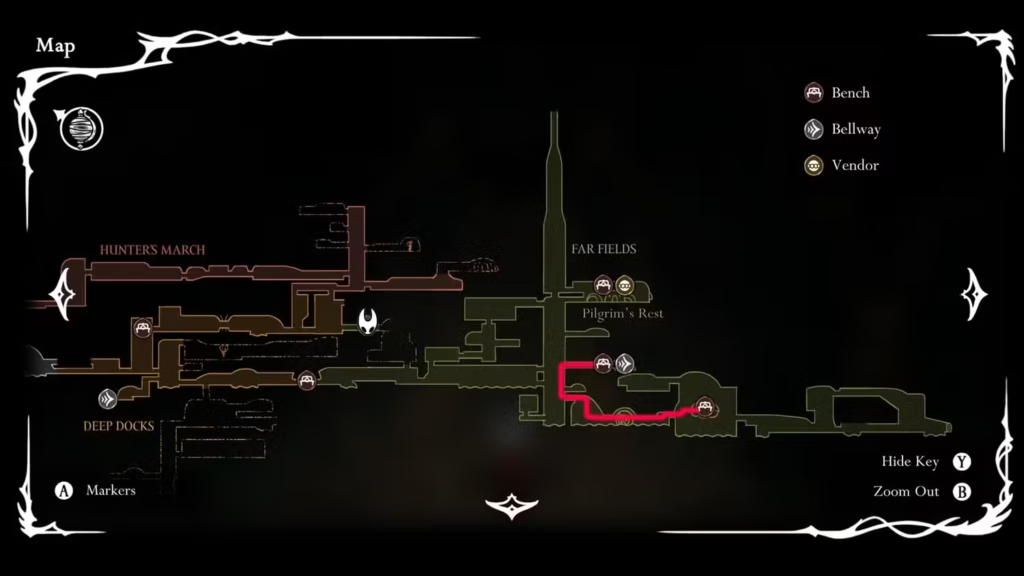
Far Fields connects to multiple major zones:
- East of Deep Docks (primary access point)
- East of Hunter’s March (not directly connected, but Hunter’s March has its own challenges)
- South of Greymoor (vertical progression upward)
- Contains connection to Bellway fast travel system
Area Overview TL;DR: East of Deep Docks → leads north to Greymoor → contains Bellway access
The Loop Problem Explained
Why players get stuck:
- Horizontal navigation appears to offer multiple paths
- All horizontal routes eventually circle back to starting areas
- Vertical progression requires specific ability not obvious to players
- No clear indication that upward movement is the solution
The “loop trap” is intentional game design that forces players to seek the Drifter’s Cloak before meaningful progression becomes possible.
Essential Prerequisite: Drifter’s Cloak
Completing the Flexile Spines Quest
Critical requirement: Far Fields progression requires the Drifter’s Cloak from the Flexile Spines quest.
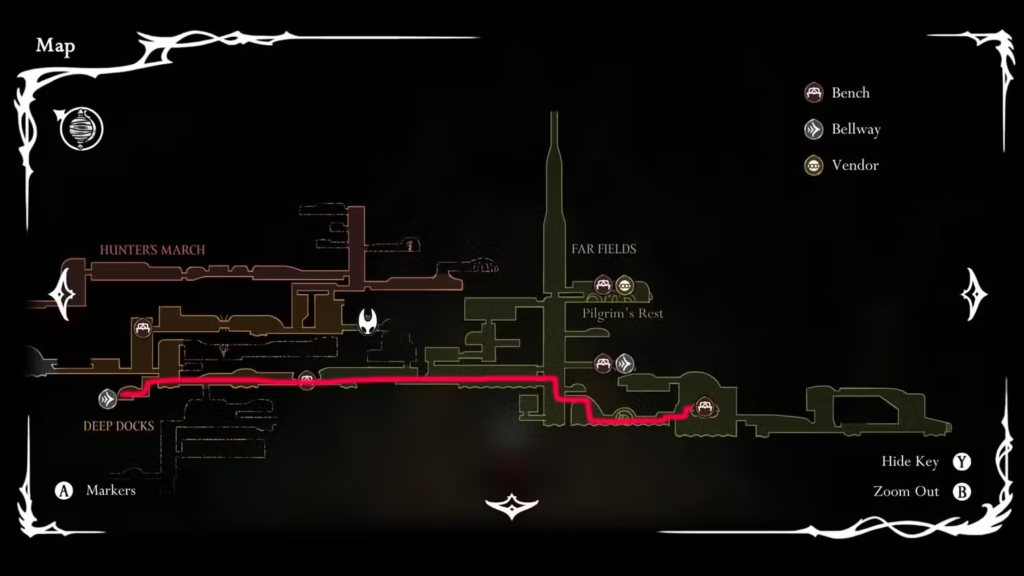
Quest location and completion:
- Navigate to large area south of Far Fields
- Find floating balloon structure (Seamstress home)
- Speak to the Seamstress inside the balloon
- Accept Flexile Spines quest (collect 25 Spine Cores)
- Complete quest to receive Drifter’s Cloak
Drifter’s Cloak capabilities:
- Ride wind currents for vertical navigation
- Controlled gliding for precise movement
- Access previously unreachable areas throughout Pharloom
Drifter’s Cloak TL;DR: Complete Flexile Spines quest → get wind riding ability → unlock Far Fields progression
Alternative Approaches (Not Recommended)
While some areas might be accessible through advanced platforming techniques, the Drifter’s Cloak is the intended and most reliable method for Far Fields progression. Attempting to bypass this requirement typically leads to frustration and dead ends.
Optional but Recommended: Far Fields Mask Shard
Accessing the Hidden Mask Shard
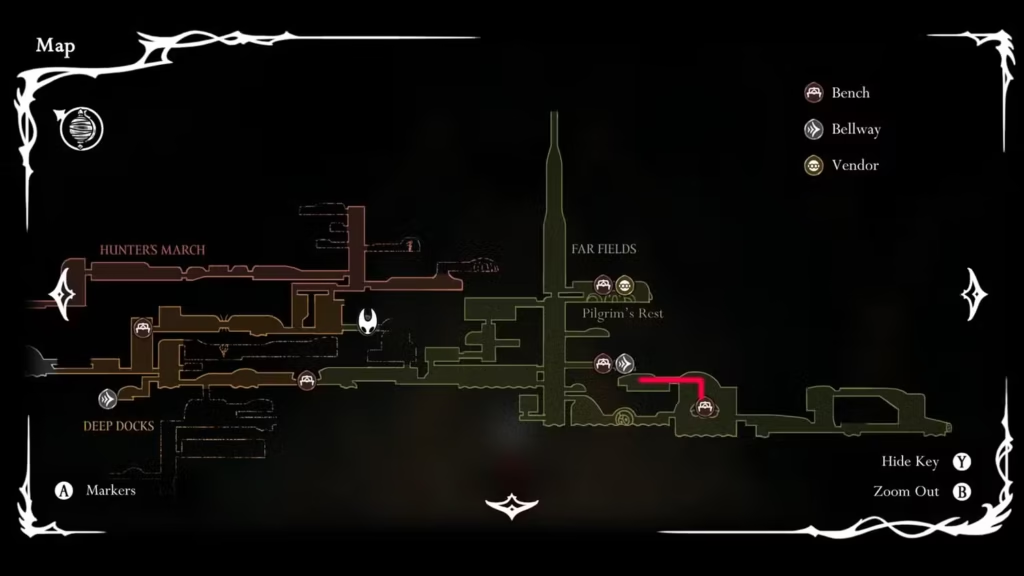
Location: Above the Seamstress’s balloon in elevated secret area
Collection sequence:
- Start from Seamstress home with Drifter’s Cloak equipped
- Head right until you see upward wind current
- Ride first wind current upward
- Continue to second wind current and ride it up
- Land and head left on upper platform
Initial Navigation TL;DR: Seamstress → right → up wind current → second wind current → left
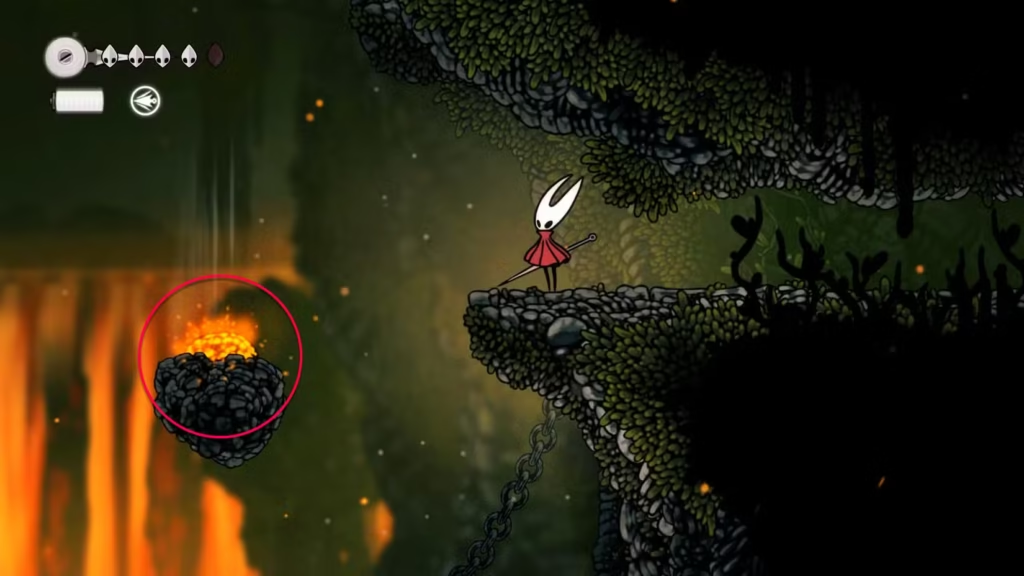
Explosive Rock Sequence
Breaking the first explosive rock:
- Hit explosive rock to release new wind current
- Avoid explosion damage by maintaining safe distance
- Ride newly created wind current to next platform area
Continuing the sequence:
- Find second explosive rock and break it (same method)
- Ride resulting wind current to third explosive rock location
- Break third rock to complete sequence
Total: 3 explosive rocks must be triggered to access Mask Shard area
Explosive Sequence TL;DR: Break 3 explosive rocks → each creates new wind current → follow sequence to Mask Shard
Final Mask Shard Collection
Entering the secret chamber:
- Glide slowly to opening on the left
- Enter hidden area and break any remaining explosive rocks
- Look upward for yellow bomb above the area
- Ride wind current to reach and destroy the yellow bomb
- Watch bomb fall while avoiding explosion damage
- Collect Mask Shard revealed under the ground
Mask Shard Collection TL;DR: Enter left opening → break remaining rocks → destroy yellow bomb above → avoid explosion → collect revealed Mask Shard
Main Progression Path: Reaching the Bellway
Fourth Chorus Boss Encounter
Boss location: On the lowest road in Far Fields
Progression sequence:
- Stay on lowest available path through Far Fields
- Encounter Fourth Chorus boss (mandatory fight)
- Defeat the boss using standard combat strategies
- Continue left after boss victory
Fourth Chorus serves as a progression gate ensuring players have adequate combat skills before accessing upper Far Fields areas.
Boss Encounter TL;DR: Lowest road → fight Fourth Chorus → defeat to continue → go left
Combat preparation techniques from guides like the Challenge button mechanics can be helpful for boss encounters like this.
Wind Current Navigation to Bellway
Post-boss progression:
- Continue left from Fourth Chorus defeat location
- Find first wind current and ride it upward
- Move left on upper platform to second wind current
- Ride second wind current to higher elevation
- Break explosive rock above to create additional wind current
- Ride new wind current to Bellway location
Navigation tips:
- Each wind current leads to progressively higher areas
- Explosive rocks create additional navigation options
- Systematic upward movement breaks the horizontal loop pattern
Bellway Navigation TL;DR: Left from boss → first wind current → left to second current → break rock above → ride new current to Bellway
Continuing Upward: Pilgrim’s Rest and Beyond
Pilgrim’s Rest Area
Accessing Pilgrim’s Rest:
- From Bellway location, continue upward using wind currents
- Break explosive rocks as encountered to create new navigation paths
- Follow same vertical progression pattern as previous sections
Pilgrim’s Rest characteristics:
- Intermediate area between Far Fields proper and Greymoor
- Contains additional challenges and potential secrets
- Continues upward navigation theme
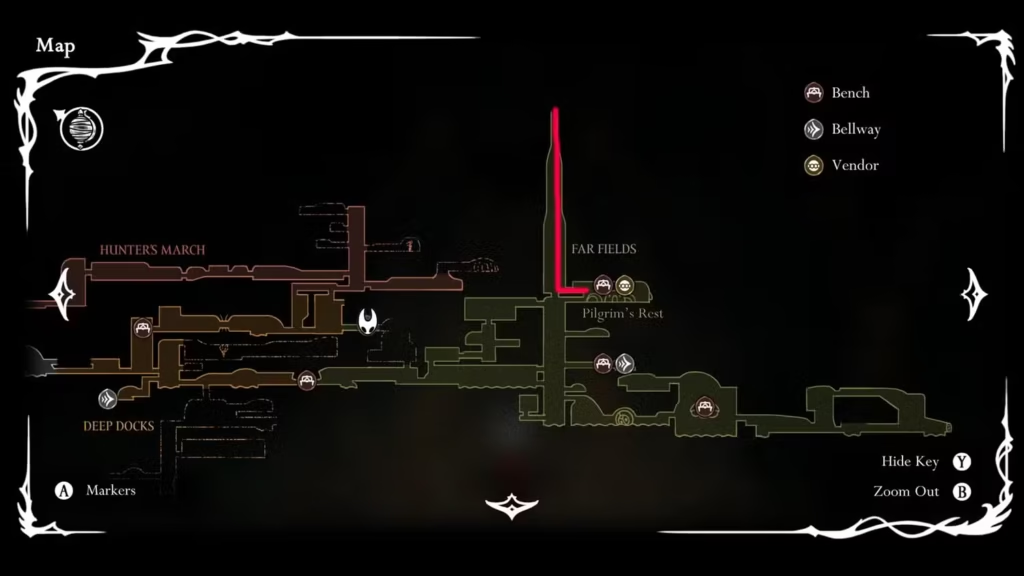
Final Ascent to Greymoor
Reaching the new area:
- Continue vertical navigation from Pilgrim’s Rest
- Use wind currents and break explosive rocks as needed
- Follow upward progression until area transition
- Enter Greymoor (new major zone)
Greymoor significance:
- New major area with distinct challenges and content
- Progression milestone that unlocks additional game content
- Validates completion of Far Fields navigation sequence
Upward Progression TL;DR: Bellway → Pilgrim’s Rest → continue up → Greymoor (new area)
Strategic Tips for Far Fields Success
Essential Preparation
Before attempting Far Fields progression:
- Complete Flexile Spines quest for Drifter’s Cloak (mandatory)
- Ensure adequate combat skills for Fourth Chorus boss
- Stock up on healing items for extended exploration
- Familiarize yourself with wind riding mechanics
Resource management skills developed through other quest experiences and strategic decisions can help with preparation planning.
Navigation Best Practices
Efficient progression techniques:
- Always look for upward options rather than horizontal paths
- Break every explosive rock encountered (creates new options)
- Use systematic exploration rather than random wandering
- Mark progress mentally to avoid backtracking confusion
Common Mistakes to Avoid
Progression errors:
- Attempting horizontal navigation without vertical thinking
- Skipping Flexile Spines quest and getting permanently stuck
- Rushing through Fourth Chorus fight unprepared
- Missing Mask Shard due to incomplete exploration
Understanding quest mechanics through experiences like the Flintbeetles quest can help avoid similar preparation mistakes.
Far Fields Exit Options
Multiple Departure Routes
Once Drifter’s Cloak is obtained and Bellway is unlocked:
Option 1: Return to Deep Docks
- Backtrack through original entry point
- Useful for resource management or quest completion
Option 2: Use Bellway Fast Travel
- Fast travel to any previously unlocked Bellway station
- Most efficient for distant destinations
Option 3: Continue to Greymoor
- Progress to new major area with fresh challenges
- Recommended for main story advancement
Exit Options TL;DR: Back to Deep Docks → Bellway fast travel → forward to Greymoor
Your Path Through Far Fields
Far Fields transforms from an impossible maze to a straightforward vertical climb once you understand the Drifter’s Cloak requirement. The area teaches important lessons about seeking prerequisites and thinking vertically in Metroidvania progression.
Essential Far Fields progression checklist:
- ✅ Complete Flexile Spines quest for Drifter’s Cloak
- ✅ Collect optional Mask Shard via explosive rock sequence
- ✅ Navigate to lowest road and defeat Fourth Chorus boss
- ✅ Use wind currents for systematic upward progression
- ✅ Break explosive rocks to create additional navigation paths
- ✅ Reach Bellway location for fast travel access
- ✅ Continue through Pilgrim’s Rest to Greymoor
Master Far Fields navigation and you’ll have developed skills for similar vertical progression challenges throughout Pharloom’s remaining areas.
Related Guides:
- Hunter’s March Bench Trap Guide
- Flintbeetles Volatile Quest Guide
- Pilgrim Shawls Quest Guide
- Should You Free Grindle?
- Post-Bell Beast Progression
- Challenge Button Combat
Official Silksong Links: