
TL;DR
- To get Iron Ingots you need: a Smelting Furnace, Iron Ore, and a Pokémon with the Burn Speciality
- The Smelting Furnace requires electricity to operate — connect it to a power grid via a Generate Pokémon, or place it near a windmill
- Iron Ore is found in Rocky Ridges — but it requires powered-up Rock Smash to mine, which you unlock by eating a Hamburger Steak made from Beans cooked in a Frying Pan. It can also be found in broken streetlamps and rusted metal objects
- Smelting converts ore at a 1:1 ratio — 1 Iron Ore = 1 Iron Ingot, with no material loss. Iron Ingots appear in 22 crafting recipes
- Place Iron Ore inside the Furnace, then lead a Burn Speciality Pokémon (like Magmar or Carkol) to it — they start smelting automatically. You can collect finished ingots while smelting is still in progress — no need to wait for the full batch
- Only one ore type can be smelted per Furnace at a time — use multiple Furnaces to smelt different ores simultaneously
- The Smelting Furnace recipe is unlocked through the Rocky Ridges questline (after meeting Magmar) — a pre-placed Furnace can also be found in the Rocky Ridges mine
- Craft a basic Smelting Furnace using 4x Iron Ore and 4x Stone
- Place the Furnace inside a Burn Pokémon’s habitat and they will smelt automatically whenever they’re home — no need to lead them each time
- The first major Iron Ingot requirement is rebuilding the Rocky Ridges Pokémon Center (25 Ingots) — start stockpiling early
How to Get Iron Ingots in Pokémon Pokopia
To get Iron Ingots in Pokémon Pokopia, you need to smelt Iron Ore inside a Smelting Furnace using a Pokémon with the Burn Speciality. This mechanic becomes available in Rocky Ridges, the fourth main area of the game, where you’ll meet Magmar and unlock both the Furnace recipe and access to Iron Ore deposits. Smelting converts ore at a clean 1:1 ratio — 1 Iron Ore becomes 1 Iron Ingot, appearing across 22 crafting recipes throughout the game.
Here’s a quick checklist of what you need before you can start smelting:
| Requirement | How to Get It |
|---|---|
| Smelting Furnace | Found in the Rocky Ridges mine (pre-placed), or craft with 4x Iron Ore + 4x Stone after unlocking the recipe. Requires electricity to operate. |
| Power source | Connect Furnace to a power grid via a Generate Specialty Pokémon, or place near a windmill |
| Iron Ore | Mine in Rocky Ridges using powered-up Rock Smash (requires eating Hamburger Steak), or get via Trubbish’s Recycle Speciality from Nonburnable Garbage |
| Burn Speciality Pokémon | Attract Magmar by completing its habitat in Rocky Ridges, or use any other Burn Pokémon already befriended (Charmander, Carkol, etc.) |
Critical: The Smelting Furnace requires electricity to operate. Without a power source — either a Generate Specialty Pokémon connected to the Furnace, or placement near a windmill — the Furnace will not smelt anything. Set up electricity before placing or using your Furnace.
How to Get Iron Ore in Rocky Ridges
Iron Ore is the bottleneck in the entire Ingot production chain, and it’s important to know that standard Rock Smash won’t break Iron Ore deposits. The rock containing Iron Ore is harder than standard stone or Copper Ore rock, and requires a powered-up version of the move.
Iron Ore can be identified by silver nuggets appearing on dark rock, and also appears in broken streetlamps and rusted metal objects throughout Rocky Ridges. To power up Rock Smash and break Iron Ore deposits:
- Gather Beans from around the Rocky Ridges area
- Cook the Beans in a Frying Pan to make Simple Hamburger Steak
- Eat the Hamburger Steak — this powers up Rock Smash, letting you break the harder Iron Ore deposits
Iron Ore deposits are found throughout Rocky Ridges and concentrated in the mine area to the north of the Pokémon Center, near the hot springs.
Alternative Iron Ore source — Trubbish (Recycle Speciality): If you’ve unlocked Trubbish through the Bleak Beach questline, you can give it Nonburnable Garbage to convert into Iron Ore. Garbage is scattered throughout the world, making this a convenient early supplement — particularly useful for Piplup’s Shower request, which requires Iron Ore before you’d naturally reach the Rocky Ridges mines.
Best bulk farming — Volcanic Dream Island: Once you’ve unlocked Dream Islands, use the Arcanine Doll to visit the Volcanic Dream Island, which has rich Iron Ore deposits you can mine freely for large quantities. This is the most efficient method for players who need Ingots in bulk for large projects. See our Pokémon Pokopia Dream Islands guide for more on unlocking Dream Islands.
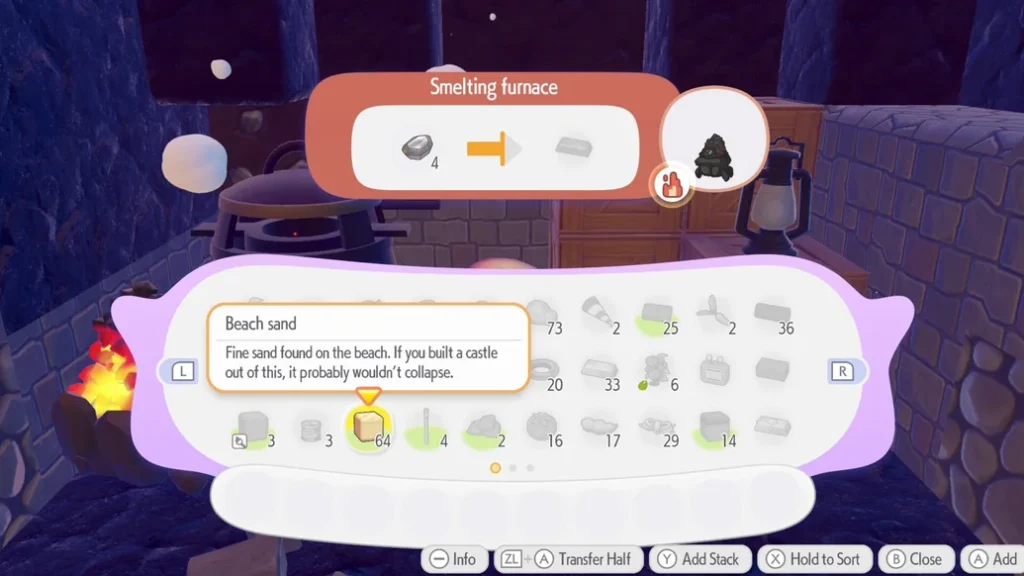
Step 1 — Place Iron Ore into the Smelting Furnace
Make sure your Smelting Furnace is connected to a power source first. Then interact with the Furnace and open your bag to load it with Iron Ore. The Furnace can process multiple pieces of ore in one session at a 1:1 ratio, so load it with as much as you have on hand. Keep in mind: only one ore type can be smelted per Furnace at a time — if you need to smelt Copper Ore and Iron Ore simultaneously, you’ll need two separate Furnaces running in parallel.
If you haven’t crafted a Furnace yet, see the section below — or use the pre-placed Furnace inside the mine in Rocky Ridges, accessible after upgrading your Cut ability.
Step 2 — Lead a Burn Speciality Pokémon to the Furnace
With your Iron Ore loaded and the Furnace powered, find a nearby Pokémon with the Burn Speciality — Magmar is the one you’ll naturally unlock during the Rocky Ridges questline, but Carkol, Charmander, and any other Burn Pokémon you’ve befriended also work. Speak to the Pokémon, have them follow you back to the Furnace, and they’ll begin heating it automatically within a few seconds. You’ll see a small icon appear to confirm which Pokémon has taken on the job, and an arrow indicator on screen showing when the next ingot will be done.
Once smelting begins, you’re free to leave. Use that window productively:
- Set up a new habitat to attract more Pokémon
- Raise the Comfort Levels of your existing residents
- Head out to mine more Iron Ore for your next batch
- Work on any outstanding Pokémon requests
Auto-smelting tip: If you place your Smelting Furnace inside or directly next to a Burn Pokémon’s habitat, they will heat it automatically whenever they’re home — without you needing to lead them to it each time. This is the most efficient long-term setup for consistent Ingot production.
Managing your time around smelting is a key habit — and having good storage nearby makes it much easier. Check out our guide to increasing storage in Pokémon Pokopia to make sure you always have room for incoming materials.
Step 3 — Collect Your Iron Ingots from the Furnace
You don’t need to wait for the entire batch to finish — you can interact with the Furnace while it’s still smelting to collect whichever ingots are already complete. The arrow indicator on screen shows when the next one will be ready. Once the full batch is done, the Furnace will power down. Return to it and interact to collect any remaining Iron Ingots. They are not added to your bag automatically — you need to manually retrieve them.
Since the Rocky Ridges Pokémon Center requires 25 Iron Ingots, it’s worth loading at least 30 Iron Ore into the Furnace in one go before tackling that quest — smelting in large batches saves significant time.
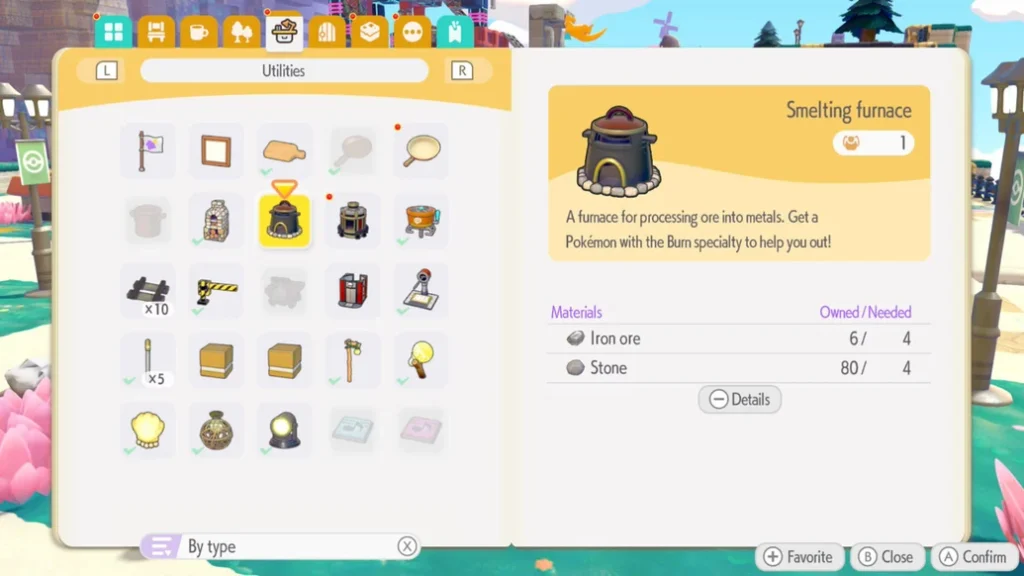
How to Craft a Smelting Furnace in Pokémon Pokopia
If you don’t already have a Smelting Furnace, you have two options: use the pre-placed one in the Rocky Ridges mine, or craft your own. The crafting recipe is unlocked automatically after using a Smelting Furnace for the first time during the Rocky Ridges questline — specifically, after the encounter with Magmar. Once you have the recipe, you can craft Furnaces freely at any area.
To craft a single Smelting Furnace, you need:
- 4x Iron Ore
- 4x Stone
Both materials are available in Rocky Ridges. Once crafted, place the Furnace wherever you like — ideally near a Workbench and Storage Boxes for a seamless production loop, and within reach of a power source. The Smelting Furnace also processes Copper Ore into Copper Ingots, Gold Ore into Gold Ingots, and smelts Glass from volcanic ash, sand, or sandstone — all at the same 1:1 ratio. For more on optimising your crafting setup, see our guide to getting Bricks in Pokémon Pokopia.
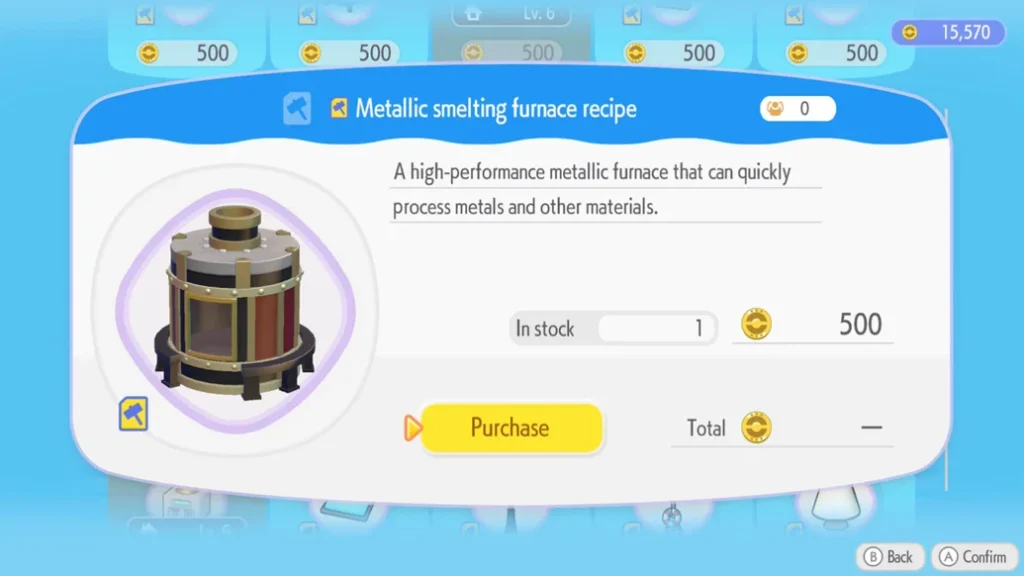
How to Unlock the Metallic Smelting Furnace
Once you reach the region of Sparkling Skylands, you’ll unlock a recipe for an upgraded version — the Metallic Smelting Furnace. This advanced Furnace is faster and more efficient, but requires significant stockpiling to craft.
| Material | Quantity | Notes |
|---|---|---|
| Iron Ingots | 10x | Smelted at a 1:1 ratio from Iron Ore |
| Pokémetal | 3x | Found in the Withered Wasteland mine — take the left fork at the railway track |
| Tinkagear | 3x | Produced by Tinkaton from Iron Ingots (~2 Iron Ingots per Tinkagear) |
Tinkagears are produced by Tinkaton, who converts Iron Ingots into Tinkagears at roughly 2 Iron Ingots per Tinkagear — meaning you’ll need around 6 additional Iron Ingots’ worth of Tinkagear production on top of the 10 directly required. Plan ahead and stockpile Iron Ingots well before you reach Sparkling Skylands.
Pokémetal is one of the rarer materials in the game. Pokémetal fragments are found in the Withered Wasteland mine — enter from the north, then take the left fork at the railway track and follow the tracks to find the Pokémetal Block deposits. You’ll need enhanced Rock Smash to break them. Note that Pokémetal is also required for other late-game projects like the Sparkling Skylands Pokémon Center (25 Pokémetal), so don’t spend it all in one place. For more detail on farming it, see our guide to getting Pokémetal in Pokémon Pokopia.
What Are Iron Ingots Used For in Pokémon Pokopia?
Iron Ingots are one of the most in-demand crafting materials in the game, appearing in 22 crafting recipes. Here are the key things you’ll need them for:
Rebuilding the Rocky Ridges Pokémon Center — The first major Ingot requirement is the Rocky Ridges Pokémon Center, which needs 25 Iron Ingots among other materials. Load at least 30 Iron Ore into the Furnace in one go before this point to save time.
Industrial Beds — Each Industrial Bed requires 2 Iron Ingots, 2 Fluff, and 2 Lumber. These come up as requirements in later quests, including the Team Initiation Challenge.
Tinkagears — Tinkaton uses Iron Ingots to produce Tinkagears, which are then used in a range of other crafting recipes including the Metallic Smelting Furnace itself.
Decorative items and furniture — Numerous furniture and decoration recipes throughout the game call for Iron Ingots, making a steady supply essential for world-building.
Metallic Smelting Furnace — The upgrade requires 10 Iron Ingots, making them self-referential in your production chain.
Tips for Getting Iron Ingots Efficiently
- Set up power before your Furnace — the Smelting Furnace needs electricity to operate. Place it near a windmill or connect via a Generate Specialty Pokémon before expecting any smelting to happen
- Eat Hamburger Steak before mining — you can’t break Iron Ore deposits without powered-up Rock Smash, so cook your Beans and eat before heading into the mines
- Load 30+ ore at once — the main Rocky Ridges quests require 25 Ingots for the Pokémon Center alone; loading a large batch in one smelting run saves significant time
- Collect partial batches mid-smelt — interact with the active Furnace to pick up completed ingots while the rest are still smelting; the arrow indicator tells you when the next one will be done
- Use multiple Furnaces for multiple ore types — since each Furnace can only smelt one ore type at a time, set up a dedicated Iron Furnace and a dedicated Copper Furnace if you need both simultaneously
- Place the Furnace inside a Burn Pokémon’s habitat — they’ll smelt automatically whenever they’re home, turning your Furnace into a passive production station
- Use Trubbish early — before you reach Rocky Ridges, give Nonburnable Garbage to Trubbish for a steady trickle of Iron Ore to get ahead of requirements like Piplup’s Shower
- Farm Iron Ore on the Volcanic Dream Island (Arcanine Doll) for bulk quantities once Dream Islands are unlocked
- Stockpile before Sparkling Skylands — the Metallic Smelting Furnace and Sparkling Skylands Pokémon Center both demand large amounts of Ingots; start saving early
- Position your Furnace near a Workbench and Storage Boxes so materials flow seamlessly between gathering, smelting, and crafting; for a full storage breakdown see our guide to increasing storage in Pokémon Pokopia
While you’re building out your crafting setup, it’s worth knowing how all your core systems fit together. Our Dream Islands guide covers the best methods for farming rare materials, and our Pokémetal guide is essential reading before you tackle the Metallic Smelting Furnace. You might also want to check out our guide to GameSharing Pokopia on Switch if you’re playing with friends on the original Switch.
Frequently Asked Questions
How do I get Iron Ingots in Pokémon Pokopia?
Smelt Iron Ore in a Smelting Furnace using a Pokémon with the Burn Speciality, such as Magmar or Carkol. Load the Furnace with Iron Ore, ensure it’s connected to a power source, lead a Burn Pokémon to it, and they’ll begin smelting automatically. The ratio is 1:1 — 1 Iron Ore becomes 1 Iron Ingot. You can collect finished ingots while smelting is still in progress.
How do I craft a Smelting Furnace in Pokémon Pokopia?
You need 4x Iron Ore and 4x Stone to craft a Smelting Furnace. The recipe is unlocked automatically after using a Furnace for the first time during the Rocky Ridges questline. A pre-placed Furnace can also be found in the Rocky Ridges mine. Note: the Furnace requires electricity to operate.
Which Pokémon can smelt Iron Ore in Pokopia?
Any Pokémon with the Burn Speciality can heat up a Smelting Furnace. Magmar is the first you’ll unlock naturally in Rocky Ridges. Carkol, Charmander, and any other Burn Pokémon you’ve befriended also work. Place the Furnace inside their habitat for automatic smelting without needing to lead them each time.
What is the Metallic Smelting Furnace in Pokémon Pokopia?
It’s an upgraded Furnace unlocked in Sparkling Skylands. It requires 10x Iron Ingots, 3x Pokémetal, and 3x Tinkagear to craft, and offers faster, more efficient smelting than the basic Furnace.
What are Iron Ingots used for in Pokémon Pokopia?
Iron Ingots appear in 22 crafting recipes and are used to rebuild the Rocky Ridges Pokémon Center (25 Ingots), craft Industrial Beds, produce Tinkagears, build the Metallic Smelting Furnace, and create a wide range of decorative furniture.
How do I mine Iron Ore in Pokémon Pokopia?
Iron Ore is found in Rocky Ridges, primarily in the mines north of the Pokémon Center near the hot springs. It also appears in broken streetlamps and rusted metal objects. You need powered-up Rock Smash to break Iron Ore deposits — power it up by cooking Beans in a Frying Pan to make Hamburger Steak and eating it. Alternatively, give Nonburnable Garbage to Trubbish (Recycle Speciality) to receive Iron Ore without mining.
Where do I find Pokémetal in Pokémon Pokopia?
Pokémetal fragments are found in the Withered Wasteland mine. Enter from the north, then take the left fork at the railway track and follow the tracks to reach the Pokémetal Block deposits. You’ll need enhanced Rock Smash to break them. Smelt Pokémetal fragments at a Furnace to produce finished Pokémetal.
Does the Smelting Furnace need electricity in Pokémon Pokopia?
Yes — the Smelting Furnace requires electricity to operate. You can power it by connecting it to a power grid via a Generate Specialty Pokémon, or by placing it near a windmill. Without a power source, the Furnace will not smelt anything regardless of how much ore is loaded inside.
Can I smelt multiple ore types at once in Pokémon Pokopia?
Not in the same Furnace — only one ore type can be smelted per Smelting Furnace at a time. If you need to produce Iron Ingots and Copper Ingots simultaneously, you’ll need to set up two separate Furnaces, each loaded with a different ore type.
Can I collect Iron Ingots before the Furnace finishes smelting?
Yes — you can interact with the Smelting Furnace while it’s still active to collect whichever ingots have already been completed. An arrow indicator on screen shows when the next ingot will be ready. You don’t need to wait for the full batch to finish before picking up what’s done.


