If you’re looking for the ultimate endgame challenge in ARC Raiders, the Harvester event is where it’s at. This is a special limited-time event that spawns randomly on maps, offering some of the best loot in the game—including legendary weapon blueprints like the Jupiter and Equalizer. But here’s the catch: it’s brutally difficult, requires teamwork, and you’ll be racing against both the clock and the ARC Queen herself.
Think of the Harvester as ARC Raiders’ version of a raid boss encounter. You’re sneaking into a downed ship, solving a multi-phase puzzle under pressure, and trying to extract alive with your rewards. It’s intense, rewarding, and honestly one of the most memorable experiences in the game when you pull it off.
This guide breaks down the entire Harvester puzzle step-by-step, including prep work, both phases, and how to safely extract with your legendary loot.
What Is the Harvester Event in ARC Raiders?
The Harvester is a special PvE event that randomly appears on certain maps. When active, players can infiltrate a downed ARC ship, complete a timed puzzle under hazardous conditions, and claim high-tier rewards—most notably legendary weapon blueprints.
Why the Harvester matters:
- Legendary weapon blueprints (Jupiter, Equalizer, etc.)
- High-value crafting materials
- Prestige and bragging rights
- Excellent coin farming opportunity if you succeed
The challenges:
- The ARC Queen and other machines patrol the area
- Environmental hazards inside the ship (fire and EMP surges)
- Time pressure—fail the puzzle and start over
- High risk of ambush from other players
Bottom line: This is not a solo activity. You’ll need at least one teammate (preferably two or three) to handle the puzzle efficiently and watch for threats.
How To Find the Harvester Event in ARC Raiders?
The Harvester event isn’t always active—it spawns randomly at different intervals. Here’s how to check:
Before Queueing for a Match
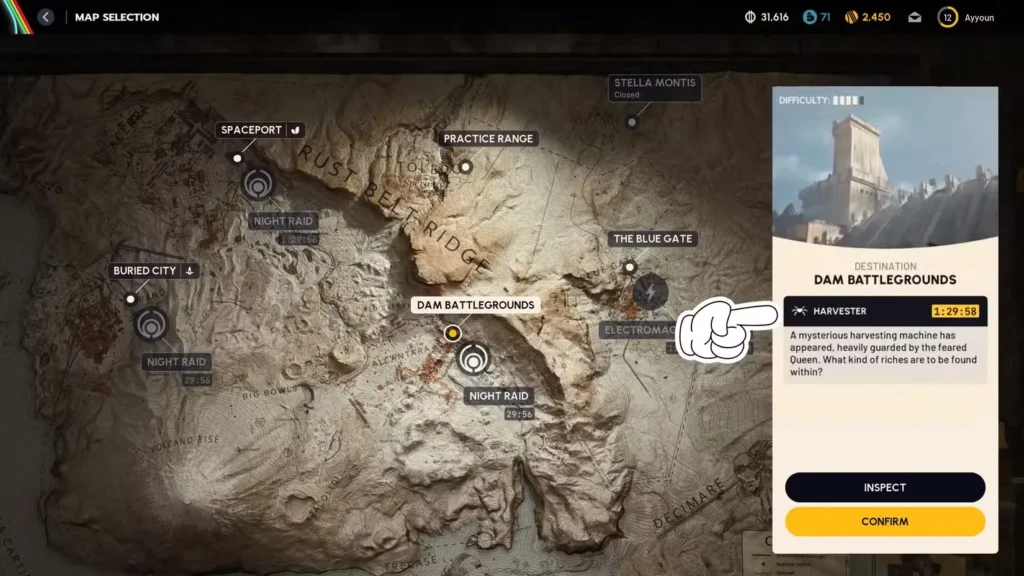
When you’re on the map selection screen, look for a special indicator showing that the Harvester event is active. The game usually displays event markers or notifications for active limited-time content.
If the Harvester is active:
- Note which map it’s on (commonly Dam Battlegrounds)
- Prepare your best loadout
- Bring teammates—seriously, don’t attempt this solo
Harvester Location on Dam Battlegrounds
The most common spawn location is on Dam Battlegrounds, specifically:
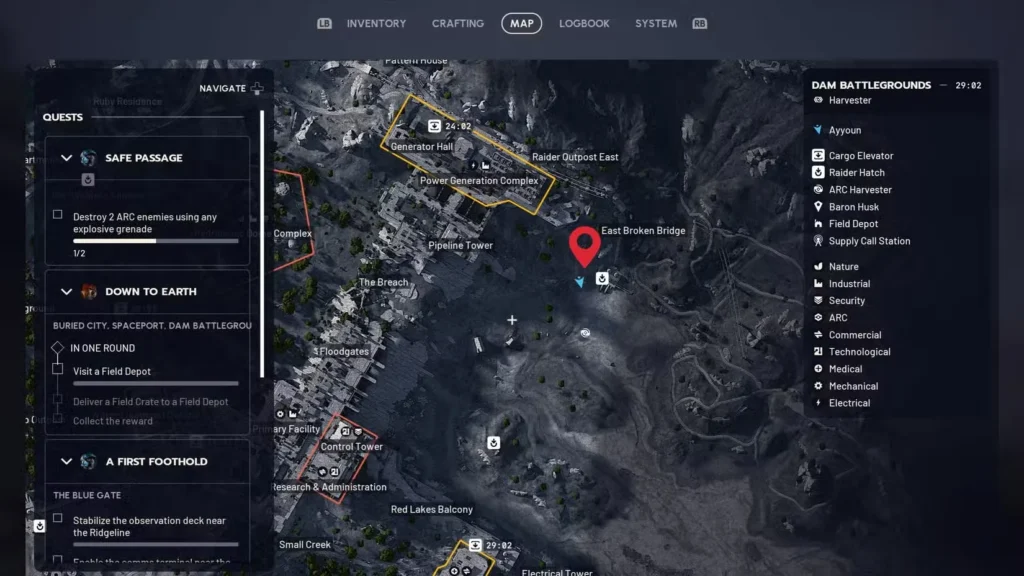
- Southeast of the Power Generation Complex
- Near Red Lake
- Look for the downed ship surrounded by the ARC Queen and her minions
The Harvester is hard to miss once you’re in the area—it’s a massive crashed vessel with ventilation shafts you’ll need to breach to enter.
Essential Prep Before Attempting the Harvester
Don’t just rush in unprepared. The Harvester requires specific gear and strategy to succeed.
Gear Checklist
Must-have items:
- Zip line (purchased from Apollo Trader)—critical for fast insertion and escape
- Best weapons and armor—bring your A-game gear
- Shield (but you’ll remove it inside—more on that later)
- Healing items and supplies
- Raider Hatch Key (optional but highly recommended for safe extraction)
If you don’t have a Raider Hatch Key, check our extraction guide for tips on securing one. Trust me, after completing the Harvester, the last thing you want is a contested normal extraction.
Team Composition
Ideal squad size: 2-4 players
Role distribution:
- Lookout – watches the ARC Queen’s patrol pattern
- Puzzle solvers – find capsules and destroy buttons (everyone)
- Combat support – deals with any machines or players that show up
Make sure everyone understands the puzzle mechanics before you start. Communication is everything. If you need help coordinating with your squad, our crossplay and party guide can help you get set up.
Setting Up Your Zip Line
Before engaging the puzzle:
- Find a safe position with a clear line of sight to the Harvester
- Set up a zip line from your safe spot to the ventilation entrance
- Test it to make sure it works smoothly
- This is your insertion AND escape route—make it count
The zip line is non-negotiable. Without it, you’re stuck running through the ARC Queen’s patrol zone, which is basically suicide when you’re carrying legendary loot.
Phase One: Entering the Harvester and Finding Power Cells

Wait for Your Window
The ARC Queen and other machines patrol around the Harvester. Don’t rush in blindly. Watch their movement patterns and wait for the Queen to move away from the ventilation entrances.
When you have an opening:
- Use your zip line to quickly reach the Harvester
- Breach the ventilation doors to enter
- Get inside as fast as possible

Understanding the Hazard System
Once inside, you’ll notice a color-coded pillar in the center of the Harvester. This pillar warns you about incoming hazards:
Red flash = Fire hazard
- Flames will erupt inside the Harvester
- GET OUT immediately and wait in the archway/entrance
- Don’t take damage—wait it out
Blue flash = EMP surge
- The ARC Queen sends an electrical pulse through the ship
- Depletes shields completely (doesn’t damage health)
- This is why you need to remove your shield first
Remove Your Shield (Critical Step!)
As soon as you enter the Harvester:
- Remove your shield from your equipment
- Store it in your inventory temporarily
- This prevents it from being permanently damaged by the EMP surges
If you forget this step, you’ll end up with a broken shield and no way to repair it mid-puzzle. Don’t learn this the hard way.
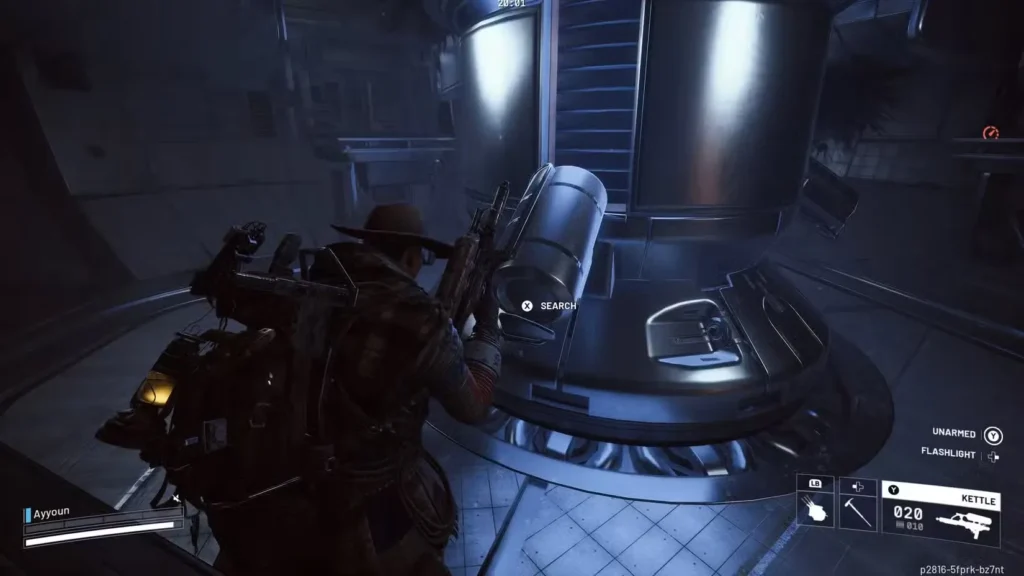
Finding the Three Power Cells/Capsules
Your objective in Phase One is simple: find three power cells hidden behind panels in the upper section of the Harvester.
How to find them:
- Search the upper areas of the interior
- Look for panels you can breach
- Behind these panels are the power cells
- Collect all three
Team coordination tip: Split up to cover more ground faster. Assign sections to each team member to avoid wasting time searching the same spots.
Inserting the Power Cells
Once you have all three power cells:
- Return to the center pillar
- Breach the panels on the pillar first
- Insert all three power cells into the pillar slots
- Do this quickly—before the pillar flashes red
If the pillar flashes red before you finish:
- The power cells will eject
- You’ll have to reinsert them
- Don’t panic—just be faster the second time
Important: All three power cells must be inserted before the next hazard cycle. Time management is everything here.
Phase Two: Destroying Yellow Buttons
Once all three power cells are successfully inserted, the puzzle shifts to Phase Two.
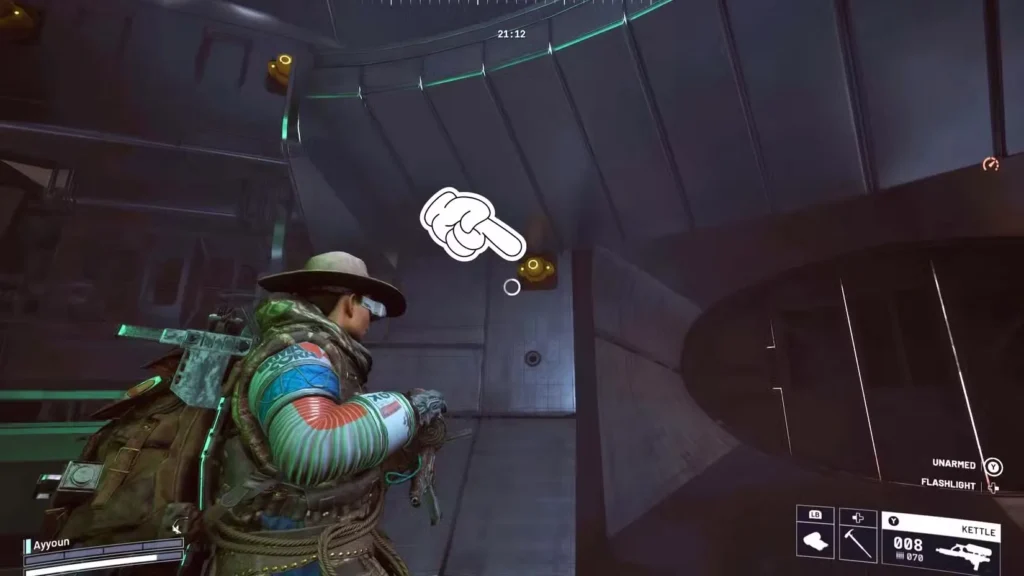
What Happens Next
Yellow buttons will appear on the walls throughout the Harvester interior. Your job is simple: destroy them all.
How to destroy the buttons:
- Shoot them with your weapon
- Melee attack them if you’re close
- Both methods work equally well
The catch:
- You must destroy all buttons before the Harvester readies another missile
- If you fail, you’ll have to restart Phase Two
- Good news: Destroyed buttons stay destroyed—you don’t re-do the ones you already got
Team Strategy for Phase Two
Split the workload:
- Assign sections of the ship to each team member
- Call out button locations over comms
- Focus fire if you’re running out of time
Don’t panic: Even if you miss the timer on your first attempt, you just need to finish off the remaining buttons. As long as you keep making progress, you’ll get there.
Watch for Hazards
The fire and EMP hazards continue throughout Phase Two, so stay alert:
- Red flash = evacuate immediately
- Blue flash = EMP incoming (shields still removed, right?)
- Don’t get caught in the fire while hunting for buttons
Claiming Your Legendary Loot
Once all yellow buttons are destroyed, the center pillar will release three loot containers.
What you’ll get:
- Legendary weapon blueprints (Jupiter, Equalizer, and more)
- High-tier crafting materials
- Valuable resources for base upgrades
Looting protocol:
- Grab everything from all three containers
- Make sure your team divides the loot fairly (or call dibs in advance)
- Don’t linger—it’s time to extract
If your inventory is full, prioritize the legendary blueprints above everything else. You can always farm coins or gather resources later, but these blueprints are rare and game-changing.
Extracting Safely After the Harvester
You’ve got legendary loot. Now comes the hard part: getting out alive.
Exiting the Harvester
- Exit through the ventilation doors
- Watch the ARC Queen’s position
- Wait for her to turn away from you
- Use your zip line to quickly escape the area
Do NOT run straight out. The Queen can and will melt you if she spots you. Patience here saves lives.
Extraction Options
You have two choices for extraction:
Option 1: Raider Hatch (Recommended)
- Silent, instant extraction
- No alarm to attract enemies
- Requires a Raider Hatch Key (9,000 coins from Shani)
- Best choice if you have one
Option 2: Normal Extraction Point
- Timed extraction with loud alarm
- Higher risk of player ambushes
- Free, but more dangerous
Check our complete extraction guide for detailed strategies on both methods.
Post-Harvester Threats
After completing the event, you’re a walking loot piñata. Other players know you just cleared the Harvester, and they will try to ambush you.
Stay alert for:
- Players camping near extraction points
- ARC machines drawn to the commotion
- Your own team’s positioning (don’t get separated)
If you have shield recharge knowledge and the best skills unlocked, you’ll have a much better chance of fighting your way out if things go south.
Additional Tips for Harvester Success
Practice Makes Perfect
Your first Harvester attempt will probably be chaotic. That’s normal. The more you run it, the better you’ll get at:
- Recognizing power cell locations
- Timing hazard cycles
- Destroying buttons efficiently
Optimize Your Performance
If you’re experiencing frame drops or lag during the intense Harvester sequence, check our PC optimization guide to smooth out your gameplay.
Learn From Other Events
The Harvester shares some mechanics with other ARC Raiders events like ARC Courier and Probe hunts. Experience with one helps with the others.
Don’t Get Greedy
If you successfully extract with legendary blueprints, don’t immediately re-queue for another Harvester run. Bank your loot, repair your gear, and then go again. Losing legendary blueprints because you got overconfident is a painful lesson.
Final Thoughts
The Harvester event is the pinnacle of PvE content in ARC Raiders. It’s challenging, rewarding, and requires real coordination with your squad. When you successfully extract with those legendary weapon blueprints, it feels incredible—like you’ve actually earned something special.
Yes, it’s difficult. Yes, you’ll probably fail your first few attempts. But once you nail the timing, understand the hazard system, and have a solid team backing you up, the Harvester becomes one of the most fun and profitable activities in the game.
So gear up, grab your squad, watch for that event notification, and go claim those legendary blueprints. For more endgame tips and strategies, check out our complete survival guide or learn how to maximize your early-game progression.
You can download ARC Raiders on PlayStation, Xbox, or through the official website. Now go show that ARC Queen who’s boss!
Quick Reference:
- Location: Dam Battlegrounds (southeast of Power Generation Complex)
- Required gear: Zip line, best loadout, optional Raider Hatch Key
- Phase One: Find 3 power cells, insert into center pillar
- Phase Two: Destroy all yellow buttons on walls
- Rewards: Legendary weapon blueprints (Jupiter, Equalizer)
- Key survival tip: Remove shield before entering to prevent EMP damage