If you’re serious about progressing in ARC Raiders, you need to understand one fundamental truth: your Workbench is everything. It’s not just a place to craft gear—it’s the backbone of your entire progression system. Better Workbench = better gear = better survival = more loot = even better gear. It’s a loop, and upgrading your crafting stations is how you climb that ladder.
But here’s the thing: the Workbench system in ARC Raiders isn’t just one station. It’s actually a network of specialized crafting benches, each with its own upgrade path and requirements. Knowing which benches to prioritize, how to farm the resources efficiently, and what unlocks at each level can dramatically speed up your progression.
This guide breaks down the entire Workshop system, explains how to upgrade each bench, and shares practical tips for gathering the materials you need without wasting time.
Understanding the Workshop System in ARC Raiders
Before we dive into upgrades, let’s clarify what you’re actually working with.
The Workbench is Just the Beginning
When you first start ARC Raiders, you’ll unlock the basic Workbench, which lets you craft essential gear like weapons, ammo, and armor. This is your starting point—enough to get you into raids without being completely helpless.
But to access better gear, advanced modifications, and higher-tier items, you need to unlock and upgrade additional specialized benches. Think of it like a tech tree: each bench focuses on a specific category of items, and upgrading them unlocks better crafting options.
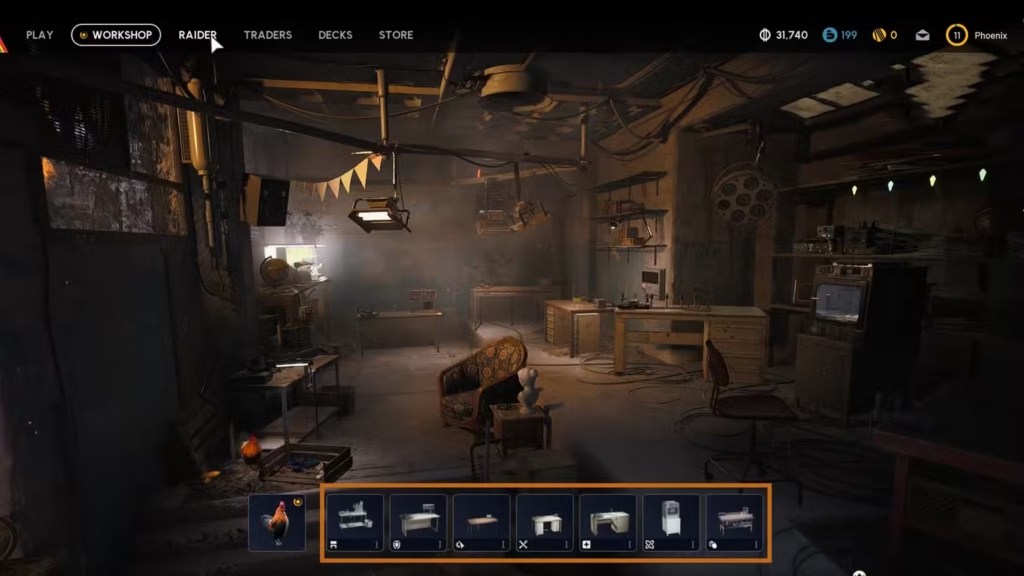
All Crafting Benches in ARC Raiders
Here’s the complete list of crafting stations available in the Workshop:
| Bench / Station | Function |
|---|---|
| Workbench | Craft basic gear (weapons, ammo, armor) |
| Gear Bench | Craft basic and advanced armor and augments |
| Gunsmith | Craft and upgrade weapons plus weapon modifications |
| Utility Station | Craft utility quick-use items (zip lines, tools, etc.) |
| Medical Lab | Craft healing items and shield rechargers |
| Refiner | Craft advanced materials from raw resources |
| Explosive Station | Craft grenades and explosive devices |
Each bench has its own upgrade path, meaning you’ll need to level them up individually based on what gear you prioritize. If you’re a combat-focused player, the Gunsmith is critical. If you prefer survivability, prioritize the Medical Lab and Gear Bench.
How To Upgrade Crafting Benches (Step-by-Step) in ARC Raiders
Now let’s get into the actual upgrade process. It’s the same for all benches, so once you understand it, you can apply it universally.
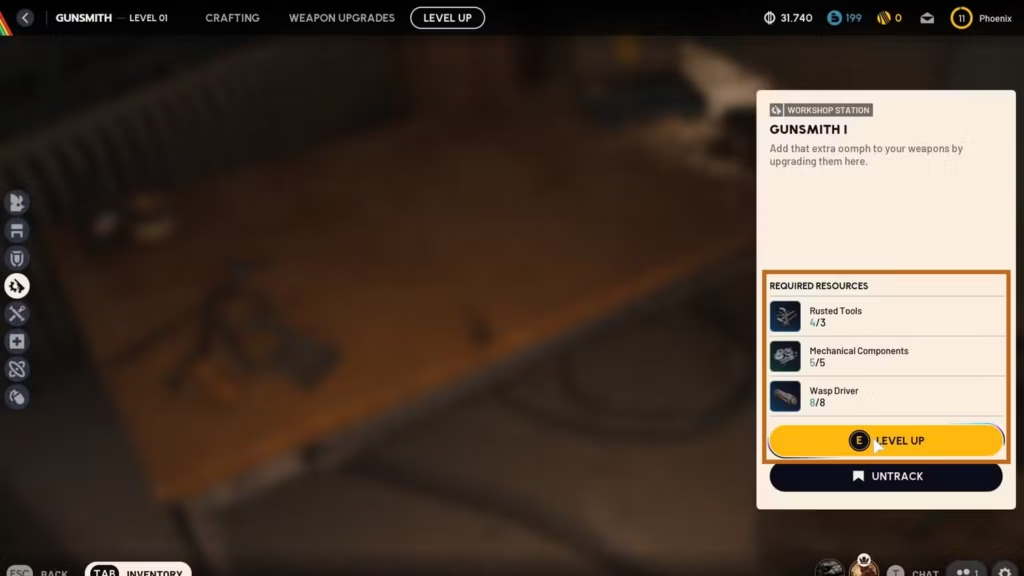
Step 1: Access the Level Up Tab
- Approach the crafting bench you want to upgrade in your Workshop
- Interact with it to open the crafting interface
- Look for the “Level Up” tab at the top of the screen
- Click on it to view upgrade requirements
This tab shows you exactly what resources you need to collect before you can upgrade the bench to the next level.
Step 2: Check Upgrade Requirements
Each bench level requires specific resources. Common requirements include:
Typical crafting materials:
- Metal Parts (common early-game material)
- Steel Spring (mid-tier mechanical component)
- Duct Tape (found everywhere, always useful)
- Advanced materials (from the Refiner or rare loot)
- Specific specialty items (depends on the bench)
The requirements get more demanding as you level up. Early upgrades might need 20-30 common materials, while higher tiers could require rare components from endgame activities.
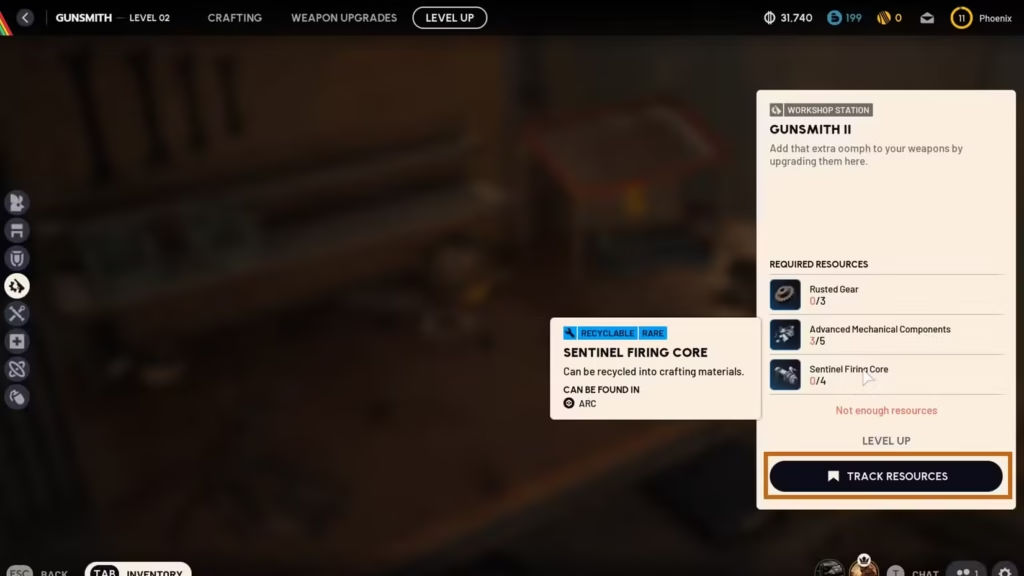
Step 3: Track Required Resources
Here’s a pro tip: you can track resource requirements directly from the Level Up tab.
How to track resources:
- In the Level Up tab, find the resources you need
- Click the track button next to each resource
- An eye icon will appear on these items during raids
- This visual marker helps you spot tracked materials in the field
This feature is a game-changer. Instead of randomly looting and hoping you find what you need, tracked items are highlighted, making resource farming exponentially more efficient.
Step 4: Farm the Required Materials
Time to hit Topside and gather resources. Here’s where understanding loot tags becomes critical.
Using item tooltips to find resources:
- Hover over any required item in the Level Up tab
- Read the tooltip at the bottom
- It will list tags indicating where to find that resource
- Match those tags to landmarks on your raid maps
Example: Finding specific resources
- Nature tag: Look for lemons, apricots, and organic materials in gardens and green zones
- Industrial tag: Metal parts, mechanical components in factories and complexes
- Military tag: Ammo, weapon parts, tactical gear in fortified areas
Always check location tags before deploying. When you’re selecting a drop zone, click on landmarks to see their tags underneath the description. If the landmark’s tag matches what you’re farming, that’s where you should go.
Step 5: Use Safe Pockets for Valuable Materials
If you’re farming rare upgrade materials, use your Safe Pockets to protect them. The last thing you want is to die with a full inventory of crafting materials you need for that critical Gunsmith upgrade.
Prioritize securing:
- Rare materials needed for higher-tier upgrades
- Hard-to-find specialty components
- Resources from dangerous areas (like Harvester event loot)
Step 6: Return and Upgrade
Once you’ve collected all required materials:
- Return to Speranza
- Head to the appropriate crafting bench
- Open the Level Up tab again
- Click the upgrade button
- Your bench levels up, unlocking new crafting recipes
Important: Make sure you have enough stash space to store all the materials you’re farming. Running out of inventory during a successful resource run is painful.
Which Benches Should You Upgrade First?
Not all benches are created equal, especially early in the game. Here’s a priority guide based on impact.
Priority 1: Workbench (Foundation)
Why upgrade first:
- Unlocks basic gear improvements across the board
- Required for general progression
- Affects multiple item categories
Upgrade the Workbench early to establish a solid foundation. You’ll need it at a decent level before other benches become truly useful.
Priority 2: Gunsmith (Combat Power)
Why upgrade second:
- Better weapons = easier raids
- Weapon modifications dramatically improve performance
- Combat is unavoidable, so weapon quality matters
If you’re struggling in firefights or against ARC machines, prioritize the Gunsmith. Better guns solve a lot of problems.
Priority 3: Medical Lab (Survivability)
Why upgrade third:
- Better healing items = more raid longevity
- Shield rechargers are essential for tough encounters
- Reduces reliance on found medical supplies
The Medical Lab is critical for pushing into more dangerous zones. If you’re constantly running out of healing, this should jump up in priority.
Priority 4: Gear Bench (Defense & Augments)
Why upgrade fourth:
- Advanced armor keeps you alive longer
- Augments provide powerful passive bonuses
- Better armor = more aggressive playstyle options
Armor and augments scale your overall effectiveness. Don’t sleep on this bench once you’ve got decent weapons and healing.
Priority 5: Utility Station & Explosive Station (Situational)
Why upgrade later:
- Less critical for basic survival
- Utility items are helpful but not essential early
- Grenades are nice-to-have, not must-have
These benches enhance your tactical options but aren’t make-or-break for progression. Upgrade them once your core gear is solid.
Priority 6: Refiner (Mid-to-Late Game)
Why upgrade last:
- Primarily used for crafting advanced materials
- Most useful once you’re pursuing high-tier gear
- Early-game materials are plentiful enough without refinement
The Refiner becomes crucial in late-game when you’re crafting legendary gear, but it’s not urgent early on.
Tips for Efficient Resource Farming
Combine Farming with Quests
Don’t make separate raids just to farm crafting materials. Combine resource farming with quest completion, coin farming, and other objectives. Multi-tasking saves time and maximizes efficiency.
Learn Landmark Tags
Memorize which landmark tags correspond to which resources. The more you understand the tag system, the less time you’ll waste searching blind.
Common tag-to-resource patterns:
- Nature: Organic materials, food, basic crafting items
- Industrial: Metal, mechanical parts, tools
- Military: Ammo, weapon components, tactical gear
- Residential: Medical supplies, common loot
Check Loot Tables After Updates
Resource spawn rates and locations can change with game updates. If you’re struggling to find specific materials, check community resources or the official website for spawn adjustments.
Use Tracked Items Feature
Seriously, always track the resources you need. That eye icon is a lifesaver during chaotic raids when you’re trying to loot efficiently under pressure.
Farm with Friends
Playing with a squad lets you cover more ground faster. Split up to search different areas, then share resources based on who needs what for their bench upgrades.
Blueprints vs. Bench Levels
Here’s something crucial to understand: finding a blueprint doesn’t automatically let you craft that item.
How Blueprints Work
- Blueprints unlock the recipe for an item
- You still need the appropriate bench at the required level
- If your bench isn’t high enough, you can’t craft it yet
Example scenario: You complete the Harvester event and get a legendary weapon blueprint. Awesome! But if your Gunsmith is only level 2 and the blueprint requires level 4, you’re stuck until you farm the materials to upgrade your Gunsmith twice.
Strategic takeaway: Prioritize upgrading benches for the blueprints you actually have. If you found a great weapon blueprint, push your Gunsmith up. If you got legendary armor blueprints, focus on the Gear Bench.
Additional Workshop Tips
Don’t Hoard Materials Endlessly
It’s tempting to save every crafting material “just in case,” but if you have enough to upgrade a bench, do it. Higher bench levels unlock better gear, which makes future farming easier. The sooner you upgrade, the sooner you benefit.
Sell Excess Materials for Coins
If you’re drowning in common materials you don’t need, sell them for coins. You can use those coins to buy rarer materials or even Raider Hatch Keys. Check our coin farming guide for the best money-making strategies.
Unlock Skills That Boost Crafting
Some skills may reduce crafting costs or improve resource gathering efficiency. Check the skill tree for any perks that synergize with your Workshop upgrades.
Check Security Lockers for Rare Materials
Security lockers often contain higher-tier crafting materials. If you’re farming for bench upgrades, always breach security areas when possible.
Final Thoughts
Upgrading your Workbench and other crafting stations is the core progression loop in ARC Raiders. Every bench level unlocks new possibilities, better gear, and more strategic options for tackling Topside’s challenges.
The key is understanding the system: track your resources, match tags to landmarks, prioritize the benches that directly improve your playstyle, and always extract safely with your farming hauls.
Yes, it takes time. Yes, you’ll need to run multiple raids to gather everything. But the payoff—crafting legendary gear, dominating raids, and consistently extracting with valuable loot—is absolutely worth it.
For more progression tips and survival strategies, check out our complete beginner’s guide or learn how to optimize your settings for the best performance.
You can download ARC Raiders on PlayStation, Xbox, or through the official website. Now get out there and build that ultimate Workshop!
Quick Reference:
- Upgrade location: Level Up tab in each crafting bench
- Track resources: Use eye icon to highlight materials during raids
- Match tags: Check item tooltips and landmark tags for efficient farming
- Priority order: Workbench → Gunsmith → Medical Lab → Gear Bench
- Key tip: Blueprints require minimum bench levels to craft