The Recon Class in Battlefield 6 isn’t just about long-range sniping—it’s about providing critical battlefield intelligence that turns the tide of battle. While everyone focuses on getting headshots with sniper rifles, smart Recon players understand that the Laser Designator gadget is often more valuable than any weapon in your loadout.
I’ll be honest: when I first unlocked this gadget, I had no idea what I was doing. I’d pull out what looked like binoculars, fumble with the controls, and wonder why I wasn’t just shooting enemies instead. Then I watched a coordinated squad annihilate three tanks in under a minute because their Recon player was painting targets like a tactical genius.
That’s when it clicked. The Laser Designator transforms you from a lone wolf sniper into the quarterback of vehicle destruction. Let’s break down exactly how this game-changing gadget works.
What Is the Laser Designator? (And Why You Should Care)
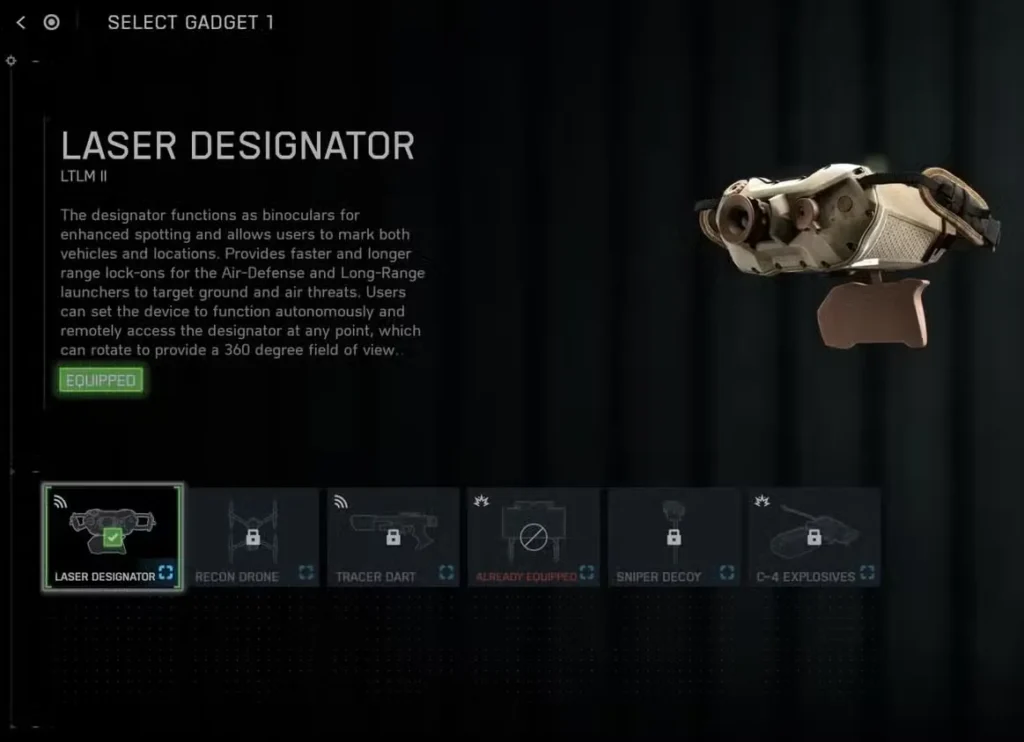
The Laser Designator is a starting gadget for the Recon class that serves two primary functions:
1. Advanced Reconnaissance Tool Think of it as high-tech binoculars with thermal vision, multiple zoom levels, and spotting capabilities that make enemy movements visible to your entire team.
2. Vehicle Target Painter This is where the magic happens. By “painting” enemy vehicles, you create a lock-on signature that allows teammates with launchers to track and destroy targets with devastating efficiency—even through smoke, terrain, and buildings.
When you’re working through Recon Class challenges, the Laser Designator often provides more assist points than actual kills. It’s the ultimate team player’s tool.
Pro Tip: While you can equip assault rifles or shotguns on Recon (thanks to open weapon playlists), sticking with sniper rifles from the complete weapons list maximizes synergy with your gadgets and Training Path bonuses.
Equipping the Laser Designator: Basic Controls
Before we get tactical, let’s cover the fundamentals.
How to Pull Out the Designator
- Controller: Press Left D-Pad
- Keyboard: Press “3” key
You’ll notice your character pulls out what looks like a targeting system. Don’t worry—it’s more powerful than it appears.
Once equipped, you have two operational modes:
- Manual handheld mode (immediate use)
- Autonomous tripod mode (deploy and forget)
We’ll cover both, but let’s start with manual operation since that’s what you’ll use in most situations.
Manual Mode: Using the Laser Designator Handheld
This is your active reconnaissance mode—perfect for mobile gameplay and dynamic battlefield situations.
Thermal Vision: Your Secret Weapon
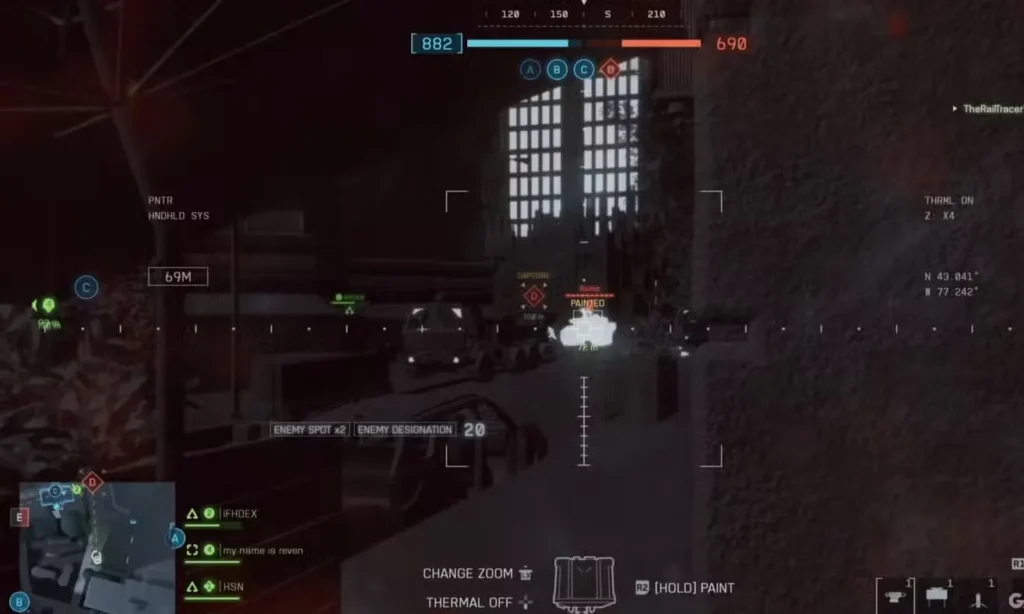
The moment you equip the Laser Designator, you’ll notice everything appears through thermal imaging. This is absolutely critical:
Why Thermal Vision Matters:
- Enemies and vehicles show up as bright heat signatures against cooler backgrounds
- Penetrates light foliage and atmospheric effects
- Makes spotting campers and hidden vehicles trivially easy
- Works exceptionally well on top-tier maps with dense urban environments
Can you toggle it off? Yes, but don’t. Seriously. The tactical advantage of thermal vision outweighs any aesthetic preference. When you’re grinding Deadeye challenges or providing overwatch, thermal vision is non-negotiable.
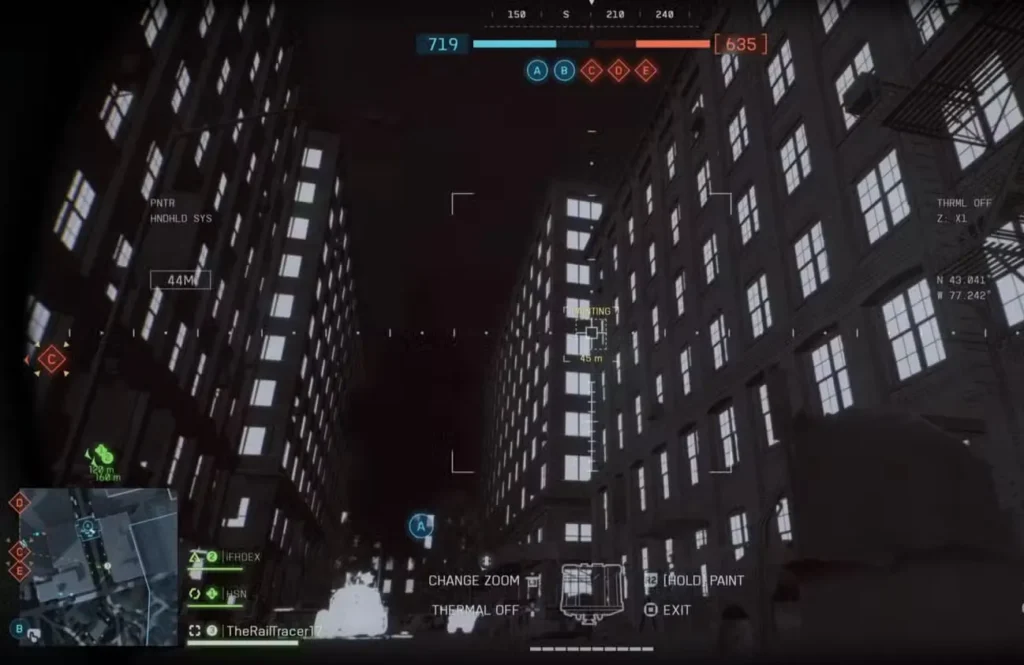
Zoom Levels: Getting Up Close
The Laser Designator offers three zoom levels for different engagement distances:
- Controller: Press L3 (click left stick)
- Keyboard: Press “F” key
Zoom Level Strategy:
- Level 1 (Low Zoom): Wide field of view for scanning multiple objectives
- Level 2 (Medium Zoom): Balanced for mid-range vehicle spotting
- Level 3 (High Zoom): Precision targeting for distant armor or aircraft
Cycle through these based on what you’re tracking. I typically keep it at Level 2 as my default since it balances detection range with situational awareness.
Painting Targets: The Money Shot
Now for the main event—actually designating targets.
How to Paint:
- Controller: Hold R2/RT
- Keyboard: Hold Left Mouse Button (LMB)
When you paint a target, you’re creating a persistent lock-on marker that appears for:
- All teammates with lock-on launchers
- Aircraft with guided missiles
- Your entire squad’s HUD
What Should You Paint?
Priority Targets (Always Paint These First):
- Enemy helicopters – Flying targets are hardest to hit without designation
- Main battle tanks – High-value targets that dominate objectives
- APCs and IFVs – Transport vehicles packed with enemy infantry
- Jets – If you can catch them, painted jets become easy prey for AA
Secondary Targets: 5. Stationary vehicles at capture points 6. Enemy turrets and automated defenses
Don’t Bother Painting:
- Infantry (use normal spotting instead)
- Already-destroyed vehicles
- Friendly vehicles (obviously, but mistakes happen)
How Long Does Paint Last?
The designation lasts as long as you maintain line-of-sight, plus a few seconds after breaking contact. This means:
- You need to stay exposed while painting
- Coordinate with teammates BEFORE painting
- Position yourself safely before designating
Getting eliminated mid-paint removes the marker, wasting your effort and your team’s opportunity.
Advanced Manual Tactics: Becoming a Designation Master
Communication is Everything
The Laser Designator’s effectiveness multiplies with communication:
Before Painting:
- “Tank at B flag, painting in 3 seconds”
- “Helicopter overhead, designating now”
- “Enemy armor convoy approaching—need launcher support”
Check the Battlefield 6 Reddit community for squad-finding if you’re tired of uncoordinated randoms. Organized squads leveraging proper designation can completely shut down vehicle-heavy strategies.
Positioning for Success
Your designation is only as good as your position:
Ideal Designator Positions:
- Elevated terrain with clear sightlines to objectives
- Building rooftops overlooking vehicle routes
- Behind friendly lines with escape routes planned
- Positions that let teammates fire from defilade (behind cover)
Avoid:
- Exposed flatland with no cover
- Forward positions where you’ll draw immediate fire
- Areas where your back is vulnerable
Remember: you’re more valuable keeping vehicles painted than getting one sniper kill. Prioritize survival over aggression.
Combining with Sniper Rifle Play
Here’s the workflow that separates good Recon players from great ones:
- Scan area with Laser Designator (thermal on)
- Identify high-value vehicle targets
- Paint target for team
- Switch to sniper rifle
- Eliminate infantry threats while designation is active
- Repeat
This rhythm keeps you productive on multiple fronts. When working on Support Class coordination, your designations enable their launcher play beautifully.
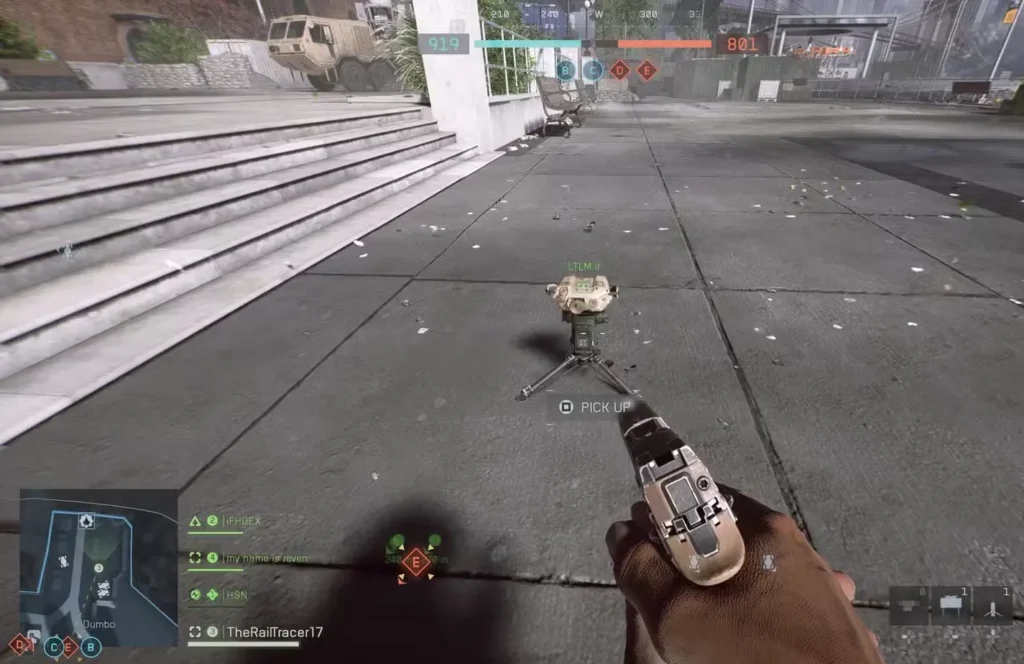
Tripod Mode: Autonomous Designation
This is where the Laser Designator evolves from tool to force multiplier.
How to Deploy the Tripod
While the Laser Designator is equipped:
- Controller: Press the designated deploy button (varies by control scheme)
- Keyboard: Press the deploy key (check your optimal settings)
Your character will place the Laser Designator on a tripod at your current location. This deployable then operates autonomously, automatically scanning and painting enemy vehicles within its field of view.
Critical Deployment Rules:
✅ Do:
- Place on elevated positions for maximum coverage
- Deploy overlooking choke points and vehicle routes
- Position near objectives that vehicles commonly attack
- Deploy with clear sightlines to multiple approach angles
❌ Don’t:
- Place in easily accessible ground-level positions (enemies will destroy it)
- Deploy where friendly vehicles will block its view
- Set up in areas where you can’t defend it if discovered
- Forget where you placed it (mark it mentally)
The Deploy-and-Forget Strategy
Here’s why tripod mode is borderline overpowered:
Once deployed, you can:
- Return to normal Recon sniping duties
- Capture objectives on foot
- Switch game modes and still contribute
- Rack up assist points passively
Meanwhile, your tripod is continuously painting every vehicle that enters its detection cone. Teammates with launchers don’t even need to ask—the targets just appear, pre-painted and ready for destruction.
Assist Point Fountain:
A well-placed tripod can generate hundreds of assist points per match while you’re doing other things. This is exceptional for XP farming and fast leveling.
Accessing Your Deployed Tripod
Even after deployment, you maintain control:
To Take Manual Control:
- Approach your deployed tripod
- Press the interaction button (varies by platform)
- You’ll enter the tripod’s POV, gaining manual zoom and painting control
- Press the same button to exit and return to normal play
Why Re-Access Your Tripod?
- Manually prioritize high-value targets the AI might miss
- Adjust focus to new vehicle approach vectors
- Provide precision painting for coordinated strikes
- Check if it’s still operational or has been destroyed
Tripod Survivability
Your tripod isn’t invincible. Enemy players can:
- Shoot and destroy it (takes damage like equipment)
- Explosive splash damage will eliminate it
- Counter-Recon players specifically hunt deployed gadgets
Maximizing Tripod Lifespan:
- Camouflage placement – Behind objects, not on bare rooftops
- Unconventional positions – Places enemies don’t typically check
- Defensive proximity – Near your squad so enemies can’t approach freely
- Backup deployment – Always be ready to replace destroyed tripods
Campaign Tutorial: Always Faithful Mission
If you’re struggling with the Laser Designator mechanics, the campaign missions actually provide excellent training.
The “Always Faithful” mission specifically teaches:
- Basic Laser Designator operation
- Vehicle painting fundamentals
- Tripod deployment in combat scenarios
- Coordinating with AI teammates using designations
My Recommendation:
Even if you’re a multiplayer-focused player, run through this campaign mission. It’s a low-pressure environment to practice the gadget mechanics before taking them into competitive matches. The muscle memory you develop here translates directly to multiplayer effectiveness.
Plus, the campaign genuinely provides good context for why the Recon class uses this equipment—it’s not just a random gadget, it’s a critical force multiplier for combined arms warfare.
Laser Designator Loadout Synergies
The Laser Designator doesn’t exist in a vacuum—your full loadout matters.
Best Weapon Pairings
1. Bolt-Action Sniper Rifles
- Pros: Maximum range for safe designation, high damage
- Cons: Slow fire rate leaves you vulnerable
- Best for: Long-range overwatch and defensive play
2. Semi-Auto Sniper Rifles
- Pros: Faster follow-up shots, better close-range defense
- Cons: Less one-shot-kill potential
- Best for: Aggressive Recon play and Close Quarters challenges
3. DMRs (Designated Marksman Rifles)
- Pros: Excellent versatility, can handle multiple threats
- Cons: Requires more precise aim at range
- Best for: Mid-range designation and objective play
Secondary Gadget Considerations
Your second gadget slot should complement your designation role:
Motion Sensors – Detect infantry while you focus on vehicles Spawn Beacon – Maintain forward positions for continuous designation Anti-Vehicle Mines – Doubles down on anti-armor role
Field Specs That Enhance Designation
Check the Field Specs guide for specifics, but prioritize:
- Improved gadget deployment speed
- Enhanced spotting duration
- Reduced equipment cooldowns
- Increased stealth for safer positioning
Common Laser Designator Mistakes
Mistake #1: Painting Everything
Don’t designate infantry or low-value targets. Your teammates’ launchers have limited ammo—save designations for vehicles that matter.
Mistake #2: Static Positioning
Counter-Recon players hunt stationary targets. Even with thermal vision, you need to relocate frequently. Check out Combat Roll mechanics for quick repositioning.
Mistake #3: Ignoring Tripod Placement
Throwing your tripod anywhere wastes its potential. Think about:
- Vehicle traffic patterns on each map
- Common attack routes
- Areas with natural cover for the tripod
Mistake #4: Solo Designation
The Laser Designator requires team coordination. If your squad has no launcher users, consider switching gadgets or joining a more balanced squad.
Mistake #5: Forgetting You’re Still Vulnerable
Thermal vision and zoom make you feel powerful, but you’re just as killable as always. Stay near cover and maintain escape routes.
Map-Specific Designation Strategies
Want to see how designation plays differently across environments? Our complete maps ranking guide breaks down each battlefield, but here are quick tips:
Urban Maps:
- Deploy tripods on rooftops overlooking main streets
- Use elevation to paint vehicles stuck in street-level traffic
- Watch for flanking armor through side alleys
Open Terrain Maps:
- Position on ridgelines with panoramic views
- Prioritize helicopter and jet designation
- Expect counter-sniper fire—move frequently
Mixed Environment Maps:
- Place tripods at transitional zones (where vehicles enter capture points)
- Paint vehicles as they cross between cover
- Coordinate with objective-focused teammates
Leveling Up Your Designation Game
Track Your Performance
Pay attention to:
- Vehicle Destroy Assists (your real KPI)
- Spot Assists (secondary metric)
- Gadget Assist score per minute
If these numbers aren’t increasing, reassess your positioning and target priority.
Learn Enemy Vehicle Patterns
After 10-15 matches on a map, you’ll recognize:
- Common vehicle spawn routes
- Preferred positioning for enemy armor
- Helicopter patrol patterns
- Vehicle escape routes when damaged
Use this knowledge to pre-position tripods and anticipate painting opportunities.
Coordinate Class Synergies
The Laser Designator shines when supporting:
- Assault Class players with launchers
- Engineers repairing friendly armor
- Support Class players with ammunition
Full squad coordination turns designation from helpful to game-breaking.
Frequently Asked Questions
A: Enemy players inside painted vehicles will see a “LASER DESIGNATED” warning, but the beam itself isn’t visible from afar like a sniper glint.
A: Only one active tripod at a time. Deploying a new one destroys your previous placement.
A: Technically yes for spotting purposes, but it provides no tactical advantage over normal spotting. Always prioritize vehicles.
A: Designation range is essentially limited by map size and your line of sight. If you can see it thermally, you can paint it.
A: No, the system only locks onto enemy vehicles.
The Designation Mindset: Playing for the Team
Here’s my final piece of advice: the Laser Designator represents a fundamental choice about how you want to play Recon.
You can chase personal glory with sniper montage clips, or you can become the intelligence backbone that enables your entire team’s success. The former feels satisfying momentarily; the latter wins matches consistently.
When you successfully paint a helicopter and watch three teammates simultaneously fire guided missiles that obliterate it before the pilot can react—that’s when you understand the power you wield. You’re not just supporting your team; you’re denying the enemy their most powerful assets.
The Laser Designator transforms Recon from a selfish class into a force multiplier. Master it, and you’ll find yourself on winning teams far more often, regardless of your personal K/D ratio.
Now get out there and light up the battlefield.
Essential Resources
- Official EA Battlefield 6 Page – Latest updates and patches
- Steam Community Hub – PC player discussions and strategies
- PlayStation Store – Console-specific information
- Battlefield 6 Subreddit – Community tactics and squad finding
- Epic Games Store – Alternative PC platform
Master the Laser Designator, and check out our complete collection of Battlefield 6 guides for class-specific challenges, weapon loadouts, and advanced tactics. Your team is counting on you, Recon.