So you’ve survived the absolutely horrifying Candy Factory (congrats on that, by the way), taken a convenient elevator ride, and arrived at the Carnevale area. Just when you think you might get a breather, Little Nightmares 3 throws its first major puzzle of Chapter 3 at you: the electrical box button puzzle.
This isn’t one of those puzzles you can brute-force your way through. You’ll need coordination between Low and Alone, careful observation, and precise timing. The good news? Once you understand the pattern, it’s actually pretty satisfying to solve.
Let me walk you through exactly how to restore power to Carnevale and get that central platform working.
Where You’ll Find This Puzzle
Location: Chapter 3 – Carnevale (opening sequence)
When: Immediately after exiting the elevator from the Candy Factory
What’s blocking you: The central rotary platform mechanism has no power
You’ll know you’re in the right place when you step onto an open platform and try to activate the central switch—only to find it completely dead. No dramatic sparks, no ominous sounds, just… nothing. That’s your cue that you need to find and restore the power source.
Step 1: Find the Power Room
From the central platform where that useless switch sits, turn right. You’ll see a doorway leading into what’s essentially the area’s electrical nerve center.
Inside the power room, you’ll find:
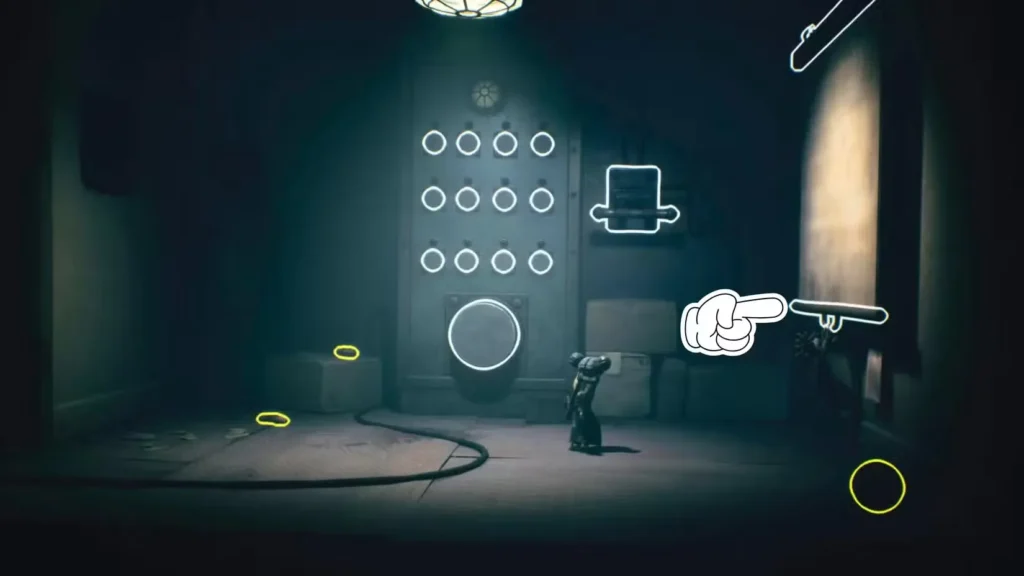
- A massive electrical box mounted on the wall
- A 12-button grid arranged in 4 columns and 3 rows
- A covered window/blind to the right side
- A large activation button in the center of the box
- A lever near the top right (you’ll need this later)
The setup might look intimidating at first glance, but the game actually gives you all the information you need—you just have to find it.
Step 2: Reveal the Secret Code
Here’s what many players miss on their first attempt: the solution is literally posted in the room with you.
What to do:
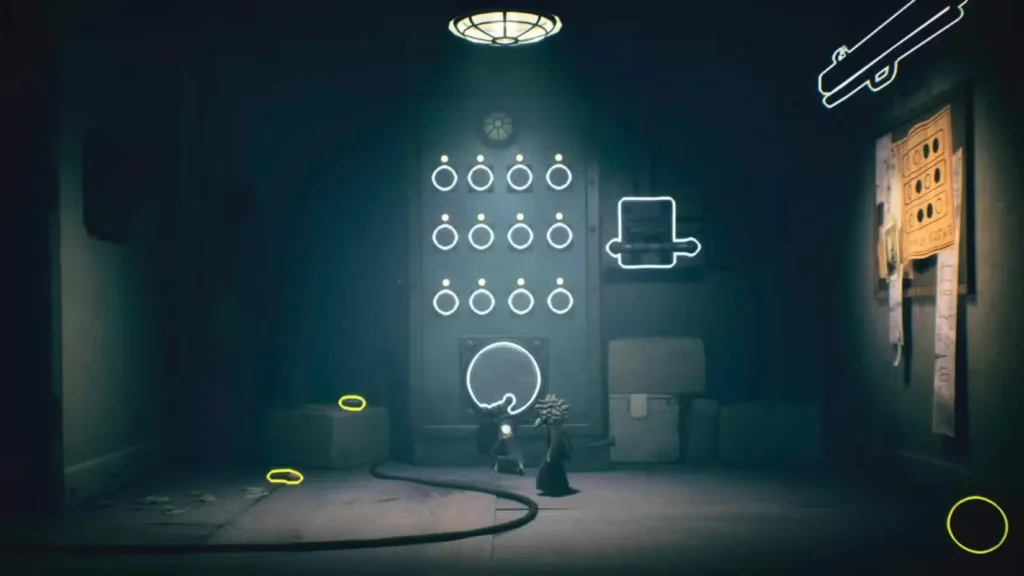
- Look to the right side of the electrical box
- You’ll see a pull-down blind/shade covering the wall
- Have either character grab the blind and pull it down
- Release it and let it snap back up (it retracts automatically)
- This reveals a poster showing the button pattern you need to follow
Pro tip: Take a moment to actually study this poster. Some players rush through, try to memorize it too quickly, and end up hitting the wrong buttons. The pattern isn’t complicated, but it is specific. You can even take a screenshot if you’re worried about forgetting.
Step 3: Activate the Button Sequence
Now that you know what pattern to follow, it’s time to actually input it.
How to start the puzzle:
- Switch to Alone (the character with the wrench)
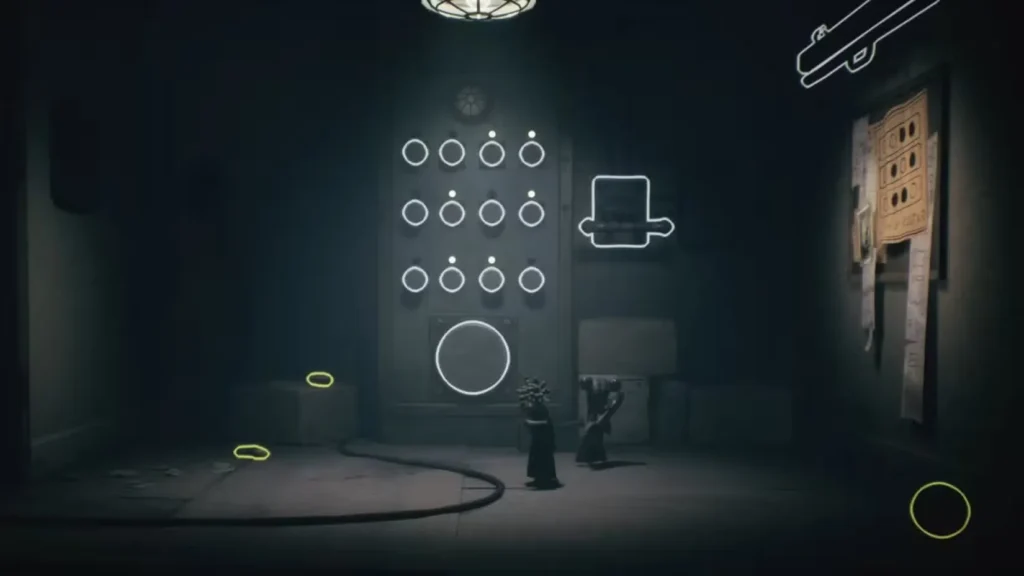
- Approach the large button in the center of the electrical box
- Hit it with the wrench to activate the sequence
- Watch as each button in the grid blinks once in succession
What happens next: Once activated, the buttons will light up briefly one at a time. This isn’t just for show—it helps you see which buttons are actually interactive and confirms the grid layout before you start shooting.
Now switch to Low (the character with the bow and arrow). Low’s ranged weapon is essential here because you need precision targeting on specific buttons.
Step 4: The Correct Button Sequence
Here’s where the puzzle actually gets solved. You need to shoot six specific buttons in the 4×3 grid, and they must be hit in a particular pattern based on the poster you revealed.
The exact solution:
Row 1 (Top Row):
- Shoot the 3rd button (third from left)
- Shoot the 4th button (fourth from left, rightmost button)
- In other words: the last two buttons in the top row
Row 2 (Middle Row):
- Shoot the 2nd button (second from left)
- Shoot the 4th button (fourth from left, rightmost button)
- Skip the 1st and 3rd buttons in this row
Row 3 (Bottom Row):
- Shoot the 2nd button (second from left)
- Shoot the 3rd button (third from left)
- In other words: the middle two buttons in the bottom row
Visual pattern if you’re a spatial thinker:
Row 1:  [ ] [ ] [X] [X]
Row 2:  [ ] [X] [ ] [X]
Row 3:  [ ] [X] [X] [ ]
Shooting tips:
- Low’s bow has auto-lock, so aim generally at the button and it should snap to target
- Take your time—there’s no rush or timer on this puzzle
- If you mess up, you can reset by hitting the center button again with Alone’s wrench
- The buttons make a satisfying electrical sound when hit correctly
Step 5: Pull the Power Lever
Once all six buttons have been successfully shot in the correct pattern, the electrical box will fully activate. But you’re not done yet—the power needs to be manually routed to the central platform.
What to do next:
- Look to the right side of the electrical box
- You’ll see a climbable box/crate positioned near the wall
- Both characters need to climb up onto this platform
- At the top, you’ll find a large lever switch
- Both Low and Alone must grab and pull the lever down together
- The lever requires both characters’ strength—solo players will need to position the AI correctly
What happens: When you successfully pull the lever, you’ll hear mechanical sounds and see electrical energy flowing. The power has now been restored to the central platform mechanism outside.
Step 6: Activate the Rotary Platform
Exit the power room and return to that central platform where this whole ordeal started.
Final steps:
- Approach the lever/switch on the central platform (the one that was dead before)
- Pull it down to activate the mechanism
- Watch as the central rotary contraption starts moving
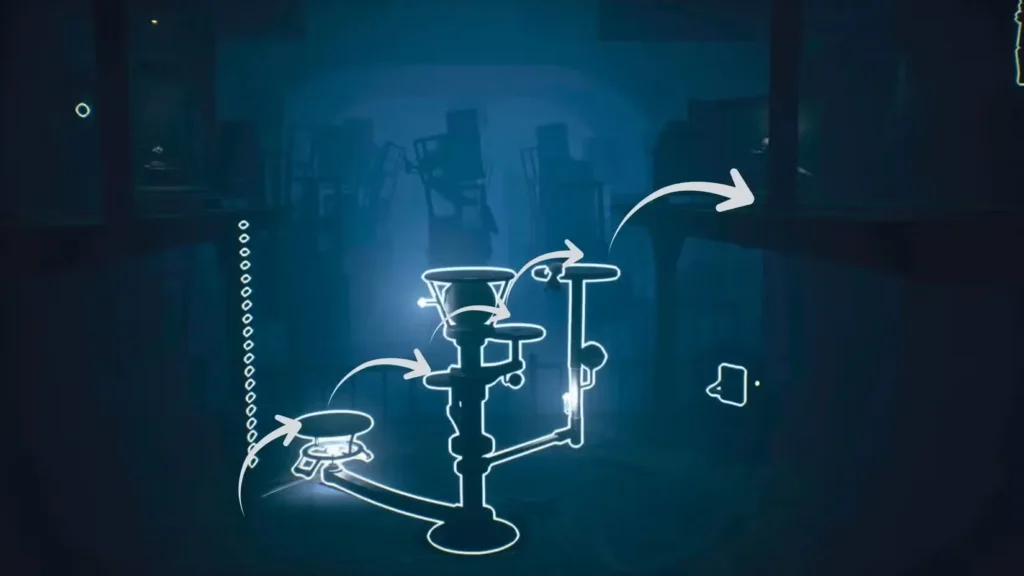
Understanding the rotary mechanism: This isn’t an elevator—it’s more like a circular carousel with small ring-shaped platforms attached. These platforms rotate around a central axis, and your goal is to use them as stepping stones to reach the upper sections of Carnevale.
How to use it:
- Wait for the platforms to rotate into position near where you’re standing
- Time your jumps onto the ring platforms as they pass by
- Ride the platform as it rotates around to higher positions
- Jump to the next platform or to a ledge when you’re at the right height
- Both characters need to make it up—coordinate in co-op, or trust your AI companion in solo
Platforming tip: Don’t rush this part. The mechanism moves at a steady, predictable pace. Wait for clear openings rather than making risky jumps. Little Nightmares has always been about patience and timing over speed.
Why This Puzzle Stumps Players
Having watched people struggle with this (and struggling myself initially), here are the common mistakes:
Common errors:
- Not finding the poster – Many players don’t realize they need to pull the blind to reveal the solution
- Memorizing wrong – The button pattern looks simpler than it is; players often mix up rows 2 and 3
- Forgetting the lever – Solving the button grid feels like completion, but the lever step is easy to overlook
- AI confusion in solo – Sometimes the AI doesn’t automatically help with the lever; reposition or restart if stuck
- Rushing the rotary platform – After solving the puzzle, players get impatient and fall during the climbing section
What makes it tricky: Unlike some puzzles where you can stumble onto the solution, this one demands precision. Six specific buttons out of twelve, in a pattern that isn’t immediately intuitive. Plus, the multi-step process (reveal code → input code → pull lever → use platform) means there are multiple points where players can get confused about what to do next.
Alternative Approaches (That Don’t Work)
For the sake of completeness, here’s what won’t solve this puzzle:
- ❌ Shooting all 12 buttons (seems logical, doesn’t work)
- ❌ Shooting buttons in numerical order (1-6, left to right)
- ❌ Random trial and error (you’ll be there forever)
- ❌ Shooting only the lit buttons after activation (they all light up briefly)
- ❌ Using Alone’s wrench on the buttons (they’re out of melee range)
The game wants you to find and follow the poster pattern—there’s really no way around it.
What Comes After
Once you’ve successfully climbed the rotary platform and reached the upper section, you’ll progress deeper into the Carnevale chapter.
Without spoiling too much: The area lives up to its creepy carnival aesthetic, and the puzzles only get more elaborate from here. The button puzzle is actually one of the more straightforward challenges in Chapter 3—consider it a warm-up for what Carnevale has in store.
Story context: The fact that the power was deliberately cut suggests someone (or something) doesn’t want visitors exploring the upper areas of Carnevale. Pay attention to environmental clues about what happened here and why this place feels so abandoned.
Co-Op vs Solo: Does It Matter?
Co-op experience:
- One player should focus on finding the poster while the other prepares at the electrical box
- Communication is key: “I’m hitting the center button, get ready to shoot”
- The lever section is smoother with two human players coordinating
- Rotary platform timing is easier to coordinate verbally
Solo experience:
- The AI companion is actually quite competent for this puzzle
- You’ll need to do all the shooting as Low yourself
- AI usually helps with the lever automatically, but sometimes needs repositioning
- Rotary platform section works fine with AI following you
Verdict: This is one of the few puzzles that doesn’t significantly favor co-op. It’s perfectly manageable solo.
Quick Walkthrough Checklist
If you just need a rapid-fire reminder:
✓ Exit elevator, go right to power room
✓ Pull the blind on right wall to reveal poster
✓ Hit center button with Alone’s wrench
✓ Switch to Low and shoot 6 buttons:
- Row 1: buttons 3, 4
- Row 2: buttons 2, 4
- Row 3: buttons 2, 3
✓ Climb box on right with both characters
✓ Pull lever together
✓ Return to central platform
✓ Activate rotary mechanism
✓ Carefully climb rotating platforms to upper area
Final Thoughts
The Carnevale button puzzle is Little Nightmares 3’s way of easing you into Chapter 3’s more complex challenges. It tests whether you’re paying attention to environmental clues (the poster), can execute precise actions (the button sequence), and understand cooperative mechanics (the lever).
What I appreciate about this puzzle: It respects your intelligence. The solution is right there in the room—the game doesn’t hide it behind obscure clues or require you to backtrack across multiple areas. It’s a fair puzzle that rewards observation and careful execution.
What could be better: The button grid could be slightly clearer visually. In some lighting conditions, it’s hard to tell exactly which button you’re targeting with Low’s bow, especially for buttons in the middle columns.
But overall? It’s a solid puzzle that feels rewarding to solve without being frustratingly obtuse. And honestly, after the Candy Factory’s horrors, a logic puzzle feels like a welcome change of pace before Carnevale reveals its own nightmares.
Now get back in there and get that power flowing. The upper levels of Carnevale are waiting—and trust me, whatever’s up there has been waiting for you too.
Official Game Resources
Need more help with Little Nightmares 3? Check the official sources:
- Official Website: Bandai Namco Little Nightmares III
- Steam (PC): Little Nightmares III on Steam
- PlayStation: Little Nightmares 3 on PlayStation Store
- Xbox: Little Nightmares III on Xbox Store
Puzzle solved? ✓
Power restored? ✓
Ready for what’s next in Carnevale? …we’ll see about that.
Also Check: How to Play Little Nightmares 3 With Friends: Complete Co-Op Guide