You’ve just survived a genuinely unsettling gauntlet of monster puppets in the carnival tents (those things are nightmare fuel), and now Low and Alone stumble into what looks like a safe haven: an abandoned house. Naturally, in Little Nightmares 3, “safe” is relative.
At the center of this dusty, lifeless building sits an old radio—completely dead, no power, no sound. Your mission: restore power to this radio and find a way out. What follows is one of Chapter 3’s most involved multi-step puzzles, requiring exploration, precise shooting, coordination, and careful timing.
Let me break down exactly how to solve the Radio puzzle in Carnevale and escape this creepy house.
Where You’ll Encounter This Puzzle
Location: Chapter 3 – Carnevale (mid-chapter)
When: After escaping the monster puppet chase sequence in the carnival tents
Setting: An abandoned two-story house with a central radio
Objective: Power the radio, tune the frequency, and reveal the hidden exit
You’ll know you’re in the right spot when you enter a seemingly empty building with a prominent vintage radio sitting in the center of the main room. The atmosphere shifts from chaotic carnival horror to eerie, silent abandonment—which, honestly, might be even creepier.
Understanding What You’re Trying to Accomplish
Before diving into the steps, it helps to understand the puzzle’s logic:
The big picture:
- The house has no power
- Power requires a functional fuse in the electrical system
- The fuse is hidden elsewhere in the house
- Once powered, the radio must be tuned to a specific frequency
- The correct frequency triggers a hidden mechanism that reveals your escape route
Why this puzzle feels complex: Unlike the button puzzle earlier in Carnevale, this one requires navigating multiple rooms, underground passages, and vertical spaces. It’s less about memorizing a pattern and more about understanding the house’s layout and how its systems connect.
Step 1: Find the Underground Passage
Start by examining the room with the dead radio. Look at the floor directly in front of it.
What to look for:
- A hatch on the ground positioned right in front of the radio
- It’s easy to miss if you’re focused on the radio itself
- The hatch is your entry point to the house’s underground tunnel system
What to do:
- Open the hatch (either character can do this)
- Drop down into the underground passage
- Follow the tunnel as it curves and extends beneath the house
- Exit through the opening on the right side
What you’ll find at the exit: You’ll emerge in a different section of the house, next to an empty fuse box mounted on the wall. This is where the fuse needs to go—but you don’t have it yet.
Important detail: Make a mental note of this fuse box location. You’ll be coming back here soon with the missing piece.
Step 2: Climb to the Upper Section
From the fuse box area, look around for vertical options.
Navigation:
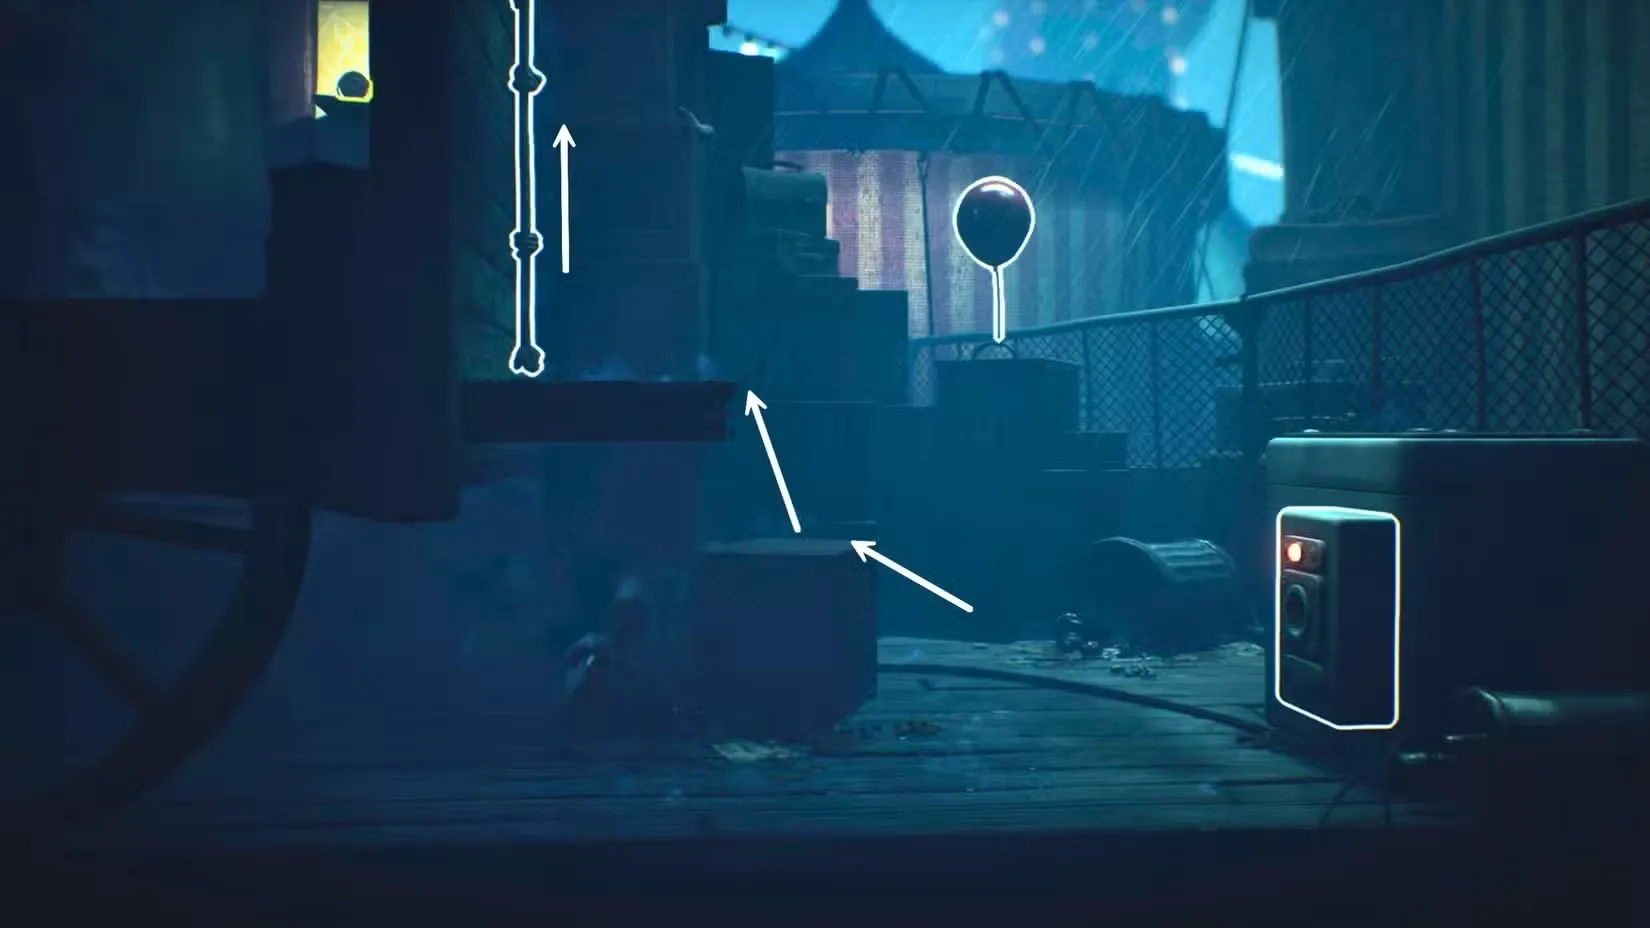
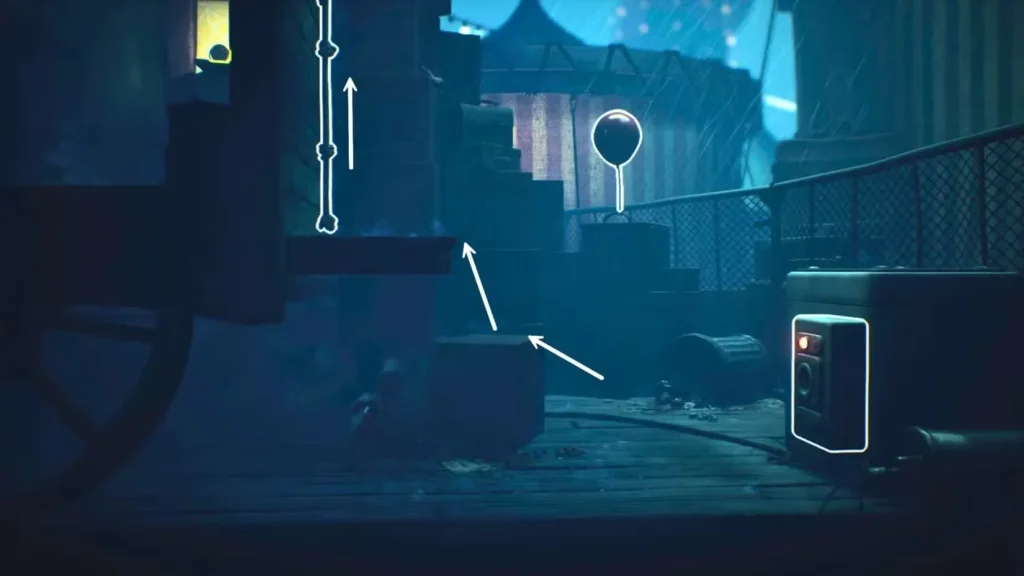
- Near the fuse box, you’ll spot a climbable box or crate
- Use it to reach the higher platform above
- Once up, look for a hanging rope
- Grab and swing on the rope to reach across to the second section of the abandoned house
Environmental note: This is a classic Little Nightmares traversal puzzle. The game is teaching you to look up and around for climbing opportunities, not just forward. The rope swing isn’t immediately obvious, so scan the upper areas carefully.
Step 3: Locate and Retrieve the Fuse
Now you’re in the interior section of the house where the fuse is hidden.
Finding the fuse:
- Look for a shelf mounted on the wall
- You’ll spot the fuse sitting on top of this shelf
- It’s out of reach—you can’t simply grab it
Getting the fuse down:
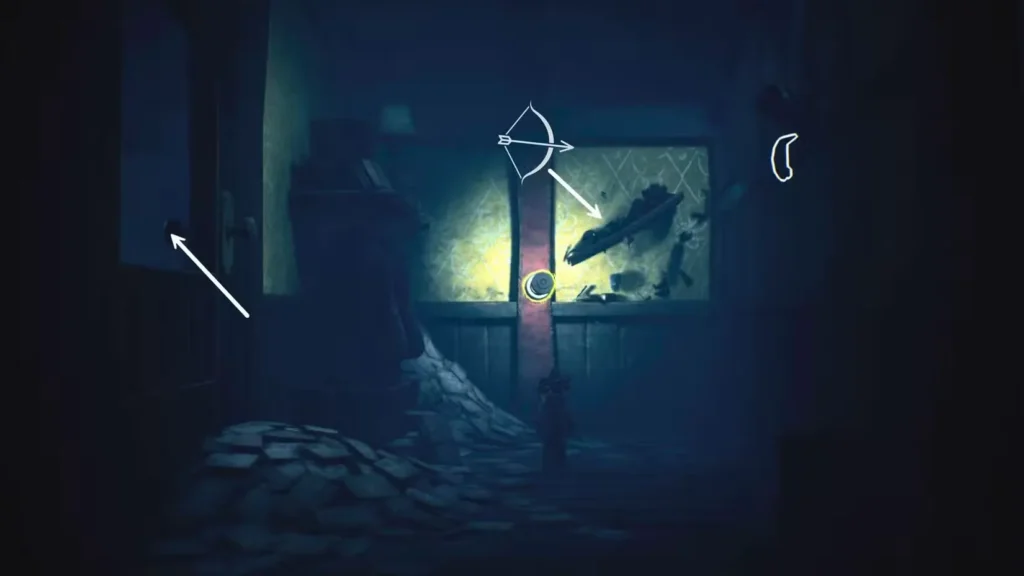
- Switch to Low (you need the bow for this)
- Aim at the shelf supporting the fuse
- Shoot the shelf multiple times with arrows
- The shelf is destructible—keep hitting it
- After several shots, the shelf will crumble and collapse
- The fuse falls to the ground
How many shots does it take? Usually 3-4 direct hits will do it. Low’s auto-lock helps here, but make sure you’re actually targeting the shelf structure, not just the wall.
Pro tip: You’ll hear cracking sounds as the shelf weakens. Keep shooting until you see the collapse animation and the fuse drops.
Step 4: Transport the Fuse (The Tricky Part)
Here’s where the puzzle gets spatial and requires some creative thinking.
The problem: You’re in an interior section separated from the fuse box by a locked or inaccessible door. You can’t carry the fuse through the normal way.
The solution:
- Pick up the fuse (either character can carry it)
- Look to your left and find a door with broken glass panels
- Throw the fuse through the broken glass to the other side
- This tosses it into the area where you need it
Why this works: The broken glass creates a pass-through that items can fit through, even if characters can’t. It’s environmental problem-solving that Little Nightmares does so well.
Next steps:
- After throwing the fuse, climb through the same broken door yourself
- You’ll likely use a different path or opening to get through
- Pick the fuse back up from where it landed on the other side
Step 5: Install the Fuse
Now that you have the fuse and you’re in the correct area, it’s time to restore power.
What to do:
- Head back to the underground tunnel via the hatch
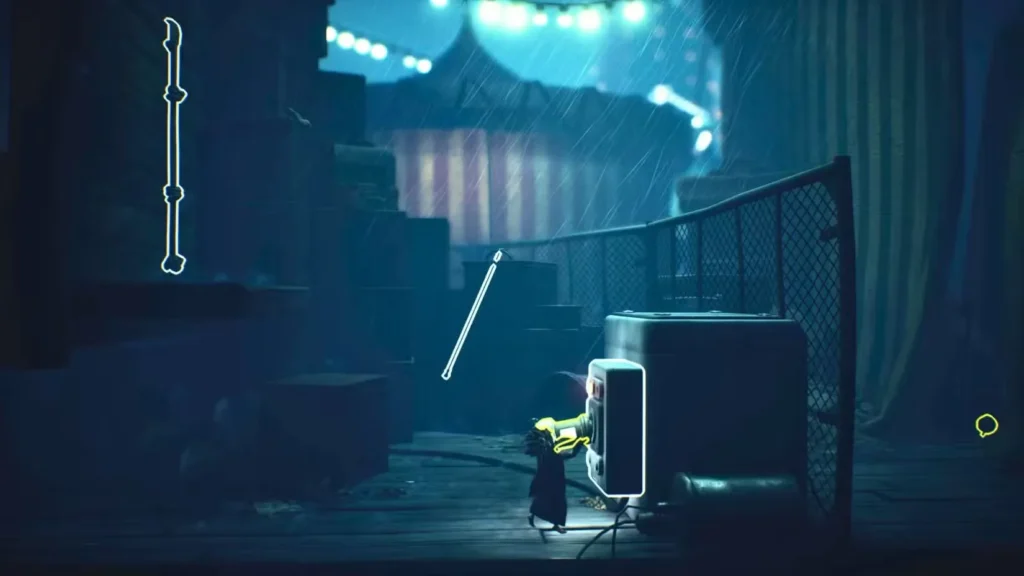
- Navigate through the passage again to the fuse box area (where you first emerged)
- Insert the fuse into the electrical box mounted on the wall
- You’ll see and hear electrical power flowing through the house
Visual feedback: The lights might flicker, you’ll hear humming sounds, and the general atmosphere of the house shifts slightly. Power has been restored.
Next step:
- Return to the main room where the radio is
- Use the same underground passage or backtrack through the house
- The radio should now be visibly powered—you might see lights or hear static
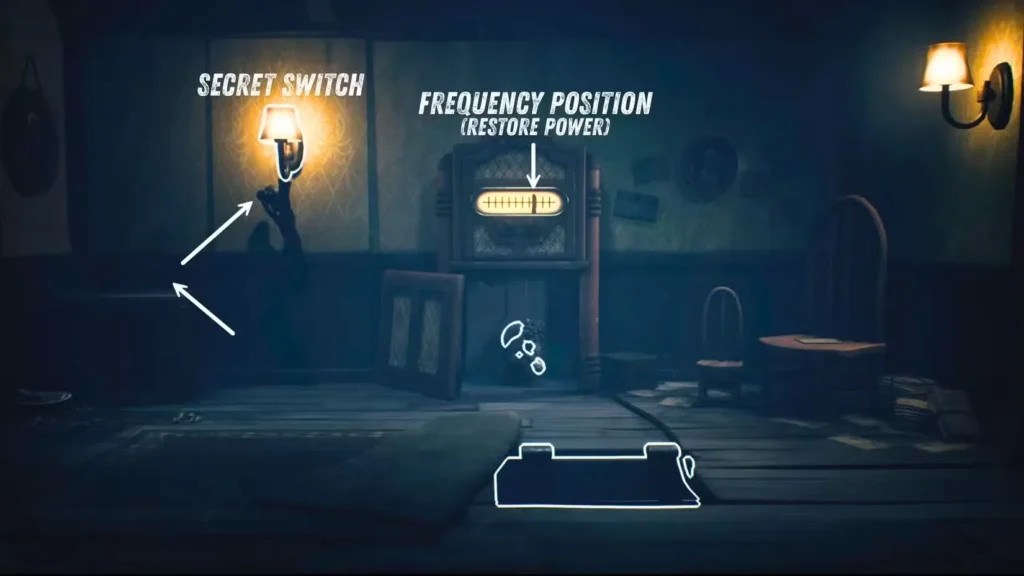
Step 6: Tune the Radio to the Correct Frequency
This is where the puzzle’s namesake mechanic comes into play.
Understanding the radio:
- There’s a crank/dial underneath the radio that controls the frequency
- A needle/indicator shows the current frequency on the radio’s display
- You need to tune it to a specific frequency to trigger the next event
How to tune correctly:
- Approach the radio and interact with the crank
- Turn the crank slowly to shift the needle
- The needle moves towards the right as you turn
- Watch for visual or audio cues indicating the correct position
- Stop when the needle reaches the proper frequency
What’s the “right” frequency? The game gives visual/audio feedback when you’re close:
- The radio static clears up slightly
- The needle visibly aligns with a marked position on the dial
- You might hear a clearer signal or tone
Visual reference: Look for a specific marking or zone on the radio’s frequency display. When the needle sits within this zone, you’ve found the correct frequency.
Important: Don’t let go of the crank yet! This is a two-person puzzle, and you’re only halfway done.
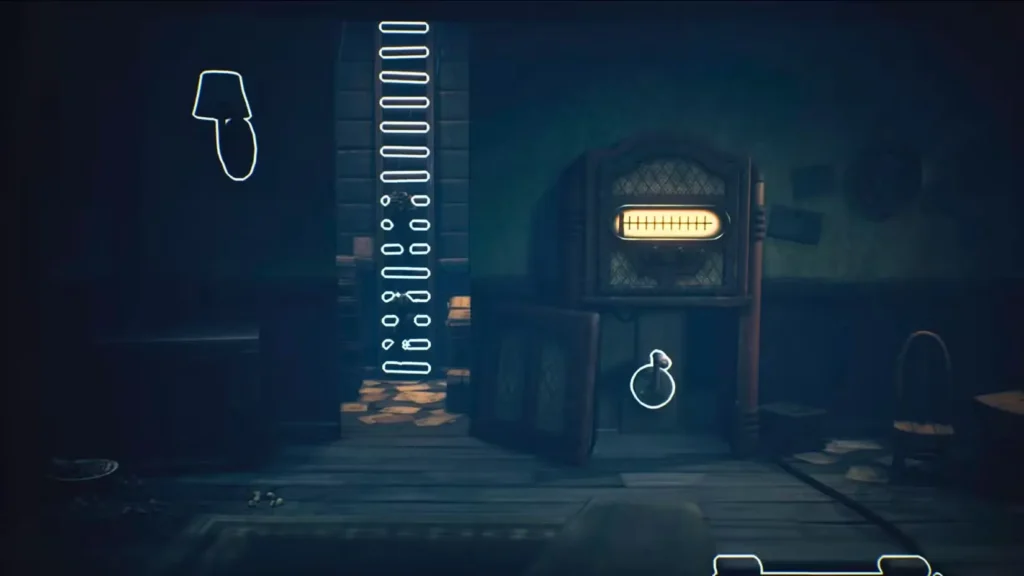
Step 7: Activate the Light Fixture Mechanism (Requires Both Players)
Here’s where cooperation becomes essential—and where solo players need to understand the AI behavior.
What happens with the radio tuned: Power is now flowing through the house’s electrical system, but the exit remains hidden. You need to trigger a secondary mechanism.
The mechanism:
- While one player holds the radio crank at the correct frequency (keeping it tuned)
- The second player moves to the left side of the room
- Look for a climbable box positioned near the wall
- Use this box to reach higher
- Jump and grab the light fixture hanging from the ceiling
What happens when you grab the light fixture:
- The fixture lowers slightly under the character’s weight
- This weight-activated trigger reveals a hidden compartment in the wall
- A ladder becomes accessible that was previously concealed
- This is your escape route
Coordination required:
- Player 1 must maintain the radio frequency (keep holding/cranking)
- Player 2 must climb, jump, and grab the fixture at the same time
- Both actions must happen simultaneously for the mechanism to work
Solo player tip: The AI companion is usually smart enough to handle one role while you do the other. If you’re having trouble, try being the one who grabs the light fixture while the AI holds the radio crank.
Step 8: Escape Through the Hidden Ladder
Once the mechanism activates and the wall compartment opens:
Final steps:
- Both players can now release their positions (let go of the crank and fixture)
- The hidden ladder remains accessible even after release
- Both characters climb the newly revealed ladder
- This leads to an upper area or exit passage
- Continue forward to progress beyond the abandoned house
Congratulations! You’ve solved the Radio puzzle and escaped the house. Chapter 3 continues with whatever fresh horrors Carnevale has waiting.
Why This Puzzle Trips Players Up
Having seen multiple people struggle here (myself included on the first attempt), here are the common stumbling blocks:
Common Mistakes:
1. Missing the underground hatch
- It’s right in front of the radio but easy to overlook
- Players waste time searching other areas first
- Solution: Always check the floor in puzzle rooms
2. Not shooting the shelf enough
- Players fire 1-2 arrows and assume it’s unbreakable
- The shelf requires persistent shooting
- Solution: Keep firing until you see the collapse animation
3. Not throwing the fuse through the glass
- Some players try to carry it through doors or tunnels
- The broken glass pass-through is the intended method
- Solution: Look for environmental shortcuts like broken windows
4. Letting go of the radio crank too early
- Players think tuning the radio completes the puzzle
- The crank must be held while the fixture is activated
- Solution: Communication in co-op, or trust the AI in solo
5. Wrong radio frequency
- Players don’t tune carefully and pick the wrong position
- The needle needs to align with a specific zone
- Solution: Listen for audio cues and watch for visual alignment markers
6. Not understanding the light fixture mechanic
- Some players don’t realize the fixture is interactive
- Others don’t connect it to the radio crank timing
- Solution: Look for anything hanging or movable in puzzle rooms
Co-Op vs Solo: Does It Change?
Co-op experience:
- Division of labor makes this puzzle smoother
- One player can focus on fuse retrieval while the other scouts
- The radio/fixture coordination is easier with voice communication
- “I’ve got the crank, go grab the light!” flows naturally
Solo experience:
- AI companion is reliable for this puzzle
- The game usually auto-assigns the AI to the simpler task (holding crank)
- You’ll likely do the platforming/fixture-grabbing yourself
- Occasionally the AI needs repositioning if it gets confused
Verdict: This puzzle is designed well for both modes. The AI handles its role competently, and the puzzle’s logic remains clear whether you’re coordinating with a human or trusting the computer.
Environmental Storytelling: What This House Reveals
While you’re solving the puzzle, take a moment to appreciate what the environment is telling you:
Questions the house raises:
- Why is this building abandoned in the middle of Carnevale?
- Who installed this elaborate radio mechanism?
- What was the original purpose of the hidden ladder?
- Why is the power system connected to a radio frequency?
Theory: This feels less like a home and more like a control station or safe house. The radio frequency mechanism suggests someone needed a hidden, secure way to access certain areas of Carnevale. Perhaps this was used by carnival workers—or by people trying to escape from something worse.
The layer of dust and decay suggests this system hasn’t been used in a long time. Whatever purpose this building once served, it’s been abandoned for reasons that probably aren’t comforting.
Quick Solution Checklist
Need a rapid-fire refresher? Here’s the condensed version:
✓ Enter hatch in front of radio, follow tunnel to fuse box
✓ Climb box near fuse box, use rope to reach interior section
✓ Find shelf with fuse, shoot it repeatedly with Low’s bow until it breaks
✓ Pick up fallen fuse, throw through broken glass door
✓ Climb through door, retrieve fuse from other side
✓ Return through tunnel, insert fuse into electrical box
✓ Go back to radio room, turn crank to tune frequency (needle to the right)
✓ While holding frequency, second player climbs box and grabs light fixture
✓ Hidden ladder reveals in wall compartment
✓ Both players climb ladder to escape
What Comes Next
After escaping the abandoned house, Chapter 3 continues deeper into Carnevale’s disturbing carnival landscape.
Without spoilers: The radio puzzle is actually one of the calmer, more methodical challenges in this chapter. The pacing shifts back to more intense, chase-oriented sequences shortly after. Enjoy the brief moment of logical problem-solving while it lasts.
Narrative significance: The hidden passages and elaborate mechanisms suggest Carnevale holds many secrets beneath its festive surface. Pay attention to similar environmental clues as you progress—this world is full of hidden layers.
My Take on This Puzzle
The Radio puzzle showcases what Little Nightmares 3 does best: environmental puzzles that feel organic to the world rather than gamey obstacles.
What works:
- The progression feels natural—you’re exploring a house and discovering its systems
- Each step teaches you something about the environment
- The cooperation elements (crank + fixture) create genuine teamwork moments
- The solution is logical without being obvious
What could be clearer:
- The throw-through-glass step isn’t immediately intuitive
- Some players miss the underground hatch entirely on first pass
- The exact “correct” radio frequency could use slightly better feedback
Overall, it’s a well-designed puzzle that rewards exploration and observation. It’s challenging without being frustrating, and it maintains that signature Little Nightmares atmosphere throughout.
Now get that radio tuned and get out of that house. Carnevale has plenty more nightmares waiting outside.
Official Game Resources
For more help with Little Nightmares 3:
- Official Website: Bandai Namco Little Nightmares III
- Steam (PC): Little Nightmares III on Steam
- PlayStation: Little Nightmares 3 on PlayStation Store
- Xbox: Little Nightmares III on Xbox Store
Puzzle checklist:
✓ Fuse found
✓ Power restored
✓ Radio tuned
✓ Hidden ladder revealed
✓ House escaped
✓ Ready for whatever’s next in Carnevale (probably not ready, but let’s pretend)
Also Check: How to Play Little Nightmares 3 With Friends: Complete Co-Op Guide


