TL;DR: Forest Temple Walkthrough
- The Forest Temple is Adult Link’s first major dungeon in Ocarina of Time Remake.
- You need the Hookshot and Song of Time to access the temple and its hidden passages.
- Find all five Small Keys, collect the Dungeon Map and Compass, and obtain the Fairy Bow.
- Defeat the four Poe Sisters: Joelle, Beth, Amy, and Meg, to restore the four flames.
- Solve the rotating basement puzzle, open the Boss Door, and defeat Phantom Ganon to obtain the Forest Medallion.
The Forest Temple is the first major dungeon Link explores after becoming an adult. Located inside the Sacred Forest Meadow, this dungeon is filled with locked doors, twisted corridors, hidden passages, and ghostly enemies. You also need to defeat four Poe Sisters before you can reach its final boss.
This Ocarina of Time Remake Forest Temple walkthrough explains the complete dungeon route, including all five Small Keys, the Fairy Bow, the Boss Key, the Poe Sister fights, and the Phantom Ganon boss battle. It also covers the important changes in the Nintendo Switch 2 version so you don’t have to rely on the original Nintendo 64 walkthrough.
What You Need Before Entering the Forest Temple
Before heading to the Forest Temple, make sure you have the necessary equipment and songs. You cannot reach some of the dungeon’s platforms and hidden passages without them.
- Hookshot: Required to reach the temple entrance and travel between distant platforms.
- Song of Time: Used to move the blue Time Block and open a blocked passage.
- Minuet of Forest: Lets you return to the Sacred Forest Meadow quickly.
- Master Sword: Your main weapon for fighting Stalfos, Floormasters, and Phantom Ganon.
- Fairy Bow: You will find this important weapon inside the Forest Temple.
You can obtain the Hookshot by completing Dampé’s graveyard challenge in Kakariko Village. After getting it, travel through the Lost Woods and reach the Sacred Forest Meadow. Play Saria’s Song when Mido blocks your path, then make your way through the Moblin guards.
At the Sacred Forest Meadow, Sheik teaches you the Minuet of Forest. Once the route is clear, use your Hookshot on the target above the temple entrance to reach the doorway.
For the complete route leading to this area, check our Ocarina of Time Remake Forest Temple Mysteries, Graveyard, and Sacred Grove Walkthrough.
Ocarina of Time Remake Forest Temple Walkthrough
1. Enter the Forest Temple and Find the First Small Key

After reaching the entrance, you will find yourself in a large outdoor chamber. Two Wolfos will appear and attack Link. You can defeat them with your sword or move past them and focus on reaching the upper section.
Look towards the right side of the room to find vines covering the wall. Climb them to reach the upper branches. There is a Gold Skulltula near the top, so use your Hookshot to collect its token.
Continue across the branches until you reach a small chest. Open it to collect your first Small Key.

Drop back down and use the key to unlock the main entrance door. Move through the corridor, watching for the Skulltula that drops from above, and enter the central chamber.
2. Explore the Main Hall and Defeat the First Stalfos

The central hall is the main hub of the Forest Temple. You will notice four coloured torches around the room. Before you can use the central elevator, you need to restore all four flames.
The four Poe Sisters appear briefly before disappearing with the flames. Your objective is to find and defeat them throughout the dungeon.
For now, head towards the northern door. Look around the central chamber for another Gold Skulltula on the wall. Use the Hookshot to collect it before continuing.
Follow the corridor and deal with the Blue Bubble. You can use your Hookshot to stop it before moving forward.

Enter the next room to face two Stalfos. These enemies carry shields, so attacking them directly from the front will not always work.
- Keep your shield ready when a Stalfos approaches.
- Wait for it to finish its attack before striking.
- Use jump attacks when you get a clear opening.
- Keep an eye on the second Stalfos so it cannot attack while you are focused on the first.
Defeat both enemies to make a chest appear. Open it to obtain your second Small Key.
3. Open the Time Block Door and Drain the Well

Return to the central hall and look towards the northwestern section. You will find a blue Time Block blocking another passage.
Stand near the block and play the Song of Time. The block will move, revealing the entrance to an overgrown courtyard.
Enter the area and defeat the Deku Baba. You will also find several Skullwalltulas on a nearby vine-covered wall. Use your Hookshot to remove them before climbing.
Reach the upper balcony and look across the gap. Use your Hookshot on the target on the opposite wall to reach another platform.
Continue through the area until you find a floor switch. Step on it to lower the water level inside the well.
Now drop down into the well and follow the passage underneath. Swim through the remaining water and reach the tunnel at the other end. You will find a chest containing your third Small Key.
Use the ladder to climb out. Continue towards the neighbouring courtyard and look for a large chest on an elevated platform. Use your Hookshot to reach it and collect the Dungeon Map.
The map is useful for understanding the different floors and checking which sections you have already explored. Use the nearby door and floor switch to return to the central hall.
4. Solve the Large Block Puzzle
Back in the central hall, look towards the western door. It requires a Small Key, so use one of your remaining keys to enter.
Inside, you will find a large room with ladders, stone blocks, and a Wallmaster waiting above. When you see a shadow or spotlight appear underneath Link, keep moving. The Wallmaster is preparing to drop down from the ceiling.
Attack it once it lands, then start working on the block puzzle.
Look at the triangular markings on the floor. These markings show the direction in which you need to move the blocks.
Follow these steps:
- Climb the first ladder and locate the large stone block.
- Pull the block backwards to create enough space to move around it.
- Get behind the block and push it along the direction shown by the floor markings.
- Continue pushing until it reaches the recessed section.
- Climb the nearby ladder and locate the second block.
- Move the second block forward until it reaches its stopping point.
- Return to the previous level, climb onto the first block, and push the second block into its final position.
Both blocks will now form a path to the upper floors. Climb the ladders and defeat the two Blue Bubbles in the next chamber.
Look for a floor switch on the western side of this room. Activate it to open a new elevator. This is a useful shortcut added to the Switch 2 remake, as you can return to the upper floor without repeating the entire block puzzle.
Before moving forward, make sure you have enough Small Keys for the remaining locked doors.
5. Find the Fairy Bow in the Stalfos Arena
After completing the block puzzle, continue through the upper locked door. You will enter a twisted corridor where the room appears to be tilted sideways.
Move through the corridor and use the jump to reach the passage on the right. Follow the stairs down until you reach another combat room.

This room is different from the original Nintendo 64 version. The Switch 2 remake features a pool of acid in the middle instead of the traditional pit.
You will need to defeat three Stalfos to unlock the reward chest. The first Stalfos appears by itself, but two more enemies join the fight after you defeat it.
Be careful not to fall into the acid. Fighting too close to the edge can make this encounter harder than it needs to be.
Defeat all three Stalfos to make a large chest appear. Open it to obtain the Fairy Bow.
This is the most important item in the dungeon. You will need it to shoot the Poe Sisters’ paintings, activate eye switches, and solve several puzzles before reaching Phantom Ganon.
After collecting the bow, look above the return doorway and shoot the eye switch to open the way back.
6. Defeat Joelle, the Red Poe Sister
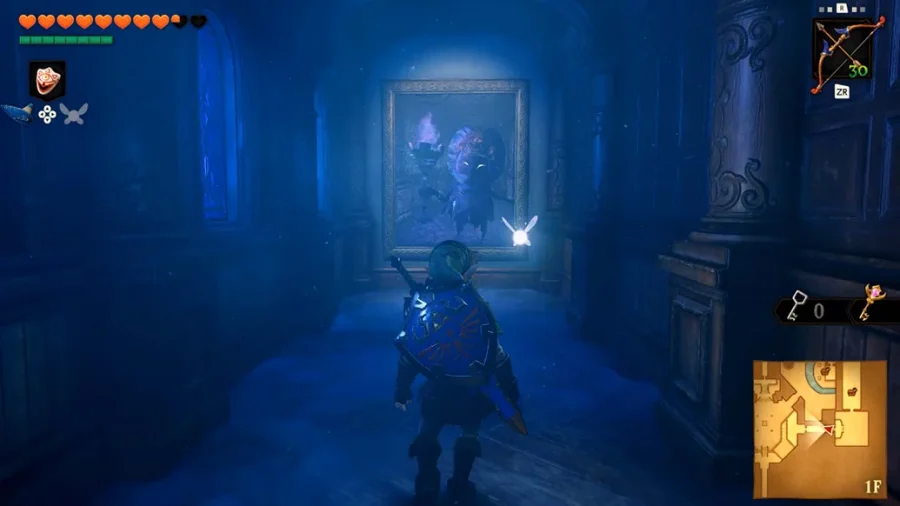
Now that you have the Fairy Bow, return to the staircase with the Poe paintings. You should have noticed the red Poe moving between the portraits earlier.
This is Joelle, the first Poe Sister you need to defeat.
When you see Joelle appear inside a painting, aim your Fairy Bow and shoot the portrait. She will move between the available paintings, so keep watching the frames and shoot her whenever she appears.

After hitting all the paintings, Joelle will appear in the room and start attacking you.
She can become invisible and charge towards Link. Move out of her way when she approaches. Once she becomes dizzy after an attack, use your sword to deal damage.
Repeat this process until she is defeated. A chest will appear containing your fourth Small Key. You will also restore the red flame associated with Joelle.
7. Find the Boss Key and Defeat the Floormaster
Before opening the next locked door, return to the area outside the twisted corridor. Look above the doorway for a silver eye switch.
Equip the Fairy Bow and shoot the switch. This will straighten the twisted corridor and change the layout of the room beyond it.
Walk through the newly straightened corridor. In the next room, you will find a Wallmaster and a chest on the lower floor.

Avoid the Wallmaster and open the ornate chest to collect the Boss Key. You will need this key to enter Phantom Ganon’s room later.
After collecting it, drop through the opening in the floor. Clear the Blue Bubbles in the water room and continue towards the outer platform.
Before leaving, check the nearby ledges for a Gold Skulltula. You can use your Hookshot to collect the token from the wall.
Next, enter the small room on the platform. You will encounter a Floormaster, an enemy that moves towards Link and splits into smaller hands when defeated.
Wait until it stops glowing before attacking. Once it splits, quickly defeat all three smaller hands before they join together again.
A chest will appear after the fight. Open it to obtain your fifth Small Key.
8. Defeat Beth, the Blue Poe Sister, and Get the Compass

Return to the Fairy Bow room and make your way towards the blue staircase. Use one of your Small Keys to unlock the door leading to the next Poe encounter.
Just like Joelle, the blue Poe Sister hides inside different paintings. Equip your Fairy Bow and shoot the portrait whenever she appears.
After you hit the paintings, Beth will leave them and enter the room. Watch her movements and avoid her spinning attack. When she becomes dizzy, use your sword to damage her.
Defeat Beth to restore the blue flame. A large chest will appear in the room. Open it to obtain the Compass.
The Compass helps you locate remaining chests and hidden areas on the Dungeon Map.
9. Activate the Torch and Solve the Frozen Eye Switch Puzzle
Continue up the blue staircase and look for the next locked passage. Use your remaining Small Key to open the door.
Inside, you will find a floor switch connected to a torch. Step on the switch to light the torch.
Now move to the other side of the room and look above the doorway. You will notice an eye switch covered in ice.
You need to shoot an arrow through the flame of the lit torch so it catches fire and melts the ice surrounding the switch.
Once the ice disappears, shoot the exposed eye switch again with your Fairy Bow.
This activates the mechanism and twists the blue corridor. Follow the changed passage and drop through the opening at the end to reach the lower floor.
10. Cross the Falling Ceiling Room
You will now reach a long corridor with a black-and-white tiled floor. Continue forward until you find a side door leading outside.
Push the nearby block off the ledge to create a shortcut. This saves you from repeating part of the route when returning to this area.
Look above the doorway for a Scarecrow summoning point. If you have learned the Scarecrow’s Song, you can play it to summon Pierre and use your Hookshot to reach a hidden Gold Skulltula.
Return to the corridor and enter the room with the falling ceiling. The ceiling repeatedly drops down, making it dangerous to walk across the floor without watching its movement.
Pay attention to the sections that briefly light up. These indicate the safer spaces where you can stand when the ceiling comes down.
- Watch one complete ceiling cycle before moving forward.
- Move between the highlighted safe spaces.
- Avoid standing underneath sections marked by dark shadows, as enemies may be waiting above them.
- Use the side switch to open the next door and take cover when needed.
There is also a chest containing bombs in this section. Collect it if you need additional supplies before continuing.
11. Solve Amy’s Block Puzzle and Defeat the Green Poe Sister
After crossing the falling ceiling room, you will reach another painting showing the green Poe Sister, Amy.
Shoot the painting with your Fairy Bow to start a block puzzle. Several picture pieces will move around the room, and your job is to arrange them to recreate Amy’s portrait.
One of the pieces is a fake. Watch the blocks carefully when they move. The correct pieces will animate, while the fake piece stays still.
Follow these tips to solve the puzzle:
- Watch the movement of every block before pushing anything.
- Ignore the piece that does not move.
- Move the correct pieces into their matching positions to rebuild the portrait.
- Check the completed image before moving on.
Once the portrait is complete, Amy will appear. Use the same strategy you used against Joelle and Beth. Shoot her when she is vulnerable and avoid her spinning charge.
Defeat Amy to restore the green flame.
12. Defeat Meg, the Purple Poe Sister
After defeating Amy, continue through the southern exit and shoot the painting containing the final Poe Sister.
Follow the corridor back towards the central hall. This is where you will encounter Meg, the purple Poe Sister.
Meg creates four copies of herself and surrounds Link. You need to identify the real one and shoot it with your Fairy Bow.
The remake provides visual clues to help identify her:
- First round: Look for the copy carrying the purple flame while the others have different coloured flames.
- Second round: Pay attention to the torches. The real Meg carries a lit torch.
- Final round: Look closely at their faces. The real Meg has her eyes open while the fake copies have their eyes narrowed.
Shoot the correct Meg during each round. Repeat until she is defeated and the purple flame returns to the central hall.
With all four Poe Sisters defeated, the four flames are restored. The central elevator will now become available.
Ride the elevator down to reach the basement and the final puzzle.
13. Solve the Rotating Basement Room Puzzle
The basement contains a large rotating room with several openings and handholds along its outer walls. You need to rotate the room to access different sections and open the route to Phantom Ganon.
Before solving the main puzzle, explore the available openings. One of the rooms contains a chest with arrows, and another has a Gold Skulltula.
Follow these steps to open the boss route:
- Find one of the handholds along the outer wall and push it to rotate the room clockwise.
- Continue rotating until you reach the section containing the chest with arrows.
- Push the rotating wall again to reveal the floor switch.
- Step on the switch to light the torch built into the wall.
- Continue rotating the room until the lit torch faces the frozen eye switch behind the window.
- Equip the Fairy Bow and shoot an arrow through the torch flame towards the frozen eye.
- Once the ice melts, shoot the exposed eye switch again to activate it.
The mechanism will unlock the passage leading to the boss door. Make sure you have enough arrows before entering the next room.
How to Beat Phantom Ganon in Ocarina of Time Remake
After opening the Boss Door with the Boss Key, enter the final chamber. You will find yourself inside a dark room surrounded by large paintings.
This is where you face Phantom Ganon, the boss of the Forest Temple. The fight has two main phases, and each requires a different strategy.

Phase 1: Shoot the Real Phantom Ganon in the Paintings
During the first phase, Phantom Ganon rides towards you through the paintings positioned around the room.
Several copies will appear, but only one is real. The fake copies turn around before leaving their paintings, while the real Phantom Ganon rides out into the arena.
Keep your Fairy Bow ready and watch the paintings carefully. Stand near the edge of the room so you can see several paintings at once.
Shoot the real Phantom Ganon as he emerges from his painting. If you hit the correct target, he will be damaged and eventually move to the second phase.
Do not waste too many arrows shooting the fake versions. Watch their movement and look for the one that actually enters the room.
Phase 2: Reflect Phantom Ganon’s Energy Attack
After the painting sequence, Phantom Ganon leaves his horse and starts floating around the arena. He will begin throwing a magical energy ball towards Link.
You need to reflect this projectile using your Master Sword. Lock onto Phantom Ganon and wait until the energy ball approaches.
Use a well-timed sword swing to hit the projectile back towards him. He may reflect it again, turning the attack into a back-and-forth exchange.
Continue hitting the energy ball until it finally strikes Phantom Ganon. When he falls to the ground, run towards him and attack with your sword.
Repeat the process until his health is depleted.
Phantom Ganon tips:
- Keep a comfortable distance during the energy ball phase.
- Time your sword swings instead of repeatedly pressing the attack button.
- Stay locked onto the boss so you can track his movement.
- Attack him immediately when he falls after being hit by his own projectile.
- Keep some health and arrows available before entering the boss room.
Once Phantom Ganon is defeated, the Forest Temple is complete. Collect the Heart Container before entering the warp portal.
After the cutscene, Link meets Saria in the Chamber of the Sages. She awakens as the Sage of the Forest and gives Link the Forest Medallion.
All 5 Gold Skulltula Locations in the Forest Temple
If you are trying to collect every Gold Skulltula in the Forest Temple, there are five hidden tokens to find. Some are easy to miss while following the main dungeon route.
- First Gold Skulltula: Climb the vines in the first entrance chamber. You will find it near the upper branches.
- Second Gold Skulltula: Look on the northern wall of the central hall, near the doorway leading towards the Stalfos room.
- Third Gold Skulltula: After collecting the Boss Key and dropping through the nearby opening, explore the upper balcony. Use your Hookshot on the token attached to the wall.
- Fourth Gold Skulltula: In the northeastern courtyard area, use the Scarecrow’s Song to summon Pierre near the shortcut doorway. Hookshot to the upper ledge to reach the token.
- Fifth Gold Skulltula: In the rotating basement room, rotate the walls until you can access the southern alcove. Collect the token inside.
Remember to learn the Scarecrow’s Song before entering the dungeon if you want to collect all five Gold Skulltulas during your first visit.
Forest Temple Rewards and Important Items
Completing the Forest Temple gives you several important items that help Link progress through the adult portion of the story.
- Fairy Bow: The main dungeon weapon, used to defeat the Poe Sisters and Phantom Ganon.
- Dungeon Map: Shows the dungeon layout and available floors.
- Compass: Helps locate chests and hidden areas.
- Five Small Keys: Used to unlock the dungeon’s locked doors.
- Boss Key: Opens the final boss chamber.
- Heart Container: Adds another heart to Link’s health.
- Forest Medallion: Obtained after defeating Phantom Ganon and awakening Saria as a Sage.
- Five Gold Skulltula Tokens: Optional collectibles hidden throughout the dungeon.
What to Do After Completing the Forest Temple
After receiving the Forest Medallion, your next major destination is Death Mountain and Goron City.
However, before continuing, consider returning to the Temple of Time. Sheik will teach Link the Prelude of Light, which allows you to return to the Temple of Time quickly.
You can also place the Master Sword back into its pedestal to return to the child version of Link. This ability becomes useful for completing optional quests and collecting items that were inaccessible during your first visit as an adult.
When you are ready to continue the main story, head towards Goron City and prepare for the Fire Temple.
Frequently Asked Questions
Where Is the Forest Temple in Ocarina of Time Remake?
The Forest Temple is located in the Sacred Forest Meadow, at the end of the Lost Woods. You need to become Adult Link, obtain the Hookshot, and use it on the target above the temple entrance to reach the dungeon.
How Many Small Keys Are in the Forest Temple?
There are five Small Keys in the Forest Temple. You need them to open the locked doors throughout the dungeon and reach the different Poe encounters.
How Do You Get the Fairy Bow in the Forest Temple?
You obtain the Fairy Bow by defeating three Stalfos in the upper combat arena. The chest containing the bow appears after all three enemies are defeated. Be careful because the remake features an acid pool in the middle of this arena.
How Do You Defeat the Four Poe Sisters?
Use the Fairy Bow to shoot their portraits whenever they appear. After hitting the paintings, each Poe will enter the room and attack Link. Avoid their spinning charges and damage them when they become dizzy. For Meg, watch the flames, torches, and visual clues to identify the real copy.
How Do You Open the Forest Temple Boss Door?
First, collect the Boss Key from the room reached through the straightened red corridor. Then restore all four flames by defeating the Poe Sisters. In the basement, rotate the walls to align the lit torch with the frozen eye switch. Shoot an arrow through the flame to melt the ice, then hit the exposed switch to open the route to the boss.
How Do You Beat Phantom Ganon?
During the first phase, use the Fairy Bow to shoot the real Phantom Ganon as he emerges from one of the paintings. During the second phase, use your Master Sword to reflect his magical energy ball. Keep reflecting it until it hits him, then attack with your sword while he is down.
Can You Collect All Gold Skulltulas in the Forest Temple?
Yes. There are five Gold Skulltulas inside the Forest Temple. You can collect them during your first visit, but you need the Scarecrow’s Song to reach one of the hidden tokens in the courtyard area.
Is the Forest Temple Different in the Switch 2 Remake?
Yes. The Nintendo Switch 2 version includes several changes to the original dungeon. The Stalfos arena now has an acid pool, an additional elevator provides a shortcut through the block puzzle section, and the puzzles and controls have been updated for the new version.
Conclusion
The Forest Temple is one of the most puzzle-heavy dungeons in Ocarina of Time Remake. You need to manage your Small Keys, navigate the twisted corridors, collect the Fairy Bow, and defeat all four Poe Sisters before reaching the basement.
The most important things to remember are the eye switches, the block-pushing puzzle, and the rotating basement mechanism. Once you understand how these sections work, the remaining route becomes much easier to follow.
Defeat Phantom Ganon, collect the Heart Container, and claim the Forest Medallion from Saria. With the Forest Temple completed, you can continue Link’s adult adventure towards Death Mountain and the next major dungeon.
If you are following the complete story walkthrough, you can also revisit our Ocarina of Time Remake Beginner Tips for additional help.
More Ocarina of Time Remake Walkthroughs
If you are following the main story in order, these walkthroughs cover the earlier areas and dungeons leading up to the Forest Temple:
- Kokiri Forest Walkthrough
- Great Deku Tree Dungeon Walkthrough
- Princess of Hyrule Walkthrough
- Spiritual Stone of Fire Walkthrough
- Dodongo Cavern Dungeon Walkthrough
- Lord Jabu-Jabu’s Belly Dungeon Walkthrough
- Spiritual Stone of Water: Zora’s Domain and Lake Hylia Walkthrough
For official game information, visit The Legend of Zelda: Ocarina of Time on Nintendo Switch 2.


