There’s nothing more frustrating in The Outer Worlds 2 than finding a locked chest or hackable terminal, hovering your cursor over it, and seeing that dreaded message: “Insufficient Mag-Picks” or “No Bypass Shunts Available.”
You know there’s probably something amazing inside—rare weapons, valuable loot, quest items—but you’re completely locked out because you burned through your consumables earlier without thinking about it. And unlike some games where lockpicks are reusable or you can “git gud” at a minigame, The Outer Worlds 2 uses consumable items that disappear forever once used.
Here’s the good news: there are multiple ways to keep yourself stocked with both Mag-Picks (for physical locks) and Bypass Shunts (for electronic hacking), and once you understand the system, you’ll never run out again. This guide breaks down every method for acquiring these essential tools, including the crafting route that most players overlook.
Before we dive in, make sure you’ve read our beginner’s guide and what to do first guide to understand the broader game systems these items fit into.
What Are Mag-Picks and Bypass Shunts?
Let’s start with the basics for anyone just starting their journey through The Outer Worlds 2:
Mag-Picks: Physical Lockpicking
Mag-Picks are consumable items used to open physical locks on doors, chests, containers, and other mechanical security systems. Think of them as futuristic lockpicks that use magnetic manipulation instead of manual pin-tumbling.
Key facts:
- Consumable: One Mag-Pick = one lock attempt (they’re gone after use)
- Stackable: No carry limit, hoard as many as you want
- Scaling difficulty: Harder locks require multiple Mag-Picks to open
- No skill check: Unlike some RPGs, you don’t “fail” at lockpicking—you either have enough Mag-Picks or you don’t
Bypass Shunts: Electronic Hacking
Bypass Shunts are consumable items used to hack terminals, computers, and electronic security systems. They’re the digital equivalent of Mag-Picks.
Key facts:
- Consumable: One Bypass Shunt = one hack attempt
- Stackable: No carry limit (stock up!)
- More expensive: Cost more than Mag-Picks both to buy and craft
- Tech-focused: Found primarily in advanced facilities and tech-heavy areas
The important thing to understand is that both items are consumables with no alternative. You can’t “level up” lockpicking to bypass the system—you need the actual items. This makes resource management crucial, especially early in the game.
How to Get Mag-Picks: All Methods Explained
There are three primary ways to acquire Mag-Picks, each with its own advantages and situations where it’s the best choice.
Method 1: Looting the World (Free but Unreliable)
Mag-Picks can be found scattered throughout the game world in various locations:
Common locations:
- Containers inside buildings (desks, lockers, filing cabinets, storage crates)
- Shelves and counters in residential and commercial areas
- Corpses of criminals and shady characters (the irony is not lost on me)
- Locked rooms (yes, sometimes the reward for using Mag-Picks is more Mag-Picks)
- Random loot spawns in exploration areas
My looting strategy: When entering any new building or area, I make it a habit to check every desk, every locker, every shelf. Mag-Picks are small and easy to miss visually, but they’re valuable enough that a few seconds of thorough searching pays off.
The biggest problem with relying solely on looting is inconsistency. You might find 5 Mag-Picks in one building and zero in the next ten. This makes it a supplementary source rather than your primary method.
Pro tip: If you’ve invested in the Observation skill and taken the Treasure Hunter perk, you’ll occasionally get bonus loot from containers, which can include Mag-Picks.
Method 2: Buying from Vendors (Fast but Expensive)
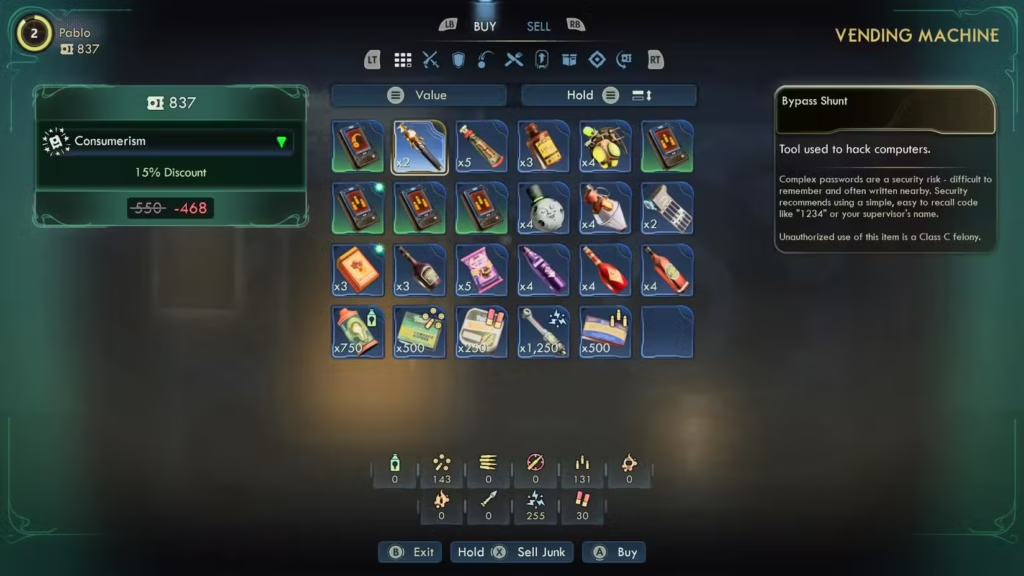
Every vendor and most vending machines sell Mag-Picks for 150 Credits each. This is your “I need them right now” option.
Pros: ✅ Instant availability when you need them ✅ No RNG involved—you know exactly what you’re getting ✅ Multiple vendors means multiple sources
Cons: ❌ 150 Credits adds up quickly if you’re buying in bulk ❌ Vendors have limited stock—once they’re out, you have to wait for restocks ❌ Credits might be better spent on weapons, armor, or Advanced Decryption Keys
When to buy: Early game when you’re credit-rich but resource-poor, or when you’re about to attempt a difficult lock and are just short on Mag-Picks.
Cost reduction trick: If you take the Consumerism flaw, you get a 15% discount on all vendor purchases, bringing Mag-Picks down to about 127 Credits each. The trade-off is you also sell items for less, so evaluate whether that’s worth it for your playstyle. Check our negative traits guide for more on this.
Alternatively, the Wholesale Spender perk from the Speech tree gives you a permanent -10% discount with vendors you trade with frequently. This compounds over time and doesn’t have the selling penalty of Consumerism.
Method 3: Crafting at Workbenches (Unlimited but Requires Setup)
This is the method most players miss, and honestly, it’s the best long-term solution once you have it set up.
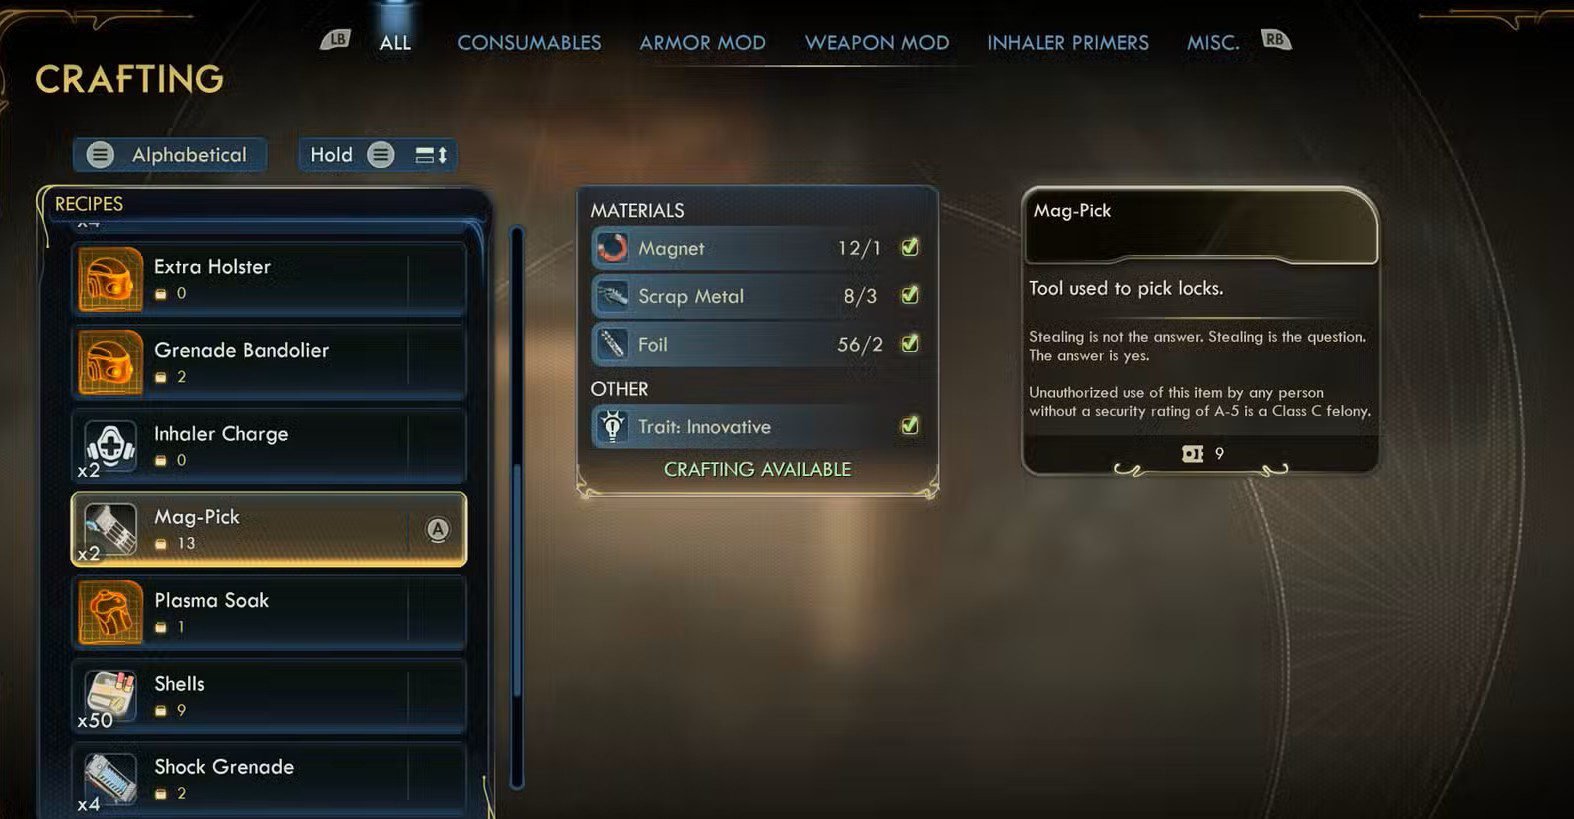
Requirements to craft Mag-Picks:
- The ‘Innovative’ trait (selected during character creation or acquired through story progression)
- Access to a workbench (found in your ship, settlements, and various locations)
- Crafting materials: 1 Magnet, 3 Scrap Metal, 2 Foil per Mag-Pick
Why crafting is superior: ✅ Unlimited supply as long as you have materials ✅ Materials are cheap and abundant if you’re breaking down junk items ✅ No credit cost beyond acquiring the Innovative trait ✅ Craft in bulk before major exploration sessions
The crafting economy: Here’s the thing—if you’ve been following our advice to break down all your junk items instead of selling them, you should have tons of Scrap Metal and Foil. Magnets are slightly less common but still abundant in electronic junk like old appliances, broken automechs, and tech debris.
My crafting routine:
- Before leaving the ship for a major exploration session, I hit the workbench
- Craft 10-15 Mag-Picks (more if I’m heading to a lockpick-heavy area)
- This takes about 30 seconds and ensures I’m never locked out of content
If you don’t have the Innovative trait: You can’t craft Mag-Picks without it, which means you’re stuck with looting and buying. If you’re planning a lockpick-heavy build, strongly consider taking Innovative during character creation. Check our backgrounds and traits guide for how this fits into different builds.
How to Get Bypass Shunts: All Methods Explained
Bypass Shunts work similarly to Mag-Picks but with some key differences in acquisition and cost.
Method 1: Looting the World (Slightly More Targeted)
Bypass Shunts appear in similar locations to Mag-Picks, but with a bias toward tech-heavy environments:
Best locations for Bypass Shunts:
- Advanced facilities with lots of computers and terminals
- Toolboxes (more common than Mag-Picks in these)
- Corporate buildings and research labs
- Bodies of tech-savvy enemies (hackers, engineers, scientists)
- Chests in tech-focused areas
- Random spawns (less predictable than Mag-Picks)
My experience: Bypass Shunts are noticeably less common in random loot than Mag-Picks. The game seems to gate them slightly more, probably because hacking often leads to more valuable rewards than physical lockpicking.
Looting strategy: When you enter a tech-heavy area (labs, data centers, automech facilities), prioritize searching thoroughly. These locations typically have multiple Bypass Shunts hidden around.
Method 2: Buying from Vendors (More Expensive but Available)
Bypass Shunts are sold by vendors and vending machines for 550 Credits each—significantly more expensive than Mag-Picks.
The cost breakdown:
- Mag-Pick: 150 Credits
- Bypass Shunt: 550 Credits
- Ratio: Bypass Shunts cost 3.67x more
Is buying worth it? Actually, yes—hear me out. While 550 Credits sounds steep, the rewards behind hackable terminals are often significantly more valuable than what’s in locked chests. Hackable terminals frequently contain:
- Valuable data that sells for hundreds of Credits
- Quest information that shortcuts objectives
- Security overrides that disable turrets or unlock multiple doors
- Rare schematics and blueprints
So spending 550 Credits to access a terminal that gives you 1,000+ Credits worth of rewards is good ROI.
Vendor limitations: Like Mag-Picks, vendors have finite stock. Once you’ve cleaned out a vendor’s Bypass Shunts, you’ll need to either wait for a restock or visit a different vendor.
Cost reduction options: The same cost-reduction strategies for Mag-Picks apply here:
- Consumerism flaw: 15% discount (467 Credits per Bypass Shunt)
- Wholesale Spender perk: 10% discount with frequently-used vendors
Given the higher base cost, these discounts save you more Credits per Bypass Shunt than per Mag-Pick.
Method 3: Crafting at Workbenches OR Using Niles’ Ability
Here’s where Bypass Shunts get interesting—you have two crafting options.
Option A: Standard Workbench Crafting
Requirements:
- The ‘Innovative’ trait (same as Mag-Picks)
- Access to a workbench
- Crafting materials: 1 Shiny Servo, 3 Scrap Metal, 2 Foil per Bypass Shunt
The Shiny Servo bottleneck: This is the key difference from Mag-Picks. Shiny Servos are less common than Magnets and typically found in:
- Automechanical enemies (they drop them when scrapped)
- High-tech loot containers
- Electronic junk in advanced facilities
Because Shiny Servos are less abundant, you can’t craft Bypass Shunts quite as freely as Mag-Picks. But if you’re fighting automechs regularly and scrapping their parts, you should have a decent supply.
Option B: Niles’ Companion Ability
Niles, one of your companions, has a special ability that lets you craft Bypass Shunts on the go without needing a workbench. This uses the same materials (1 Shiny Servo, 3 Scrap Metal, 2 Foil) but offers the convenience of field crafting.
Why this matters: You can be deep in a dungeon, realize you’re out of Bypass Shunts, and craft more on the spot if you have materials. This removes the “I guess I’ll come back later” problem.
Niles synergy: If you’re running a hacking-focused build, having Niles in your party essentially gives you unlimited Bypass Shunts as long as you have materials. This makes him one of the best companions for tech-focused characters.
Resource Management: Making Your Consumables Last
Now that you know how to get these items, let’s talk about using them efficiently so you’re not constantly scrambling for more.
Prioritize High-Value Locks First
Not all locks are created equal. Some contain amazing loot; others have a single healing item and some Credits. Here’s how to prioritize:
Always unlock: ✅ Quest-related locks (might be required for progression) ✅ Locks in rare/unique locations (you might not come back) ✅ High-security containers (typically better loot) ✅ Terminals with multiple unlocks (hacking one terminal might open several doors)
Consider skipping: ❌ Common loot containers in areas you can revisit ❌ Locks that require 5+ Mag-Picks unless you’re swimming in them ❌ Terminals with obvious low-value rewards (you can sometimes preview what’s behind them)
Invest in Lockpick and Hack Skills
Higher Lockpick and Hack skill levels reduce the number of consumables required for difficult locks and hacks. This isn’t always obvious, but it makes a huge difference over time.
Example:
- Lock difficulty: Hard
- With Lockpick 10: Requires 4 Mag-Picks
- With Lockpick 30: Requires 2 Mag-Picks
Investing skill points into these abilities literally halves your consumable consumption for difficult locks. If you’re planning a stealth or exploration build, this is essential.
Check our perks guide for lockpick-related perks like Pickpocket, Through the Keyhole, and Bag Check that enhance your lockpicking capabilities.
Perks That Help With Lock/Hack Economy
Several perks indirectly help you conserve consumables:
Through the Keyhole (Lockpick 2):
- View container contents before lockpicking
- Why it matters: You can see if the loot is worth the Mag-Picks before committing
Restricted Access (Hack 1):
- Access restricted vendor inventories
- Why it matters: More vendors = more Mag-Picks/Bypass Shunts to buy
Treasure Hunter (Observation 1):
- Occasionally get bonus loot from containers
- Why it matters: Sometimes includes Mag-Picks or Bypass Shunts
Scrapper (Engineering 1):
- Automechs drop extra crafting materials
- Why it matters: More Shiny Servos = more craftable Bypass Shunts
The Break Down Everything Strategy
If you’ve read our junk items guide, you know I’m a huge advocate for breaking down junk instead of selling it. Here’s why this matters for Mag-Picks and Bypass Shunts:
Materials you need:
- Scrap Metal: Literally everywhere, infinite supply
- Foil: Common in junk items (food containers, packaging, electronics)
- Magnets: Moderately common in electronic junk and appliances
- Shiny Servos: From automechs and advanced tech
By breaking down everything, you ensure a constant flow of crafting materials. This makes crafting Mag-Picks and Bypass Shunts essentially free—you’re just converting trash into useful tools.
My routine:
- Loot everything
- Break down all junk at the nearest workbench
- Craft a batch of Mag-Picks and Bypass Shunts
- Continue exploring with full stocks
This cycle takes maybe 2-3 minutes every hour of gameplay and completely eliminates resource anxiety.
How Many Should You Carry?
Since there’s no carry limit on either item, you might wonder: how many is enough?
My Recommendations:
Mag-Picks:
- Minimum: 10-15 for casual exploration
- Comfortable: 20-30 for lockpick-heavy areas
- Paranoid (me): 40+ because running out is the worst
Bypass Shunts:
- Minimum: 5-10 for casual exploration
- Comfortable: 15-20 for tech-heavy facilities
- Paranoid (me): 30+ because terminals often gate quest content
Why carry more than you think you need:
- Some locks require multiple consumables (hard locks can need 3-5 Mag-Picks)
- You might find a cluster of locked containers all at once
- Running back to craft more is annoying and breaks immersion
- There’s literally no downside to carrying extras (no weight, no inventory slots)
Think of it like ammunition—you wouldn’t go into a combat zone with 10 bullets and hope for the best. Same principle applies here.
Early Game vs. Late Game Strategies
Your approach to acquiring these items should evolve as you progress:
Early Game (Levels 1-10): Scarcity Management
The problem: You don’t have much Credits, materials are scarce, and you probably don’t have the Innovative trait yet.
Strategy:
- Buy sparingly from vendors (only when necessary)
- Loot obsessively (check every container)
- Be selective about which locks to attempt
- Save your consumables for quest-critical locks
Early-game priority: Get the Innovative trait ASAP if you’re planning a stealth/exploration build. The ability to craft these items completely changes the resource economy.
Check our starting builds guide for character setups that include Innovative from the start.

Mid Game (Levels 11-25): Building Self-Sufficiency
The opportunity: You have decent Credits, you’re accumulating materials, and you’ve probably unlocked crafting.
Strategy:
- Start crafting regularly before major exploration sessions
- Buy materials if you’re short (cheaper than buying finished items)
- Invest in Lockpick/Hack skills to reduce consumable requirements
- Take relevant perks (Through the Keyhole, Restricted Access)
Mid-game priority: Establish your crafting routine. Make hitting the workbench a habit before leaving your ship.
Late Game (Levels 26+): Unlimited Resources
The reality: You’re swimming in Credits and materials, and consumables are no longer a concern.
Strategy:
- Craft in bulk (50+ of each item)
- Buy without hesitation when convenient
- Never skip a lock (you can afford to be thorough)
- Stockpile for completionist runs
Late-game freedom: This is when you can truly explore every nook and cranny without resource anxiety. Enjoy the power fantasy.
Common Mistakes to Avoid
❌ Not Taking the Innovative Trait
If you’re doing ANY exploration or lockpicking, Innovative is practically mandatory. Not having it forces you to rely entirely on looting and buying, which is expensive and unreliable.
❌ Selling Crafting Materials
Never sell Scrap Metal, Foil, Magnets, or Shiny Servos. These convert into far more valuable items when crafted into Mag-Picks and Bypass Shunts. Review our sell vs. break down guide for the full economics.
❌ Not Checking Vendor Inventories
Vendors restock over time. Check back periodically to replenish your supply, especially if you’re not crafting.
❌ Wasting Consumables on Low-Value Locks
Use Through the Keyhole to preview container contents. Don’t burn 3 Mag-Picks to open a chest with 50 Credits and a health pack.
❌ Not Investing in Lockpick/Hack Skills
Every skill point reduces the consumable cost of difficult locks. If you’re using these items frequently, invest in the skills.
❌ Forgetting About Niles
If you have Niles as a companion and need Bypass Shunts, use his ability! Don’t fast-travel back to your ship unnecessarily.
The Consumerism Flaw: Is It Worth It for Discounts?
Since we’ve mentioned it several times, let’s address this directly:
The Consumerism flaw provides: ✅ 15% discount on all purchases (including Mag-Picks and Bypass Shunts) ❌ 15% reduction on all sale prices (you get less Credits for selling)
Should you take it? If you’re buying lots of consumables: Yes, probably. The discount compounds over time. If you’re selling lots of loot: No, the reduced sale prices hurt. If you’re crafting everything: Doesn’t matter much either way.
My take: If you’re following the break-down-junk strategy and crafting most of your consumables, the Consumerism flaw is less relevant. But if you prefer buying Bypass Shunts at 467 Credits instead of 550 Credits, it can save you thousands of Credits over a full playthrough.
For more on flaws and whether to accept them, check our negative traits guide.
Quick Reference: At-a-Glance Comparison
| Aspect | Mag-Picks | Bypass Shunts |
|---|---|---|
| Base Vendor Price | 150 Credits | 550 Credits |
| Primary Use | Physical locks (doors, chests) | Electronic terminals (computers, security systems) |
| Crafting Cost | 1 Magnet, 3 Scrap Metal, 2 Foil | 1 Shiny Servo, 3 Scrap Metal, 2 Foil |
| Material Bottleneck | Magnets (moderately common) | Shiny Servos (less common) |
| Looting Frequency | More common | Less common |
| Special Crafting Option | Workbench only | Workbench or Niles’ ability |
| Typical Rewards | Weapons, armor, Credits, consumables | Data, quest info, security overrides |
Never Be Locked Out Again
The Mag-Pick and Bypass Shunt economy in The Outer Worlds 2 is designed to reward thorough exploration and smart resource management. Once you establish a crafting routine and break down your junk regularly, you’ll have effectively unlimited access to both items.
The golden rule: If you take away one thing from this guide, it should be this—get the Innovative trait and break down all your junk. Those two actions alone solve 90% of your consumable problems.
The game wants you to explore every locked room and hack every terminal. Don’t let resource anxiety stop you from experiencing all the content Obsidian has packed into this game. Stock up, stay prepared, and crack open every secret the galaxy has to offer.
Now get out there and put those Mag-Picks to good use. That High Security Lockbox isn’t going to open itself.
Related guides you might find helpful:
- Complete perks guide for lockpick-enhancing perks
- Backgrounds and traits to plan Innovative trait acquisition
- Inez Graft choice walkthrough for a major quest decision
- How to increase max health for survivability while exploring


