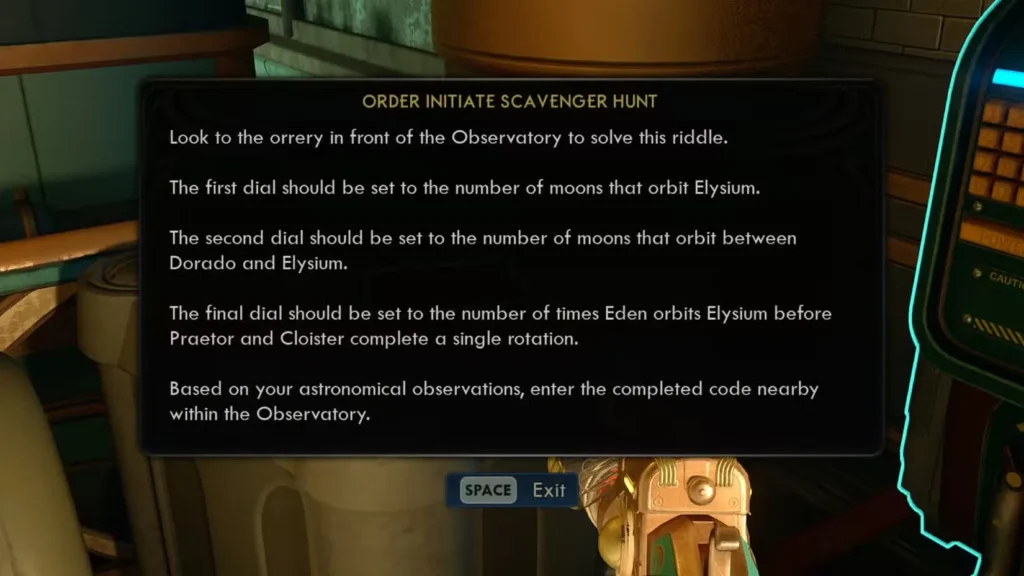
High in the monastery overlooking Golden Ridge, the Order of the Ascendant has created a deceptively challenging astronomy puzzle—the Order Initiate Scavenger Hunt. Unlike straightforward combat encounters or dialogue choices, this puzzle requires you to become a space detective, studying planetary models, orreries, and navigation charts to decode three cryptic riddles about the Arcadia star system.
It’s the kind of puzzle that makes you feel brilliant when you solve it legitimately, but also frustrates you enough that looking up the answer feels completely justified. I’ve done it both ways across different playthroughs, and honestly? Both approaches are valid. Sometimes you want the satisfaction of discovery; other times you just want the rewards so you can move on with the story.
Whether you’re here for the quick answer or want to understand how the solution works, this guide covers everything about the Order Initiate Scavenger Hunt—including why the puzzle is more cleverly designed than it first appears.
Finding the Order Initiate Scavenger Hunt
Before you can solve the puzzle, you need to reach the Observatory in the monastery above Golden Ridge. This location becomes accessible as you progress through the main story and interact with the Order of the Ascendant faction.
Location Details:
- Area: Golden Ridge monastery (upper levels)
- Specific Room: The Observatory with astronomical exhibits
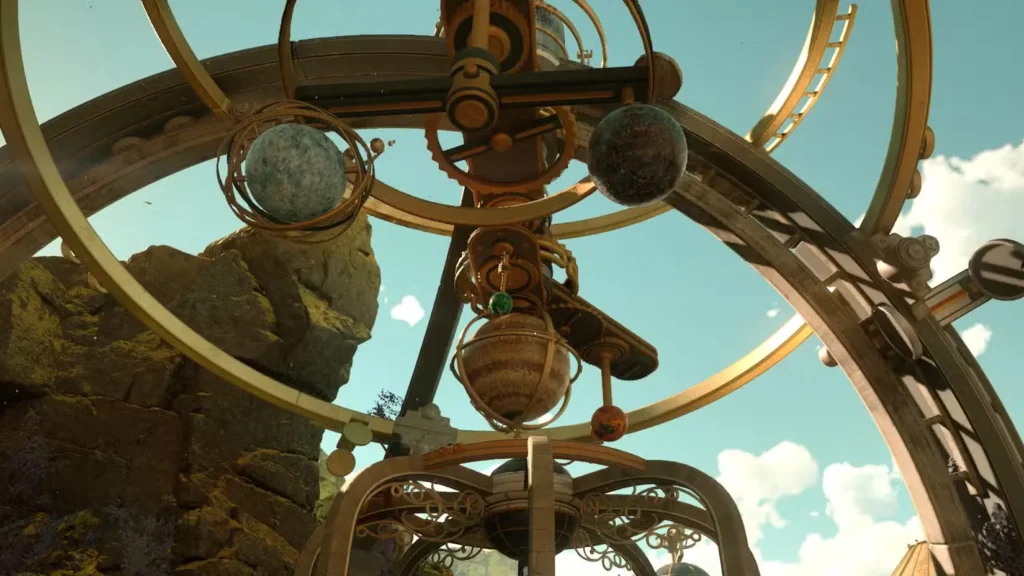
- Landmark: Large orrery (mechanical planetary model) outside the main puzzle room
You’ll naturally encounter this area if you’re following the main questline involving the Order. If you’re exploring thoroughly, you might stumble upon it while investigating the monastery’s many rooms and exhibits.
Navigation Tip: The Observatory is clearly marked and contains extensive astronomy displays. If you see planetary models and cosmic-themed decorations, you’re in the right place.
The Three Riddles Explained
The puzzle presents three astronomical riddles that determine a three-digit code. Each riddle corresponds to one dial on the input terminal. Let’s break down what each riddle is actually asking:
Riddle 1: “The number of moons that orbit Elysium”
What it’s asking: How many natural satellites orbit the planet Elysium?
Where to find the answer: The orrery outside the Observatory shows Elysium’s orbital system. Count the small celestial bodies circling Elysium itself (not the entire star system—just Elysium specifically).
The answer: 4 moons
Riddle 2: “The number of moons that orbit between Dorado and Elysium”
What it’s asking: How many moons have orbital paths positioned between the planets Dorado and Elysium?
Where to find the answer: This requires understanding the relative positions of planets in the Arcadia system. The orrery shows planetary distances from the central star. Examine which moons orbit in the spatial region between these two planets.
The answer: 1 moon
This is the trickiest riddle because “between” is spatial positioning, not orbital relationship. You’re looking for moons whose orbital paths fall within the distance range between Dorado and Elysium’s orbits around the star.

Riddle 3: “The number of times Eden orbits Elysium before Praetor and Cloister complete a single rotation”
What it’s asking: Eden is a moon. Praetor and Cloister are binary planets that orbit each other. How many complete orbits does Eden make around Elysium in the time it takes Praetor and Cloister to complete one full rotation around their common center?
Where to find the answer: Watch the orrery’s mechanical movement. Eden is the small green-blue moon orbiting relatively quickly. Praetor and Cloister are the two planets locked in mutual orbit. Count Eden’s revolutions during one complete Praetor-Cloister cycle.
The answer: 4 orbits
Research Locations: How to Solve It Legitimately
If you want to crack this puzzle without looking up the answer, the game provides three research locations with all the necessary information:
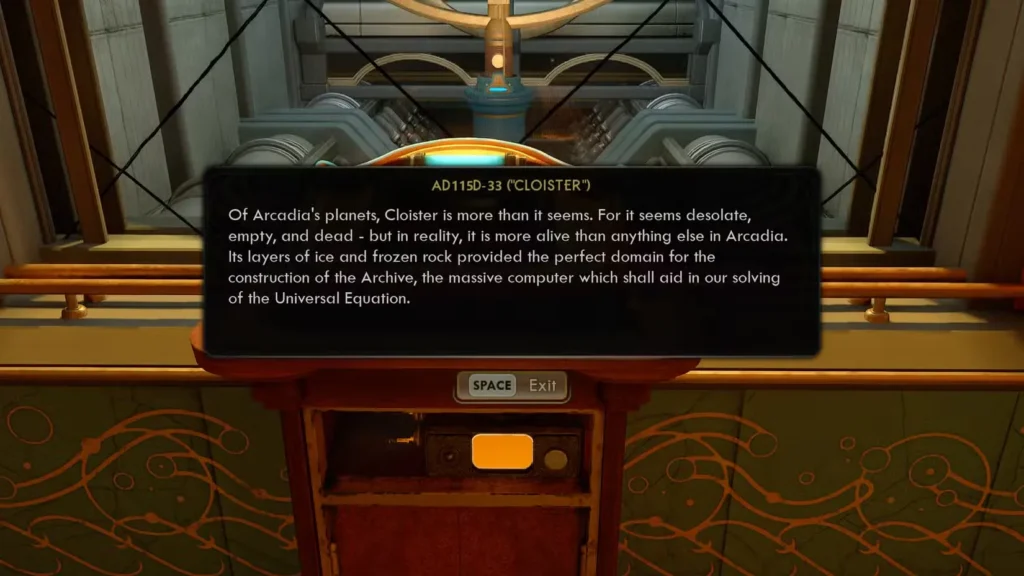
1. The Order Astronomy Museum (Inside Observatory)
What you’ll find:
- Visual models showing what each planetary body looks like
- Classifications distinguishing planets from moons
- Informative plaques describing celestial bodies
- Context about the Arcadia system’s formation and properties
Why it matters: This helps you identify which celestial bodies are moons versus planets—crucial for interpreting the riddles correctly.
2. The Orrery (Outside Observatory)
What you’ll find:
- A working mechanical model of the Arcadia star system
- Real-time movement showing orbital relationships
- Spatial positioning of planets and moons
- Visual representation of orbital speeds
Why it matters: This is your primary tool for answering all three riddles. The orrery literally shows you the answers if you watch carefully and count correctly.
Pro tip: Stand in front of the orrery and watch for at least one full rotation cycle. Eden moves quickly, while Praetor and Cloister orbit each other slowly. Patience is key for riddle three.
3. The Incognito’s Navigation Terminal
What you’ll find:
- The star map you use for ship travel
- Classifications of all discovered celestial bodies
- Labels indicating which locations are planets versus moons
- Orbital relationship data
Why it matters: If the museum or orrery don’t make classifications clear, your ship’s navigation system confirms which bodies are officially designated as moons.
Access tip: You can return to your ship at any time before solving the puzzle. Check the navigation terminal, take notes, then return to the Observatory.
Order Initiate Scavenger Hunt Solution (Quick Answer)
If you’d rather skip the astronomical investigation and get straight to the rewards, here’s what you need:
The Code: 4-1-4
- First dial: 4 (moons orbiting Elysium)
- Second dial: 1 (moon between Dorado and Elysium)
- Third dial: 4 (Eden orbits before Praetor-Cloister rotation completes)
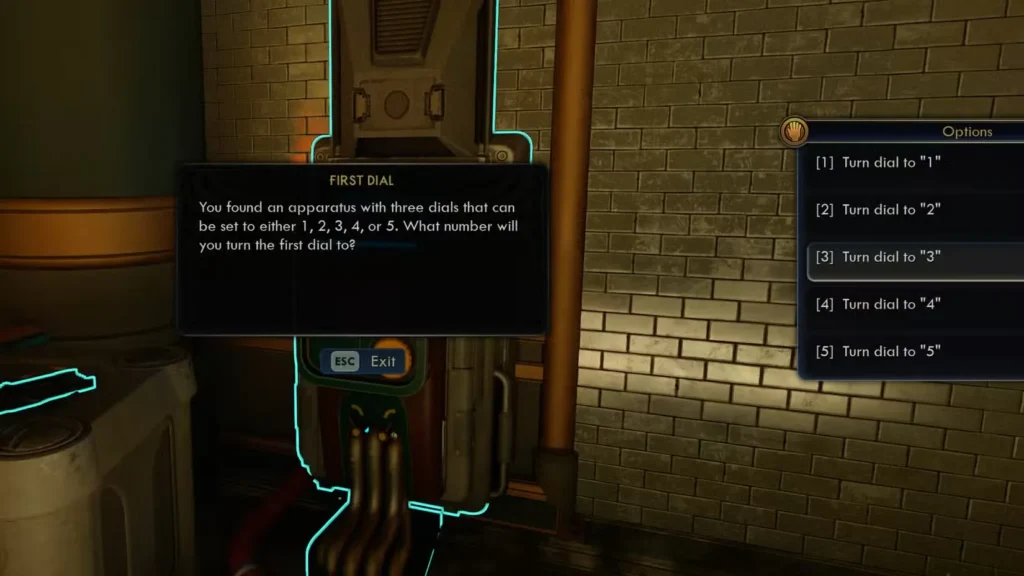
How to Enter the Code
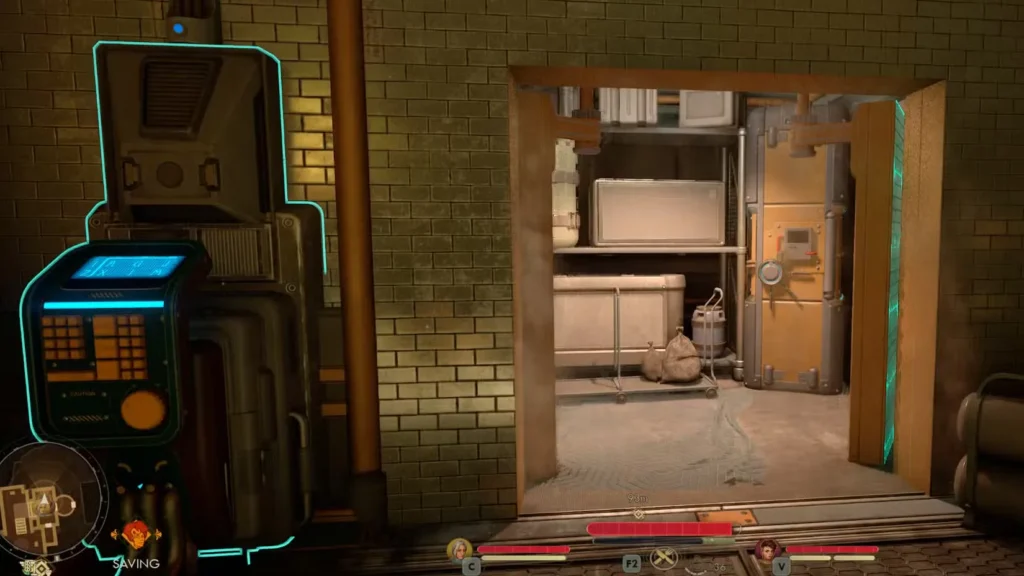
- Locate the terminal next to the riddle plaques inside the Observatory
- Interact with the terminal to access the code input interface
- Set the first dial to 4
- Set the second dial to 1
- Set the third dial to 4
- Confirm your entry
What happens next: A door to your immediate right will unlock with a satisfying mechanical sound. The previously sealed chamber is now accessible, revealing your rewards.
Note: Unlike some puzzles that reset if you enter wrong codes, this one simply won’t unlock until you input the correct sequence. Feel free to experiment if you want to solve it yourself—there’s no penalty for incorrect attempts.
Scavenger Hunt Puzzle Rewards
The unlocked chamber contains several valuable items that make solving this puzzle worthwhile, especially for players focused on optimization and collection.
Pitchball Card: Feargus Urquhart
Effect: Increases overall damage output by 1%
Why it’s valuable: Permanent 1% damage boost might sound minor, but these percentage increases stack across multiple sources. Combined with the right perks, weapon mods, and build strategies, every damage percentage point contributes to significantly higher DPS.
Pitchball cards are collectibles scattered throughout the game, each providing small but permanent bonuses. Finding them all creates substantial cumulative benefits.
Easter egg note: Feargus Urquhart is Obsidian Entertainment’s CEO and director. The card is a fun developer reference for long-time fans of Obsidian’s work.
Bit Cartridge (Several Thousand Bits)
Value: Approximately 2,000-3,000 Bits (varies slightly)
Why it’s valuable: This is substantial currency, especially at the point in the game when you typically reach Golden Ridge. You can use these Bits for:
- Purchasing rare items from Golden Ridge vendors
- Stocking up on Inhaler Charges and consumables
- Buying Advanced Decryption Keys from merchants
- Funding equipment upgrades at crafting stations
- Saving toward expensive companion gear
A single Bit cartridge of this value can cover multiple shopping trips or one expensive unique item.
Additional Minor Loot
The chamber also contains miscellaneous items like ammo, consumables, and possibly crafting materials. Nothing game-changing, but useful supplies nonetheless.
What About The Oracle Gun?
Sharp-eyed players will notice a weapon case in the Observatory containing The Oracle—a unique, powerful gun that’s separate from the Scavenger Hunt rewards.
Important clarification: Solving the Order Initiate Scavenger Hunt puzzle does NOT unlock The Oracle’s case. That weapon requires a different approach entirely.
How to Get The Oracle
You have two options for accessing The Oracle weapon case:
Option 1: Hack the Terminal
- Requires high Hacking skill (check your skills and backgrounds)
- Consumes a Bypass Shunt if your skill isn’t sufficient
- Available immediately if you have the required skill level
Option 2: Abbot’s All-Access Pass
- A special keycard obtained through Order of the Ascendant questlines
- Unlocks multiple restricted areas throughout the monastery
- More story-integrated method that doesn’t require technical skills
Both methods are valid. If you’re playing a tech-focused character, hacking works perfectly. If you’re invested in the Order’s storyline, the All-Access Pass fits more naturally into your progression.
The Oracle weapon stats: Without spoiling specifics, The Oracle is one of the better unique weapons available at this stage of the game, particularly for science-focused builds. It’s worth acquiring through whichever method suits your character.
When to Solve This Puzzle
You have flexibility regarding when to tackle the Order Initiate Scavenger Hunt:
Solve It During Your First Visit
Advantages:
- Get the damage boost card immediately
- Substantial Bits help with Golden Ridge expenses
- One less thing to remember for completionists
- Natural story progression
Best for: Players who enjoy puzzles and like clearing content as they encounter it
Return Later After More Exploration
Advantages:
- More familiarity with the Arcadia system from visiting multiple locations
- Better understanding of astronomy terminology
- The rewards remain relevant regardless of when you claim them
Best for: Players who prefer focusing on main quests first and cleaning up side content later
My recommendation: Solve it when you first find it. The puzzle takes only a few minutes with this guide, and the rewards are immediately useful. There’s no benefit to waiting unless you’re specifically trying to solve it without external help and need more in-game research time.
Why This Puzzle Design Works
The Order Initiate Scavenger Hunt exemplifies thoughtful game design for several reasons:
1. Multiple Solution Paths
You can solve it by:
- Studying the orrery carefully (visual learners)
- Reading museum exhibits thoroughly (text-based learners)
- Checking your navigation terminal (systematic researchers)
- Looking up the answer online (pragmatists)
No single approach is “correct”—the game respects different player types.
2. Thematic Integration
The puzzle fits perfectly within the Order of the Ascendant’s character. They’re a quasi-religious organization obsessed with cosmic understanding and celestial bodies. Of course they’d create astronomy-based initiation challenges for their members.
This isn’t a random puzzle dropped into the game; it’s world-building that reinforces faction identity.
3. Optional Challenge
You never need to solve this puzzle for main story progression. It’s purely for players who enjoy exploration and problem-solving—the exact audience who will appreciate it most.
4. Rewards Match Effort
The loot isn’t so powerful that skipping the puzzle punishes you, but it’s valuable enough that solving it feels rewarding. Perfect balance.
Similar Puzzles in The Outer Worlds 2
If you enjoyed the Order Initiate Scavenger Hunt, The Outer Worlds 2 contains several other environmental puzzles:
Otto’s Lock Puzzle
Located in Free Market Station, this 11-switch sequence puzzle requires careful observation (or our complete solution guide). Rewards include an Advanced Decryption Key.
Commander’s Safe
A hidden safe with valuable loot that requires finding a specific key. Check our Commander’s Safe guide for the solution.
Various Environmental Puzzles
Multiple locations feature switch-based puzzles, wire-tracing challenges, and observation-dependent solutions. Keep your eyes open for interactable terminals and suspicious environmental details.
Troubleshooting Common Issues
The Code Won’t Accept My Input
Make sure you’re setting the dials to 4-1-4 exactly. Some players accidentally input 1-4-4 or 4-4-1 due to misreading the riddle order.
I Can’t Find the Input Terminal
It’s directly next to the plaques displaying the three riddles inside the Observatory. Look for an interactive console with three dial controls.
The Door Didn’t Unlock
Double-check that all three dials are correctly set before confirming. The door is immediately to your right after the terminal—a previously sealed chamber.
I Accidentally Skipped This Area
You can return to the Observatory at any time. Golden Ridge remains accessible throughout the game, so backtracking to solve this puzzle later is perfectly fine.
Maximizing Your Puzzle Rewards
The Pitchball Card
Since this provides a permanent damage increase, it benefits every build type. Whether you’re using melee weapons, ranged guns, or science weapons, that 1% adds up over time.
Collection tip: Track down other Pitchball cards throughout Arcadia. The bonuses stack, and completionists will want them all.
The Bit Cartridge
Don’t immediately splurge on random items. Consider:
- Saving for expensive unique weapons from Golden Ridge vendors
- Purchasing crafting materials in bulk for long-term savings
- Investing in pet purchases if you’re a collector
Several thousand Bits represents significant purchasing power at this story stage—use it strategically.
Frequently Asked Questions
No. The Observatory is located in Golden Ridge’s monastery, which becomes accessible through main story progression.
No skills are required. It’s purely observation and deduction (or looking up the answer).
No. It’s a self-contained challenge that doesn’t impact your standing with any faction.
No. The code is always 4-1-4 for every player in every playthrough.
No. Those are the only two methods for accessing The Oracle’s weapon case.
Absolutely. Permanent passive bonuses always provide value, and 1% damage stacks with other percentage increases throughout your playthrough.
External Resources
Learn more about The Outer Worlds franchise and check out The Outer Worlds 2 on Steam or the official game site.
Final Thoughts: Astronomy as Game Design
The Order Initiate Scavenger Hunt represents a specific type of puzzle design philosophy: rewarding observation and environmental storytelling over pure mechanical skill. You don’t need lightning reflexes or perfect timing—just patience and the willingness to study the world around you.
For players who enjoy this style of challenge, solving it legitimately by watching the orrery and studying exhibits provides genuine satisfaction. For players who prefer efficiency over discovery, the 4-1-4 code gets you the rewards instantly. Neither approach is wrong.
What I appreciate most is how the puzzle reinforces the game’s themes. The Order of the Ascendant isn’t just a faction with a name and logo—they’re a group with genuine astronomical obsession baked into their culture. Finding astronomy puzzles in their monastery feels natural and earned, not arbitrary.
The rewards—particularly the Pitchball card—make this puzzle worth solving regardless of your preferred method. Whether you’re a completionist tracking down every collectible, an optimizer seeking every damage boost, or just someone who wants the Bits for shopping, the Order Initiate Scavenger Hunt delivers.
When you reach the Observatory, take a moment to appreciate the orrery’s craftsmanship. Watch the planets orbit. Consider the effort that went into creating a functional mechanical model of an entire star system. Then input 4-1-4 and claim your rewards—you’ve earned them either way.
Related Guides: