Looking to unlock every character skin and alternative operator in Battlefield 6? The Unit Challenges are your ticket to the game’s most exclusive cosmetic rewards. These 16 challenge categories represent some of the longest grinds in BF6, but they’re absolutely worth it if you want to stand out on the battlefield.
This guide breaks down every single Unit Challenge, explains the smartest strategies for completion, and shows you exactly what rewards you’ll earn. Let’s dive in.
What Are Unit Challenges in Battlefield 6?
Unit Challenges are special Assignment objectives that unlock alternative character skins for different classes and factions. You’ll find them in the Assignments tab once you reach Career Rank 4.
Key things to know:
- 16 total challenge categories covering all major game modes
- Multiple objectives per category – some have 3-5 sub-challenges
- Exclusive character skins for Desert Locusts, Kahina Unite, Espada, United Albion, and more
- Progressive difficulty – early challenges are straightforward, later ones demand serious skill
⚠️ Important: You must be Career Rank 4 or higher to access Unit Challenges. If you need to level up faster, check our XP farming and fast leveling guide.
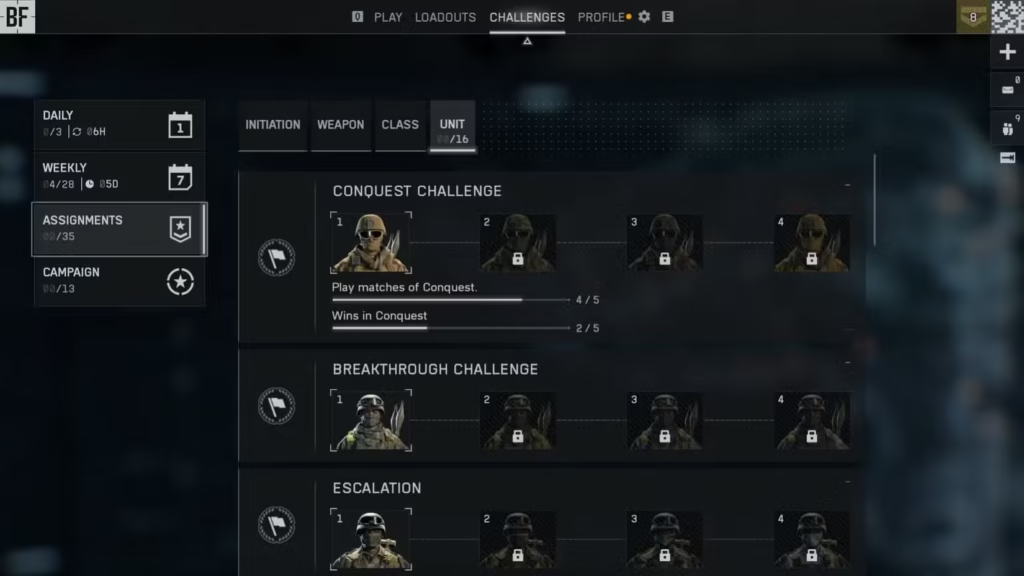
Conquest Unit Challenges – Desert Locusts Engineer Skins
Conquest is perfect for passive challenge completion since matches run long and you can approach objectives strategically. These challenges reward Desert Locusts Engineer skins.
Conquest Challenge 1: Match Completion
Requirements:
- Play 5 Conquest matches
- Win 5 Conquest matches
Strategy: Just queue up and play normally. Conquest matches average 20-30 minutes, so expect about 3-4 hours of playtime minimum. Focus on PTFO (playing the objective) to help secure those wins.
Reward: Standard Issue The Desert Locusts Engineer
Conquest Challenge 2: Score Master
Requirements:
- Score 10,000 points in a single Conquest round
- Win 5 Conquest matches
Strategy: This sounds harder than it is. Focus on:
- Capturing objectives – 500-1000 points per flag
- Defense kills – Kill enemies near friendly objectives for bonus points
- Squad orders – Follow your squad leader’s objectives for multiplier bonuses
- Revives and resupplies – Easy points that add up quickly
Playing Support class makes this trivial since you get constant points from revives and ammo drops.
Reward: Bracken The Desert Locusts Engineer
Conquest Challenge 3: Kill Mastery
Requirements:
- Get 30 kills in a single Conquest round
- Win 5 Conquest matches
Strategy: Position yourself at high-traffic midpoint flags. The key is finding a good defensive position where enemies constantly rotate through. Use meta weapons for your chosen class to maximize your effectiveness. The M433 or PW5A3 work exceptionally well here.
Pro tip: Don’t chase kills – let enemies come to you. Defend a central flag and rack up those elimination points naturally.
Reward: Gridlock The Desert Locusts Engineer
Conquest Challenge 4: Total Domination
Requirements:
- Win by holding all objectives simultaneously in Conquest
- Win 5 Conquest matches
Strategy: This is luck-based since you need your entire team coordinating. You don’t need to personally capture all flags – you just need to be IN the match when it happens. The match ends moments after one team caps all objectives, so this requires teamwork.
Best approach: Join matches in progress and hope you land on a dominant team, or squad up with friends and communicate.
Rewards: Heatwave The Desert Locusts Engineer + Coldfront The Desert Locusts Engineer
Breakthrough Unit Challenges – Kahina Unite Engineer Skins
Breakthrough’s focused combat zones make these challenges more intense but often faster to complete than Conquest equivalents.
Breakthrough Challenge 1: Match Grind
Requirements:
- Complete 5 Breakthrough matches
- Win 5 Breakthrough matches
Strategy: Standard match completion challenge. Breakthrough matches are typically shorter than Conquest (15-25 minutes), making this potentially faster. Play Assault class on offense for maximum impact.
Reward: Standard Issue Kahina Unite Engineer
Breakthrough Challenge 2: Point Accumulation
Requirements:
- Score 10,000 points in a single Breakthrough match
- Win 5 Breakthrough matches
Strategy: Easier than the Conquest version since combat is more concentrated:
- Attackers: Focus on arming objectives and getting kills near sectors
- Defenders: Hold choke points and get defense kills for huge point bonuses
- Always spot enemies using the ping system for assist points
Reward: Snare Kahina Unite Engineer
Breakthrough Challenge 3: Objective Elimination Specialist
Requirements:
- Get 40 objective kills in a single Breakthrough round
- Win 5 Breakthrough matches
Strategy: Stay inside objective boundaries while getting kills. This is actually easier than it sounds:
- On defense: Position yourself inside the sector boundaries and mow down attackers
- On offense: Push into objectives aggressively with your squad
Use smoke grenades to safely enter objective zones, then hold position with an LMG or meta SMG.
Reward: Ironclad Kahina Unite Engineer
Breakthrough Challenge 4: Outstanding Attack Master
Requirements:
- Earn 10 Outstanding Attack medals in Breakthrough sectors
- Win 5 Breakthrough matches
Strategy: The Outstanding Attack medal requires aggressive attacking play:
- First into sectors when attacking
- Multiple kills within objective zones
- Minimize squad deaths by reviving teammates quickly
- Successfully capture the sector
Play with a coordinated squad and use the Engineer class to destroy enemy deployables blocking your advance.
Rewards: Polar Kahina Unite Engineer + Sunstroke Kahina Unite Engineer
Escalation Unit Challenges – Kahina Unite Assault Skins
Escalation’s dynamic objective system creates unique opportunities for rapid challenge progression.
Escalation Challenge 1: Mode Familiarization
Requirements:
- Complete 5 Escalation matches
- Win 5 Escalation matches
Strategy: Learn Escalation’s flow – objectives shrink as the match progresses, forcing more intense combat. Stay mobile and adapt to the shrinking playspace.
Reward: Standard Issue Kahina Unite Assault
Escalation Challenge 2: Objective Control
Requirements:
- Capture 25 objectives in Escalation
- Win 5 Escalation matches
Strategy: This accumulates across multiple matches. Always push with your team to the next objective marker. The key is being present during captures – you don’t need to solo cap, just be in the zone when it flips.
Reward: Snare Kahina Unite Assault
Escalation Challenge 3: High Score Domination
Requirements:
- Score 10,000 points in a single Escalation round
- Win 5 Escalation matches
Strategy: Similar to other point-based challenges, but Escalation’s constant action makes this easier:
- Capture multiple shrinking objectives for repeated point bonuses
- Get objective kills while holding points
- Defend during lockout phases when objectives are contested
Reward: Ironclad Kahina Unite Assault
Escalation Challenge 4: Objective Kill Specialist
Requirements:
- Get 35 objective kills in a single Escalation match
- Win 5 Escalation matches
Strategy: Post up inside active objective zones with strong defensive weapons. The M250 LMG with bipod deployed shreds waves of enemies. As objectives shrink, combat intensifies – perfect for farming kills.
Rewards: Polar Kahina Unite Assault + Sunstroke Kahina Unite Assault
Rush Unit Challenges – Espada Assault Skins
Rush mode’s objective-focused gameplay creates unique challenge conditions that reward aggressive attacking or solid defending.
Rush Challenge 1: Mode Completion
Requirements:
- Play 5 Rush matches
- Win 5 Rush matches
Strategy: Rush is attack/defend M-COM stations. Learn the Rush game mode mechanics and communicate with your squad for consistent wins.
Reward: Standard Issue Espada Assault
Rush Challenge 2: M-COM Interaction Master
Requirements:
- Arm or disarm 50 M-COM explosives in Rush
- Win 5 Rush matches
Strategy: This accumulates across matches. Whether attacking or defending:
- Attackers: Rush M-COM stations when clear and arm them (7-8 seconds)
- Defenders: Defuse armed stations before they detonate
Use smoke grenades and the combat roll mechanic to reach M-COMs safely.
Reward: Thorn Espada Assault
Rush Challenge 3: Sector Control
Requirements:
- Capture or defend 50 sectors in Rush
- Win 5 Rush matches
Strategy: A “sector” is captured when both M-COM stations in an area are destroyed. Focus on:
- Attackers: Coordinate with your squad to destroy both M-COMs
- Defenders: Prevent M-COM detonations at all costs
This naturally progresses as you play Rush normally.
Reward: Urban Sprawl Espada Assault
Rush Challenge 4: Single Match Destruction
Requirements:
- Destroy 4 M-COMs in a single match
- Win 5 Rush matches
Strategy: You need to personally arm (or contribute to arming) 4 M-COM stations in one match. This is challenging:
- Communicate with squad to ensure you get arming credit
- Use Engineer to destroy enemy deployables blocking access
- Play on attacker side and rush objectives early when defense is weak
Rewards: Icebreaker Espada Assault + Scorched Espada Assault
King of the Hill Challenges – United Albion Recon Skins
King of the Hill’s single-objective focus creates intense firefights perfect for kill-based challenges.
King of the Hill Challenge 1: Mode Introduction
Requirements:
- Play 5 King of the Hill matches
- Win 5 King of the Hill matches
Strategy: One objective spawns, teams fight for control, repeat. Straightforward mode that rewards aggressive play and good positioning.
Reward: Standard Issue United Albion Recon
King of the Hill Challenge 2: Point Accumulation
Requirements:
- Score 10,000 points in a single King of the Hill match
- Win 5 King of the Hill matches
Strategy: You earn points per second while holding the objective. Focus on:
- Staying alive inside the objective zone as long as possible
- Capturing quickly when new objectives spawn
- Defending aggressively with Recon loadouts optimized for area denial
Reward: Overgrown United Albion Recon
King of the Hill Challenge 3: Kill Milestone
Requirements:
- Get 100 kills in King of the Hill
- Win 5 King of the Hill matches
Strategy: Accumulates across multiple matches. Since combat focuses on single objectives, kills come fast. Use meta SMGs or carbines for the chaotic close-quarters engagements.
Reward: Metropolis United Albion Recon
King of the Hill Challenge 4: Defensive Killstreak
Requirements:
- Get a killstreak while defending your objective in King of the Hill
- Win 5 King of the Hill matches
Strategy: You need multiple kills without dying while standing on a friendly-controlled objective. Set up defensively:
- Use cover within the objective zone
- Deploy as Support with an LMG for sustained fire
- Watch flanks and call out enemy positions to teammates
Reward: Tundra United Albion Recon
King of the Hill Challenge 5: Single Match Domination
Requirements:
- Get 25 objective kills in a single King of the Hill match
- Win 5 King of the Hill matches
Strategy: All kills must be while you’re inside the objective zone. Camp the hill with strong defensive weapons and mow down enemies as they push. The L110 LMG or DRS-IAR work beautifully here.
Reward: Canyon United Albion Recon
Squad Deathmatch Challenges – Espada Support Skins
Squad Deathmatch emphasizes small-team coordination and creates excellent opportunities for squad-focused challenges.
Squad Deathmatch Challenge 1: Match Completion
Requirements:
- Play 5 Squad Deathmatch matches
- Win 5 Squad Deathmatch matches
Strategy: 4 squads compete for kills. Stay with your squad, communicate, and focus fire on isolated enemies. Playing on Steam or console, voice chat dramatically improves win rates.
Reward: Standard Issue Espada Support
Squad Deathmatch Challenge 2: Guardian Angel
Requirements:
- Get 30 Savior kills in Squad Deathmatch
- Win 5 Squad Deathmatch matches
Strategy: Savior kills = killing an enemy actively shooting your teammate. Stick close to squadmates and watch for:
- Red damage indicators on friendly nameplates
- Enemy fire directed at teammates
- Ambush situations where you can counterattack
Accumulates across matches, so just play naturally and protect your squad.
Reward: Thorn Espada Support
Squad Deathmatch Challenge 3: Medic Duty
Requirements:
- Get 30 squad revives in Squad Deathmatch
- Win 5 Squad Deathmatch matches
Strategy: Only squad revives count (not team revives). Stick with your squad and prioritize revives:
- Clear threats before reviving
- Use smoke for safe revives in open areas
- Drag revive if necessary to pull teammates to safety
Easy to complete naturally across 10-15 matches.
Reward: Urban Sprawl Espada Support
Squad Deathmatch Challenge 4: Squad Elimination
Requirements:
- Wipe out 15 enemy squads in Squad Deathmatch
- Win 5 Squad Deathmatch matches
Strategy: A squad wipe means eliminating all 4 members of an enemy squad. You don’t need all kills yourself – your squad’s collective effort counts. Focus fire and coordinate pushes.
Reward: Icebreaker Espada Support
Squad Deathmatch Challenge 5: Single Match Dominance
Requirements:
- Wipe out 4 enemy squads in a single Squad Deathmatch
- Win 5 Squad Deathmatch matches
Strategy: This is tough. You can wipe the same squad multiple times or different squads. Communication is critical:
- Call out low-health enemies for squad cleanup
- Coordinate pushes to overwhelm isolated squads
- Track squad respawns and hit them before they regroup
Reward: Scorched Espada Support
Domination Challenges – Desert Locusts Recon Skins
Domination’s three-flag system creates constant objective rotation, perfect for capture-focused challenges.
Domination Challenge 1: Mode Completion
Requirements:
- Complete 5 Domination matches
- Win 5 Domination matches
Strategy: Classic three-flag control mode. Flip flags, hold majority, win. Fast-paced matches (10-15 minutes) make this quicker than Conquest.
Reward: Standard Issue Desert Locusts Recon
Domination Challenge 2: Capture Marathon
Requirements:
- Capture 50 objectives in Domination
- Win 5 Domination matches
Strategy: You must actively participate in captures (be in the zone as it flips). Don’t worry about defending – constantly rotate to neutral or enemy flags. This accumulates across many matches.
Reward: Bracken Desert Locusts Recon
Domination Challenge 3: Single Match Captures
Requirements:
- Capture 7 objectives in a single Domination round
- Win 5 Domination matches
Strategy: With only 3 flags (A, B, C), you need to cap flags multiple times in one match. Constantly rotate:
- Follow the spawn flip – when your team spawns on one side, enemies spawn opposite
- Cap back flags when enemies push forward
- Use fast weapons and mobility for quick rotations
Reward: Gridlock Desert Locusts Recon
Domination Challenge 4: Deathless Captures
Requirements:
- Capture 5 objectives in a single life in Domination
- Win 10 Domination matches (note: doubled requirement)
Strategy: This is brutal. You need 5 objective captures without dying once:
- Play conservatively – avoid risky engagements
- Rotate smartly – cap undefended flags
- Use smoke and cover aggressively
- Run Support for self-healing via field spec
If you die before 5 caps, the counter resets. Patience is key.
Rewards: Coldfront Desert Locusts Recon + Heatwave Desert Locusts Recon

Team Deathmatch Challenges – United Albion Support Skins
Pure kill-focused mode that emphasizes gunfighting and positioning skills.
Team Deathmatch Challenge 1: Match Completion
Requirements:
- Complete 5 Team Deathmatch matches
- Win 5 Team Deathmatch matches
Strategy: Straightforward team vs team elimination. Stay with teammates, control power positions, and outfrag the enemy team.
Reward: Standard Issue United Albion Support
Team Deathmatch Challenge 2: Kill Accumulation
Requirements:
- Get 100 kills in Team Deathmatch
- Win 5 Team Deathmatch matches
Strategy: Accumulates across matches. Use your best weapons and focus on maintaining a positive K/D. Expect 15-20 matches to complete this naturally.
Reward: Overgrown United Albion Support
Team Deathmatch Challenge 3: Multi-Kill Master
Requirements:
- Get 10 multi-kills in Team Deathmatch
- Win 5 Team Deathmatch matches
Strategy: Multi-kill = 3 quick eliminations in succession. Look for:
- Grouped enemies pushing together
- Choke points where you can surprise multiple enemies
- Explosive opportunities with grenades on clustered opponents
Accumulates across matches.
Reward: Metropolis United Albion Support
Team Deathmatch Challenge 4: Single Match Slayer
Requirements:
- Get 30 kills in a single Team Deathmatch round
- Win 5 Team Deathmatch matches
Strategy: You need to go off in one match:
- Use meta weapons you’re comfortable with
- Control spawns by understanding map flow
- Play aggressively but smartly – dying resets momentum
- Target weak players for easier eliminations
Check our best tips and tricks for gameplay optimization.
Reward: Tundra United Albion Support
Team Deathmatch Challenge 5: Killstreak Mastery
Requirements:
- Get 12 killstreaks in Team Deathmatch
- Win 5 Team Deathmatch matches
Strategy: A killstreak requires multiple kills without dying. Accumulates across matches:
- Play conservatively when on streaks
- Disengage losing fights to preserve streaks
- Use cover effectively and watch flanks
Reward: Canyon United Albion Support
Combat Expert Challenges – Fireteam Vedmak & Coyote Squad Engineer
These challenges test your core combat skills with increasingly difficult objectives.
Combat Expert Challenge 1: Payback & Multi-Kill
Requirements:
- Get 10 Payback kills
- Get 50 multi-kills
Strategy:
- Payback kills: Eliminate the enemy who just killed you (revenge kills)
- Multi-kills: 3+ quick kills in succession
Best completed on small maps (Team Deathmatch, Domination) where respawns are fast and enemy clusters are common.
Rewards: Polysteel Fireteam Vedmak Engineer + Grey Strike Coyote Squad Engineer
Combat Expert Challenge 2: Takedown Specialist
Requirements:
- Perform 10 takedowns in a single match
Strategy: Melee takedowns require holding melee button while near/behind enemies. This is tough in one match:
- Use Recon Spec Ops for stealth bonuses
- Flank constantly – don’t engage head-on
- Pick distracted enemies focused on teammates
- Small maps like Domination work best
Rewards: Avalanche Fireteam Vedmak Engineer + Glacial Coyote Squad Engineer
Combat Expert Challenge 3: High Kill Game & Killstreak
Requirements:
- Get 50 kills in a single match
- Get a 15 killstreak
Strategy: These go hand-in-hand. Play small-scale modes:
- Team Deathmatch or Squad Deathmatch for constant action
- Domination if you’re comfortable with objective combat
- Use meta weapons and don’t experiment
- Play defensively once you hit 10+ killstreak
The 15 killstreak will likely happen while pursuing 50 kills. Stay alive, play smart, and dominate.
Rewards: Sandstone Fireteam Vedmak Engineer + Drought Coyote Squad Engineer
Land Vehicle Expert Challenges – Fireteam Vedmak & Coyote Squad Assault
Vehicle-focused challenges that reward players comfortable with ground armor and transport vehicles.
Land Vehicle Expert Challenge 1: Distance & Roadkills
Requirements:
- Travel 20,000 meters in ground vehicles
- Get 50 roadkills
Strategy:
- Play Conquest or Breakthrough on large maps
- Use ATVs or buggies for speed and maneuverability
- Roadkills: Literally run over enemies with vehicles (instant kill)
- Target infantry near objectives who aren’t watching flanks
Accumulates naturally across many matches if you always grab vehicles. Check our vehicle loadout guide for optimization.
Rewards: Polysteel Fireteam Vedmak Assault + Grey Strike Coyote Squad Assault
Land Vehicle Expert Challenge 2: Kills & Captures
Requirements:
- Get 100 kills or assists with ground vehicles
- Capture 30 objectives while using ground vehicles
Strategy:
- Use tank main guns or buggy-mounted turrets for kills
- Park on objectives while gunning to complete both simultaneously
- Damage assists count – soften targets for teammate cleanup
Play Engineer to repair your vehicle between engagements for longer survival.
Rewards: Avalanche Fireteam Vedmak Assault + Glacial Coyote Squad Assault
Land Vehicle Expert Challenge 3: Vehicle Destruction & High Kills
Requirements:
- Destroy 30 vehicles while using a ground vehicle
- Get 20 kills in a single match using a ground vehicle
Strategy:
- Tank main cannons destroy vehicles easily
- Buggy turrets can shred light vehicles and aircraft
- Target enemy transports for multi-kills when passengers die
The 20 kills in one match requires:
- Tank dominance on vehicle-heavy maps
- Aggressive positioning near enemy spawns
- Prioritize infantry around objectives
Rewards: Sandstone Fireteam Vedmak Assault + Drought Coyote Squad Assault
Aerial Combat Expert Challenges – Fireteam Vedmak & Coyote Squad Recon
Aircraft challenges that separate skilled pilots from ground-pounders. These are among the hardest challenges.
Aerial Combat Expert Challenge 1: Distance & Objective Kills
Requirements:
- Travel 50,000 meters in aircraft
- Get 20 kills at objectives using aircraft
Strategy:
- Jets fly faster = distance accumulates quicker
- Helicopters are easier for precision objective kills
- Strafe objective zones repeatedly for kills
- Practice flying mechanics before attempting
Expect many matches of practice if you’re not a skilled pilot.
Rewards: Polysteel Fireteam Vedmak Recon + Grey Strike Coyote Squad Recon
Aerial Combat Expert Challenge 2: Air & Ground Destruction
Requirements:
- Destroy 50 enemy aircraft while using aircraft
- Deal 3,000 damage to ground vehicles using aircraft
Strategy:
- Jets excel at air-to-air combat with missiles
- Attack helicopters excel at ground vehicle damage
- Coordinate with gunners in multi-seat aircraft
- Target enemy helicopters first (easier than jets)
Air-to-air combat requires significant practice. Join Reddit’s BF6 community for pilot tips.
Rewards: Avalanche Fireteam Vedmak Recon + Glacial Coyote Squad Recon
Aerial Combat Expert Challenge 3: Single Match Dominance
Requirements:
- Get 20 kills in a single match while using aircraft
Strategy: You need an incredible game in an aircraft:
- Use attack helicopters with gunner support
- Strafe infantry clusters around objectives
- Destroy occupied vehicles for multi-kills
- Stay alive – aircraft survival is key
Consider playing on PlayStation or Epic Games where you might find less experienced pilots to farm.
Rewards: Sandstone Fireteam Vedmak Recon + Drought Coyote Squad Recon

Protection Expert Challenges – Fireteam Vedmak Support & Kahina Unité Assault
Support-focused challenges emphasizing team protection and assistance.
Protection Expert Challenge 1: Savior Kills
Requirements:
- Get 30 Savior kills
Strategy: Kill enemies actively engaging your teammates. Look for:
- Red damage indicators on friendly nameplates
- Teammates under fire in your peripheral vision
- 1v1 duels where you can third-party
Accumulates across matches naturally if you stick with teammates.
Reward: Polysteel Fireteam Vedmak Support
Protection Expert Challenge 2: Drag Revives
Requirements:
- Drag and revive 50 teammates at enemy-held or contested objectives
Strategy: Instead of instant revive, hold the revive button to drag downed teammates to safety:
- Only works at contested objectives (red or yellow flags)
- Drag behind cover before completing revive
- Use smoke grenades for safe extractions
Play Support on Breakthrough or Conquest for constant opportunities.
Rewards: Avalanche Fireteam Vedmak Support + Coldfront Kahina Unité Assault
Protection Expert Challenge 3: Assists & Repair Tool Kill
Requirements:
- Get 50 assists of any kind in a single match
- Destroy 1 vehicle with the Repair Tool
Strategy:
- Assists: Damage enemies for teammates to finish. Use LMGs to spray enemy clusters
- Repair Tool kill: Play Engineer, sneak up on enemy vehicles, and “repair” them (damages enemies). Takes ~10 seconds to destroy a full-health vehicle
The repair tool kill is hilariously satisfying but dangerous. Target distracted vehicle operators.
Reward: Sandstone Fireteam Vedmak Support
Explosives Expert Challenges – Coyote Squad Support & Desert Locusts Assault
Challenges focused on explosive ordinance and area damage.
Explosives Expert Challenge 1: Grenade Mastery
Requirements:
- Get 50 kills or assists using grenades
Strategy:
- Use Assault class with Breacher training for extra grenades
- Target objective clusters where enemies group up
- Assists count – soften groups for teammates to finish
Accumulates across many matches. Check our Assault class challenges guide for more tips.
Rewards: Grey Strike Coyote Squad Support + Bracken The Desert Locusts Assault
Explosives Expert Challenge 2: Multi-Kill Explosives
Requirements:
- Get 20 multi-kills using explosives
Strategy: Need 3+ kills in quick succession with explosives:
- Equip rocket launcher as Engineer
- Destroy occupied vehicles for instant multi-kills
- Target vehicle spawns when enemies cluster around them
- C4 traps on objectives work well too
Reward: Glacial Coyote Squad Support
Explosives Expert Challenge 3: Single Match Explosive Domination
Requirements:
- Get 30 kills in a single match using explosives
Strategy:
- Play Engineer with C4 and rocket launcher
- Small maps (Domination, Team Deathmatch) for target density
- Spam explosives at choke points and objectives
- Resupply frequently from Support teammates or ammo crates
Extremely challenging – expect multiple attempts.
Reward: Drought Coyote Squad Support
Weapon Expert Challenges – Espada Recon Skins
These challenges test your versatility across BF6’s entire weapon arsenal.
Weapon Expert Challenge 1: Weapon Category Master
Requirements:
- Get a kill with each weapon type in a single match (15 times)
Strategy: BF6 has 8 weapon categories (AR, Carbine, SMG, LMG, DMR, Sniper, Shotgun, Pistol). You must:
- Get 1 kill with each category in a match
- Repeat 15 times across different matches
Bring multiple weapons and a pistol. Start each match working through all types systematically.
Reward: Thorn Espada Recon
Weapon Expert Challenge 2: Range Mastery
Requirements:
- Get short, medium, and long-range kills in a single match (10 times)
Strategy:
- Use versatile weapons like assault rifles with long-range optics
- Hipfire = close range, ADS = medium/long range
- Play large maps (Conquest, Breakthrough) with varied engagement distances
Repeat across 10 matches. Track your progress each game.
Reward: Icebreaker Espada Recon
Weapon Expert Challenge 3: No Reload Streak
Requirements:
- Get 5 kills without reloading
Strategy:
- Use Support class with LMGs (high magazine capacity)
- Equip extended magazines for maximum ammo
- Aim for headshots to conserve bullets
- Target grouped enemies for efficient kills
The L110 or DRS-IAR with 100+ round magazines make this manageable. Wait for enemy clusters and let it rip.
Rewards: Scorched Espada Recon + Heatwave The Desert Locusts Assault
Headshot Expert Challenges – Espada Engineer Skins
Precision challenges that demand excellent aim and target tracking.
Headshot Expert Challenge 1: Headshot Accumulation
Requirements:
- Get 100 headshot hits
Strategy: Note this says “hits” not “kills” – easier than it sounds:
- Use weapons with low recoil for easier headshot tracking
- Aim slightly above center mass and let recoil ride up
- Practice on stationary targets defending objectives
Accumulates across many matches naturally. Our weapon control guide helps with precision aiming.
Reward: Thorn Espada Engineer
Headshot Expert Challenge 2: Single Match Precision
Requirements:
- Get 30 headshot kills in a single match
Strategy: This is brutal – 30 headshot kills (not hits) in one game:
- Play small maps (Team Deathmatch, Domination) for target density
- Use familiar weapons you can control perfectly
- Lower sensitivity slightly for precise aiming
- Target distracted enemies fighting teammates
Check our no recoil techniques and optimal settings for better accuracy.
Reward: Icebreaker Espada Engineer
Headshot Expert Challenge 3: Pistol Headshot Master
Requirements:
- Get 4 headshot kills with sidearms without reloading
Strategy: Four consecutive headshot kills with a pistol without reloading once:
- Use the M44 Revolver – high damage per shot (can 1-shot headshot)
- Alternative: ES 5.7 for faster follow-ups
- Target wounded enemies for easier kills
- Wait for perfect shots – don’t waste bullets
See our all pistols ranked guide for the best sidearm choices.
Reward: Scorched Espada Engineer
Adaptable Challenges – Desert Locusts Support Skins
The final and arguably toughest category, testing sustained performance without dying.
Adaptable Challenge 1: Medic Marathon
Requirements:
- Revive 15 teammates in a single life
Strategy: Revive 15 teammates without dying once:
- Play large-scale modes (Conquest, Breakthrough) for more revive opportunities
- Stay behind frontlines – don’t push aggressively
- Use smoke grenades for safe revives
- Prioritize survival over kills
Play extremely conservatively. Your goal is revives, not combat.
Reward: Bracken The Desert Locusts Support
Adaptable Challenge 2: Repair Specialist
Requirements:
- Repair 3,000 health of damaged vehicles in a single life
Strategy:
- Play Engineer in large-scale modes
- Follow friendly tanks and repair constantly
- Stay near cover to avoid sniper fire while repairing
- Communicate with vehicle operators to coordinate safe repairs
Each repair tick adds to your total. Stay alive and keep repairing throughout the match.
Reward: Coldfront The Desert Locusts Support
Adaptable Challenge 3: Deathless Domination
Requirements:
- Get 50 kills or assists in a single life
Strategy: This is hands-down one of the hardest challenges in BF6. You need 50 kills/assists without dying:
Recommended approach:
- Play Breakthrough on defense – enemies funnel into predictable choke points
- Use LMG with bipod for sustained fire from safe positions
- Prioritize assists over kills – damage enemies for teammates to finish
- Disengage losing fights immediately – survival is everything
- Use Support field spec for self-healing
- Communicate constantly with squad for backup
Key mindset: Play like your life depends on it (because your challenge progress does). Avoid all risks. Let enemies come to you. This may take 20+ attempts.
Reward: Heatwave The Desert Locusts Support
Pro Tips for Completing Unit Challenges Efficiently
General Strategy Tips
Stack compatible challenges: Work on multiple challenges simultaneously. For example:
- Conquest point challenges + kill challenges in same matches
- Vehicle distance + vehicle kills together
- Multi-kills + explosive kills with rocket launchers
Choose optimal modes:
- Large-scale (Conquest, Breakthrough): Vehicle challenges, point accumulation
- Small-scale (TDM, Domination): Kill challenges, headshot challenges
- Specific modes: Rush for M-COM challenges, King of the Hill for objective holds
Use XP Boosters wisely: Rank up faster to unlock better weapons for harder challenges. Learn how to activate XP boosters effectively.
Optimize your loadouts: Don’t experiment during challenge runs. Use proven meta weapons and loadouts you’re comfortable with.
Play during peak hours: Full servers with balanced teams make wins more achievable than lopsided matches.
Technical Optimization
Fix performance issues first:
- High CPU usage problems hurt your reaction time
- Packet loss issues cause hit registration problems
- Optimize your game settings for maximum FPS
Consider your input method: The controller vs keyboard/mouse debate matters for precision challenges.
Mode-Specific Advice
For objective-based challenges:
- Always spot enemies for assist points
- Understand all game modes thoroughly
- Learn the best maps for each challenge type
For kill-based challenges:
- Master weapon bloom mechanics
- Use field specs strategically
- Complete related challenges like Deadeye, Close Quarters, and Danger Close
Rewards Summary: What You’ll Unlock
Completing all Unit Challenges unlocks 60+ character skins across four factions:
Desert Locusts (Engineer/Recon/Support/Assault):
- Standard Issue, Bracken, Gridlock, Heatwave, Coldfront variants
Kahina Unite (Engineer/Assault):
- Standard Issue, Snare, Ironclad, Polar, Sunstroke variants
Espada (Assault/Support/Recon/Engineer):
- Standard Issue, Thorn, Urban Sprawl, Icebreaker, Scorched variants
United Albion (Recon/Support):
- Standard Issue, Overgrown, Metropolis, Tundra, Canyon variants
Fireteam Vedmak (All Classes):
- Polysteel, Avalanche, Sandstone variants
Coyote Squad (All Classes):
- Grey Strike, Glacial, Drought variants
These exclusive skins show your dedication and skill. Many are among the rarest cosmetics in the game since completing all 16 challenge categories requires 50+ hours of focused gameplay.
Tracking Your Progress
In-game tracking:
- Open Collection Menu → Assignments → Unit Challenges
- Each challenge shows progress bars and requirements
- Completed challenges display a green checkmark
External tracking: Consider creating a spreadsheet to track:
- Challenges completed per category
- Estimated time remaining
- Win requirements (many need 5-10 wins per mode)
Pro tip: Focus on completing “win X matches” requirements passively while working on skill-based objectives.
Common Mistakes to Avoid
❌ Attempting too many challenges simultaneously – Focus on 2-3 categories at once ❌ Using unfamiliar weapons – Stick with your best guns during challenge runs ❌ Playing tilted – Take breaks when frustrated; performance drops dramatically when angry ❌ Ignoring prerequisites – Some challenges build on each other; complete in order ❌ Solo queuing for squad challenges – Squad up for coordinated play when needed ❌ Rage quitting – Leaving matches doesn’t count toward completions
Are Unit Challenges Worth It?
Unit Challenges represent BF6’s longest grind, requiring 50-100+ hours for full completion. They’re worth it if you:
✅ Want exclusive character customization options ✅ Enjoy long-term progression goals ✅ Like challenging yourself across all game modes ✅ Play BF6 regularly and want meaningful objectives
They’re NOT worth grinding if you: ❌ Only play casually a few hours per week ❌ Get frustrated by difficult challenges ❌ Don’t care about cosmetic rewards ❌ Prefer playing one mode exclusively
The hardest challenges (Adaptable 3, Combat Expert 3, Aerial Combat Expert series) alone can take 10+ hours of attempts. Set realistic expectations and work on challenges gradually over weeks or months.
For players chasing 100% completion, Unit Challenges are mandatory. They’re also excellent skill-building exercises that force you to master every aspect of Battlefield 6’s gameplay.
Looking for more completion challenges? Check out our guides for Assault, Engineer, Recon, and Bullet Storm challenges.
Want to unlock everything faster? Our max level rank system guide and all camos unlock guide help you progress efficiently.
Good luck with your Unit Challenge grind, soldier. See you on the battlefield!
Related Guides: