A First Foothold marks a turning point in your early ARC Raiders experience. After completing simpler fetch quests and learning the basics, Apollo gives you something more substantial—a multi-objective mission that requires you to travel across The Blue Gate map repairing critical infrastructure.
Unlike quests that send you hunting for specific items like toasters or mechanical components, A First Foothold tests your navigation skills and map awareness. You’ll need to locate and repair four different structures scattered across one of the game’s larger maps.
The good news? You can tackle these objectives in any order you want. The quest doesn’t force a specific sequence, so you can plan an efficient route based on where you spawn or which areas feel safest at the moment.
Quest Overview: What You’re Actually Doing
Quest giver: Apollo
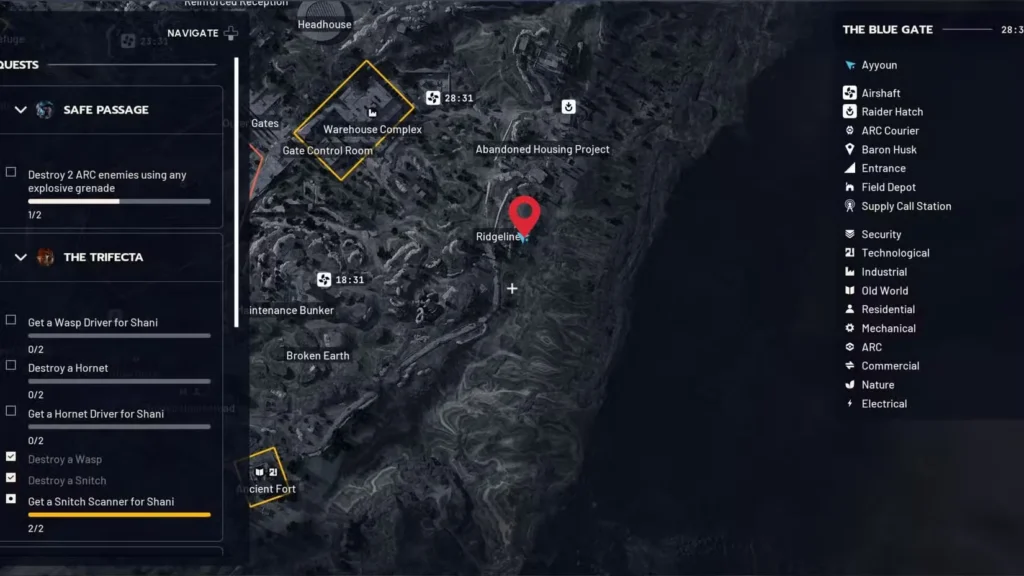
Map required: The Blue Gate
Number of objectives: 4
Can complete in any order: Yes
PvP risk: Varies by location
The four tasks:
- Stabilize the Observation Deck near Ridgeline
- Enable the Comms Terminal near Olive Grove
- Rotate the Satellite Dishes on the church roof north of Data Vault
- Nail Down the Roof Plates on the raider structure near Trapper’s Glade
Each objective involves finding a specific structure and interacting with it to complete repairs. No combat is technically required, but since you’re traversing a PvP-enabled map, encounters are always possible.
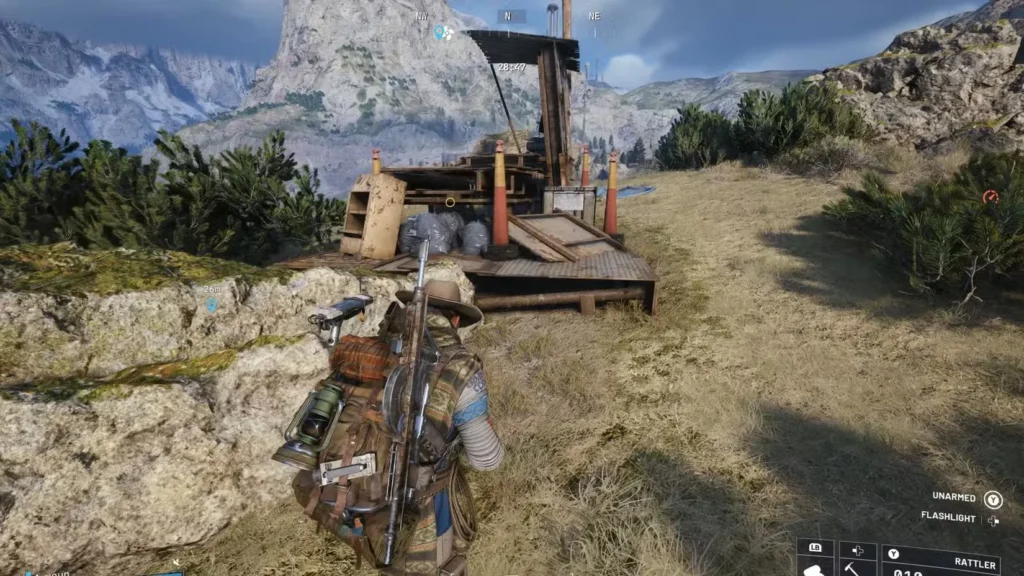
Objective 1: Stabilize the Observation Deck (Ridgeline)
Location: Eastern side of The Blue Gate, just below Abandoned Housing Project
Landmark: Damaged observation deck with sliding metal plates
Difficulty: Easy
Finding the Observation Deck
Head to the Ridgeline area on the eastern portion of The Blue Gate map. This is a relatively exposed location on elevated terrain, making it easy to spot from a distance but also leaving you vulnerable to long-range attacks.
What you’re looking for:
- A damaged observation platform structure
- Metal plates visibly sliding off the framework
- Multiple interaction points around the deck
Completing the Repair
Once you arrive, you’ll see several points where you can interact with the damaged structure. Approach any of these interaction points and hold the prompt to begin stabilizing the observation deck.
Quick completion tips:
- Check surroundings first – The elevated position makes you visible from multiple angles
- Repair quickly – The interaction doesn’t take long, so just get it done
- Have an escape route – Know where you’ll go if hostiles approach mid-repair
This is probably the most exposed objective in the entire quest. The Ridgeline’s elevation gives you good visibility, but it cuts both ways—other players can spot you easily too. If you’re learning how to survive in contested areas, treat this as practice for staying alert while completing objectives.
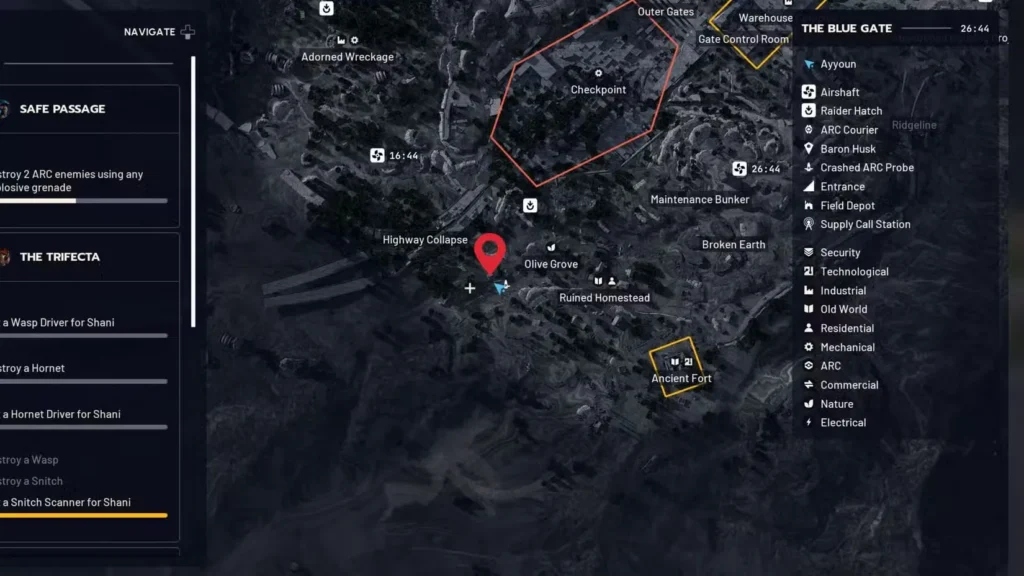
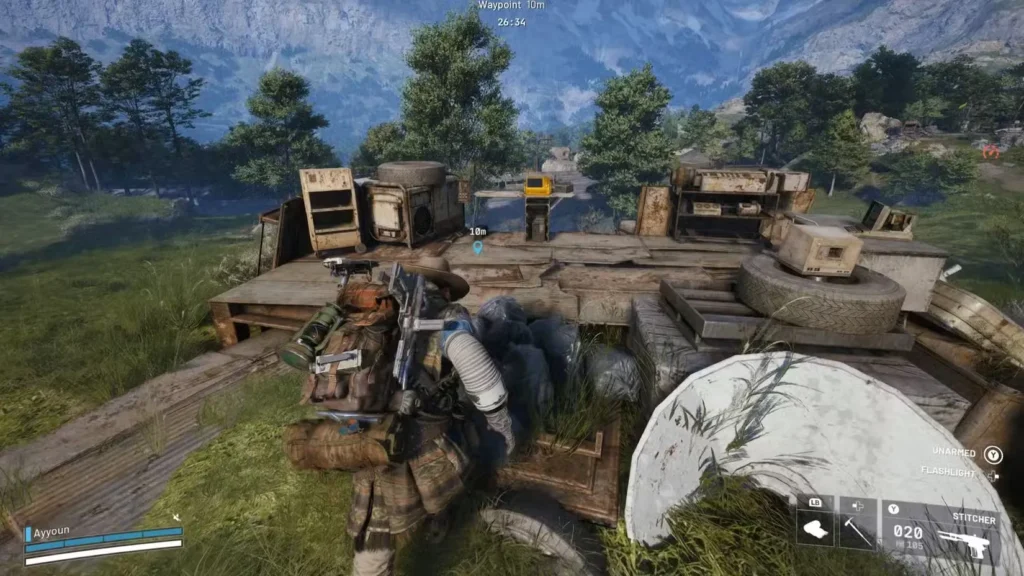
Objective 2: Enable the Comms Terminal (Olive Grove)
Location: Southwest of Ridgeline, near Olive Grove
Landmark: Yellow terminal on a makeshift platform
Difficulty: Easy
Navigating to the Terminal
From the Ridgeline observation deck, travel southwest toward the Olive Grove area. This is a relatively short journey, making these two objectives efficient to complete back-to-back.
Identifying the terminal:
- Bright yellow color makes it stand out
- Mounted on a constructed platform
- Obvious interaction prompt when you approach
Activating the Comms
Walk up to the yellow terminal and interact with it to restore communications. The repair animation is quick—you’ll spend more time getting to the location than actually completing the objective.
Strategic considerations:
- Cover is limited – The platform is somewhat exposed
- Quick getaway – Flat terrain allows for easy escape if needed
- Central location – This spot is roughly midway between several other objectives
The comms terminal objective is straightforward. Unless you run into hostile players or ARCs in the area, you should be in and out within seconds. If you’re completing multiple objectives in one raid, this is a good second or third stop since it’s centrally positioned.
Objective 3: Rotate the Satellite Dishes (Church Roof)
Location: Northernmost area of The Blue Gate, above Data Vault
Landmark: Abandoned church with construction equipment
Difficulty: Medium (requires climbing)
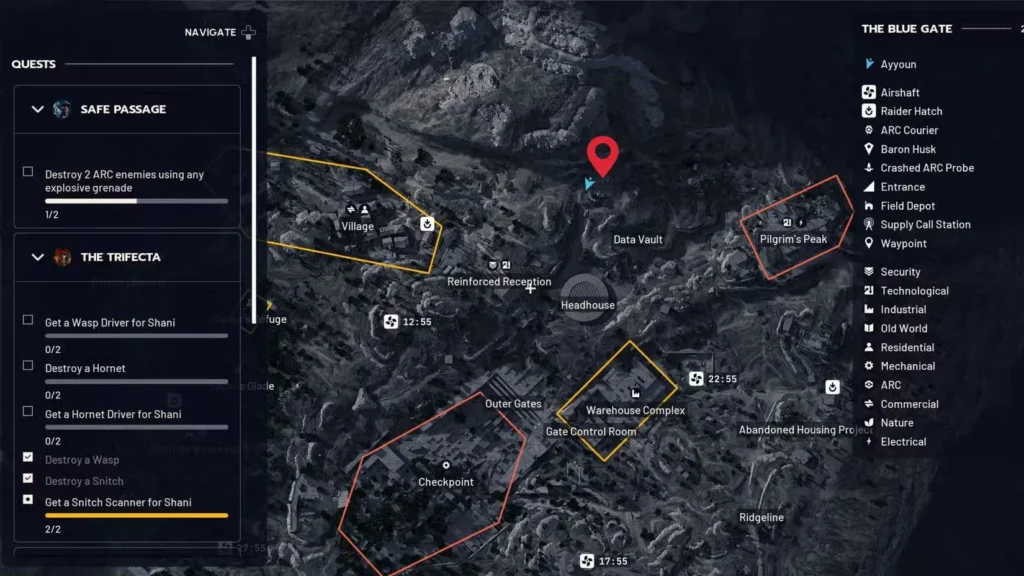
Locating the Church
Head to the northern edge of The Blue Gate map, just above the Data Vault area. The church is hard to miss—it’s one of the more distinctive structures on the map with its traditional architecture contrasting against the industrial ruins.
Spotting the objective:
- Large abandoned church building
- Construction equipment scattered around the perimeter
- Satellite dish visible on the roof
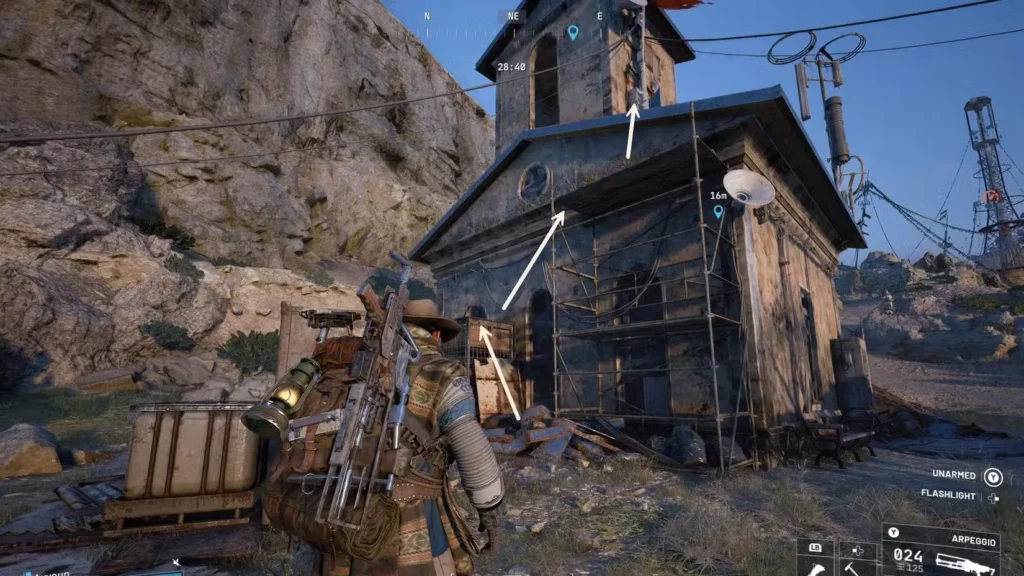
Accessing the Roof
Unlike the previous two objectives which were at ground level, this one requires some vertical movement. Look for the platforms on the sides of the church that allow you to climb up.
Climbing safely:
- Use the side platforms – They provide the easiest access route
- Watch for campers – Churches often attract players using them as overwatch positions
- Listen for footsteps – Audio cues can save your life
Once you’re on the roof, locate the satellite dish and interact with it to calibrate it. The interaction is quick, but being elevated makes you visible from considerable distances.
Why this objective is riskier:
The church’s prominence makes it a known landmark that players use for navigation and tactical positioning. You’re more likely to encounter other raiders here than at the observation deck or comms terminal. Consider checking the Eyes in the Sky quest guide if you need practice with elevated objectives under PvP pressure.
Objective 4: Nail Down the Roof Plates (Raider Structure)
Location: Near Raider’s Refuge, close to Trapper’s Glade
Landmark: Broken structure with red and green flags
Difficulty: Medium (requires climbing, higher player traffic)
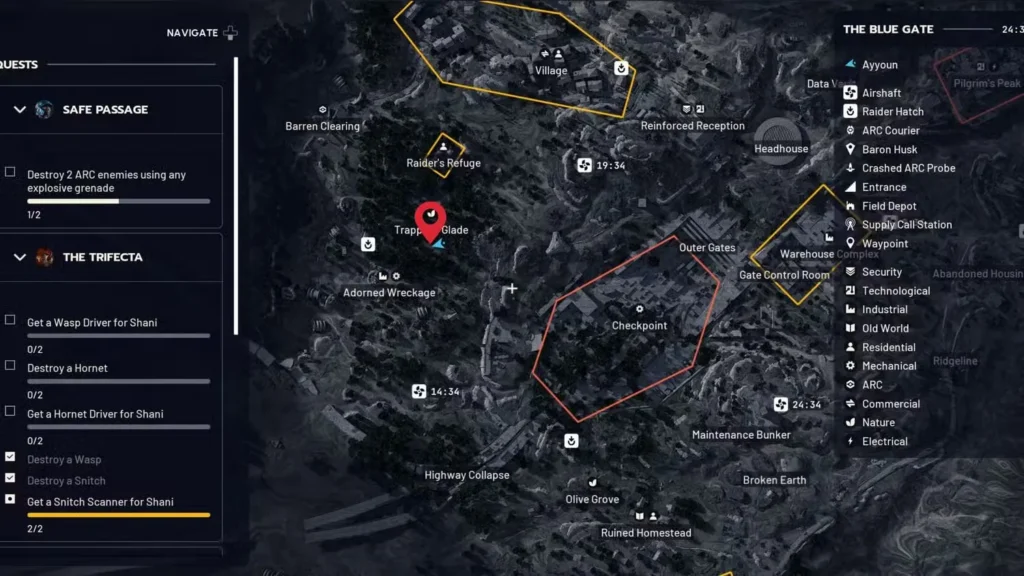
Finding the Raider Structure
The final objective takes you to the Raider’s Refuge area, specifically near Trapper’s Glade. This is one of the busier zones on The Blue Gate map since it’s close to extraction points and contains decent loot.
Identifying the structure:
- Damaged building with visible roof plates
- Red and green flag hoisted on top (key visual identifier)
- Makeshift construction around the base
Climbing and Repairing
Scale the structure using the available climbing points. Once you reach the roof, interact with the damaged section to nail down the plates and complete the repair.
High-risk completion area:
- Proximity to Raider’s Refuge – Heavy player traffic
- Near extraction zones – Players heading in/out increase encounter chances
- Limited cover on structure – You’re exposed while climbing
This is arguably the most dangerous objective in A First Foothold simply because of the location. The Raider’s Refuge area sees constant activity, especially during peak hours. Players farming loot, completing quests like Hatch Repairs, or heading to extract all pass through here.
Survival tips for this objective:
- Scout before climbing – Spend 30 seconds observing the area
- Climb during lulls – If you hear gunfire nearby, wait it out
- Have extraction planned – Know your nearest hatch location
- Use Safe Pockets – Protect any valuable items you’re carrying
If you’re playing with friends, have one person provide overwatch while another completes the objective.
Optimal Route Planning for A First Foothold
Since you can complete objectives in any order, smart routing saves time and reduces risk. Here are several approaches based on different priorities:
Route 1: Safest Path (Risk-Averse)
Best for solo players or those carrying valuable loot:
- Comms Terminal (Olive Grove) – Central, relatively safe
- Observation Deck (Ridgeline) – Exposed but quick
- Satellite Dishes (Church) – Moderate risk
- Roof Plates (Raider’s Refuge) – Highest risk, save for last
Reasoning: Start with lower-risk objectives and work toward the dangerous Raider’s Refuge area last. If you die at the final objective, you’ve still completed most of the quest.
Route 2: Fastest Completion (Time-Efficient)
Best for experienced players wanting quick turnaround:
- Observation Deck (Ridgeline) – Eastern spawn point
- Comms Terminal (Olive Grove) – Short southwest travel
- Roof Plates (Raider’s Refuge) – Continue southwest
- Satellite Dishes (Church) – North to finish
Reasoning: Minimizes total travel distance by following a logical geographic progression around the map.
Route 3: High-Value Combo (Multi-Tasking)
Best for players farming multiple objectives:
Combine A First Foothold with other Blue Gate quests like Reduced to Rubble or With a Trace by completing objectives near each other.
Reasoning: Maximizes efficiency by knocking out multiple quest objectives in a single raid.
Recommended Loadout for A First Foothold
This quest doesn’t require combat, so your loadout should prioritize mobility and defense over raw firepower:
Budget Loadout Option
- Weapon: Basic rifle or SMG for self-defense
- Shield: Ferro or equivalent for protection
- Items: Basic healing consumables like mushrooms
- Safe Pocket: Use it for any valuable loot you find
Total cost: Minimal, won’t hurt much if you lose it
Free Loadout Consideration
Running completely free gear is viable for this quest since you’re just interacting with objects, not fighting ARCs or players. However, you lose Safe Pocket access, which means any blueprints or rare materials you find are at risk.
The trade-off: Zero financial risk vs. zero item protection
Check our weapon upgrade guide if you’re unsure what constitutes a “good enough” budget weapon for self-defense during quest runs.
Dealing with PvP During Quest Completion
A First Foothold objectives make you vulnerable because you’re stationary during interactions. Here’s how to minimize deaths:
Before Each Objective
- Scout the area – Spend 20-30 seconds observing before approaching
- Listen for audio cues – Gunfire, footsteps, or vehicle sounds indicate nearby players
- Check elevation – Scan rooftops and hills for snipers
During Interactions
- Position strategically – Stand where you have cover from at least one direction
- Stay alert – Keep your camera moving to watch for approaches
- Be ready to abort – If you see hostiles, abandon the interaction and reposition
After Completion
- Don’t linger – Move to your next objective or extraction immediately
- Vary your routes – Don’t take obvious paths that predictable players use
- Use terrain – Stay in cover when possible, avoid open ground
Understanding all shield types helps you choose the right protection for quest runs where you’ll be exposed during interactions.
Quest Rewards: What You’re Working Toward
Successfully completing all four objectives and extracting rewards you with a solid grenade package:
Reward breakdown:
- 3x Shrapnel Grenades – Area damage, good for clearing grouped enemies
- 3x Snap Blast Grenades – Quick detonation, useful for aggressive plays
- 3x Heavy Fuze Grenades – High damage, slower fuse
Why these rewards matter:
Grenades are consumable tools that can turn fights in your favor. Unlike permanent items, you’ll use these up over time, making them valuable but not game-changing rewards. They’re particularly useful for:
- Clearing ARC patrol groups when farming resources
- PvP engagements where area denial wins fights
- Forcing enemies out of cover during contested situations
The variety in grenade types means you have options for different tactical situations. Shrapnel grenades excel at damage, Snap Blasts provide instant impact, and Heavy Fuze grenades deliver maximum destruction with planning.
Common Mistakes to Avoid
Mistake #1: Doing This Quest During Peak Hours
The Blue Gate sees heavy traffic during prime time. If possible, attempt A First Foothold during off-peak hours when fewer players are online. You’ll complete objectives faster with fewer interruptions.
Mistake #2: Not Using Safe Pockets
Even though this is a “repair quest,” you’ll likely stumble upon loot while traveling between objectives. Always use Safe Pockets to protect valuables you find along the way.
Mistake #3: Completing Objectives in Terrible Order
If you start with the Raider’s Refuge objective and die, you’ve wasted your entire raid. Save high-risk objectives for last so you’ve already completed most of the quest if things go wrong.
Mistake #4: Forgetting to Extract
This sounds obvious, but you’d be surprised how many players complete all four objectives, then die before extracting and receive zero rewards. The quest only counts as complete after you successfully extract back to Speranza.
Combining with Other Blue Gate Quests
If you’re already heading to The Blue Gate for A First Foothold, consider stacking other objectives to maximize efficiency:
Compatible Quests
- Raiders Refuge Cellar Door – Same map, different objectives
- Marked for Death – If objectives overlap
- A Lay of the Land – Similar objective style
Resource Farming Opportunities
While completing A First Foothold, you’ll pass through areas containing:
- Supply drops – Check spawn points along your route
- Sentinel Firing Cores – From defeated ARC enemies
- Snitch Scanners – Rare tech components
Efficient players knock out multiple objectives per raid rather than making dedicated trips for single quests.
Progression Context: Why Apollo’s Quests Matter
A First Foothold represents Apollo’s investment in rebuilding infrastructure across the maps. Completing his quest chain unlocks additional missions and helps you level up faster through consistent quest XP.
Apollo’s quest line typically includes:
- Infrastructure repair missions (like A First Foothold)
- Reconnaissance objectives
- Territory control tasks
Each completed quest builds your relationship with Apollo, potentially unlocking better rewards in later missions. It’s worth completing these early quests even if the rewards seem modest—they’re building blocks for more substantial content later.
If you’re new to the game, check out our best skills to unlock first to ensure you’re investing skill points wisely while completing these early quests.
Advanced Tips for Repeat Completions
If you’re helping friends complete this quest or running it on alternate characters:
Speed Running Strategies
- Memorize exact locations – No more checking maps mid-raid
- Optimize spawn selection – Choose spawn points near your first objective
- Travel light – Absolutely minimal gear for maximum speed
- Skip all combat – Only fight if directly threatened
Teaching New Players
If you’re guiding someone through their first A First Foothold run:
- Let them lead – They need to learn navigation
- Provide overwatch – Protect them from threats they miss
- Share map knowledge – Point out landmarks and safe routes
- Explain PvP zones – Teach them which areas are dangerous and why
Veterans helping newcomers should review our complete tips guide to refresh fundamentals you might explain to new players.
What Comes After A First Foothold?
Completing this quest opens up additional content from Apollo and other quest givers. You’ll receive new missions that build on the skills you demonstrated here—navigation, objective completion under pressure, and successful extraction.
Next steps in your progression:
- Continue Apollo’s quest chain as new missions unlock
- Explore other quest givers like Shani for different mission types
- Focus on Workshop upgrades using materials you’ve gathered
- Improve your loadouts with better blueprints
A First Foothold teaches you that quest completion isn’t just about following markers—it requires situational awareness, risk assessment, and smart routing. These skills transfer directly to more complex missions later.
Final Thoughts on A First Foothold
This quest serves as a bridge between beginner-friendly missions and more challenging content. It forces you to navigate a full map, manage risk across multiple locations, and extract successfully with your rewards.
Key takeaways:
- Complete objectives in any order – Plan efficient routes
- Stay alert for PvP – The Blue Gate sees heavy traffic
- Use Safe Pockets – Protect loot found during the quest
- Extract to complete – Objectives don’t count until you’re back at Speranza
- Save Raider’s Refuge for last – Highest risk objective should be final
The grenade rewards you receive set you up nicely for future engagements, whether you’re fighting ARCs or defending yourself against hostile players. Don’t underestimate the value of having quality throwables in your inventory.
Ready to tackle more challenges? Start your journey in ARC Raiders on PlayStation or Xbox today.
Good luck with your infrastructure repairs, Raider!