⚡ Quick Answer
To open the Isolation Ward in RE9, you need the ID Wristband (Level 2). Obtain it by inserting the Artificial Heart and Artificial Lungs into the organless corpse in the East Wing Examination Room, defeating the reanimated zombie, and looting the wristband from its wrist. Then use it on the green security door in the north-east corridor of the East Wing, between the Blood Lab and Waiting Room.
The Isolation Ward in Resident Evil Requiem is one of the most critical locked areas in the Rhodes Hill Chronic Care Center. It sits in the north-east corner of the East Wing, glowing ominously with red lighting — and it will stay shut until you track down the right key item. Unlike a simple keycard, unlocking this area requires solving one of RE9’s most memorable puzzles: the organless corpse in the Examination Room. This guide walks you through every step, from finding the wristband to exploring what’s inside.
What You Need to Open the Isolation Ward
The Isolation Ward security door uses a green biometric lock that only responds to Level 2 clearance. That means you cannot enter this area with the Level 1 ID Wristband you pick up near the Lead Researcher’s Office — you need to earn the upgrade.
| Required Item | Where to Get It | Purpose |
|---|---|---|
| ID Wristband (Level 1) | Corridor near Lead Researcher’s Office, East Wing 2F | Unlocks West Wing doors & Custodian’s Office |
| Wrench | Custodian’s Office, West Wing (requires Level 1) | Opens the broken Cold Storage valve door |
| Artificial Lungs | Organ Transport Box in the Garage, West Wing | Revives the Examination Room corpse |
| Artificial Heart | Cold Storage, West Wing (opened with Wrench) | Revives the Examination Room corpse |
| ID Wristband (Level 2) | Looted from the reanimated corpse, Examination Room | Opens the Isolation Ward security door |
Important: You cannot skip ahead. The Level 2 wristband is physically locked on the corpse’s wrist — it only drops after you install both organs, defeat the zombie, and loot the body. There is no shortcut around this puzzle.
Step-by-Step: How to Get the Level 2 ID Wristband
Follow these steps in order. Each one unlocks the next, so don’t worry if a door seems impossible right now — you’ll circle back with the right item.
Get the ID Wristband (Level 1)
Head to the second floor of the East Wing. The Level 1 ID Wristband is on a headless corpse just outside the Lead Researcher’s Office. Pick it up — but be ready to move fast. The moment you grab it, the hulking enemy called Chunk will spawn. You can fight him (3 Requiem headshots) or loop around the Waiting Room to escape. See our guide on the Level 1 ID Wristband location in RE Requiem for the exact path.
Grab the Wrench from Custodian’s Office
With Level 1 clearance, open the West Wing’s Level 1 security door south of the Kitchen. The Custodian’s Office is just beyond it — and it doubles as a save point. Collect the Wrench here. You’ll also want to look around the office for extra supplies. This tool is essential for opening Cold Storage. Our guide on how to open the door without a handwheel in the Care Center explains the full Cold Storage process.
Unlock the Organ Transport Box for the Artificial Lungs
Proceed through the Custodian’s Office into the Garage. After handling the bulldozer zombie encounter, examine the Organ Transport Box on the floor. To open it, follow the instructions from the Leatherbound Notebook found in the Lead Researcher’s Office puzzle box. The Artificial Lungs are inside. Need help cracking it? Read our full Organ Transport Box guide for the exact switch sequence.
Collect the Artificial Heart from Cold Storage
The Cold Storage door is in the north-west corner of the West Wing’s first floor. When you first try the handwheel it snaps clean off. Use the Wrench on the hexagonal protrusion to force it open. Inside you’ll find the Artificial Heart hanging on a rack. Watch out — The Butcher may be patrolling nearby, so stay alert.
Revive the Organless Corpse in the Examination Room
Return to the Examination Room in the East Wing with both organs. Interact with the corpse on the gurney and insert the Artificial Heart and Artificial Lungs into its chest cavity. The moment both organs are placed, the corpse reanimates. Other “sleeping” zombies in the room may also wake up — clear the room first if possible.
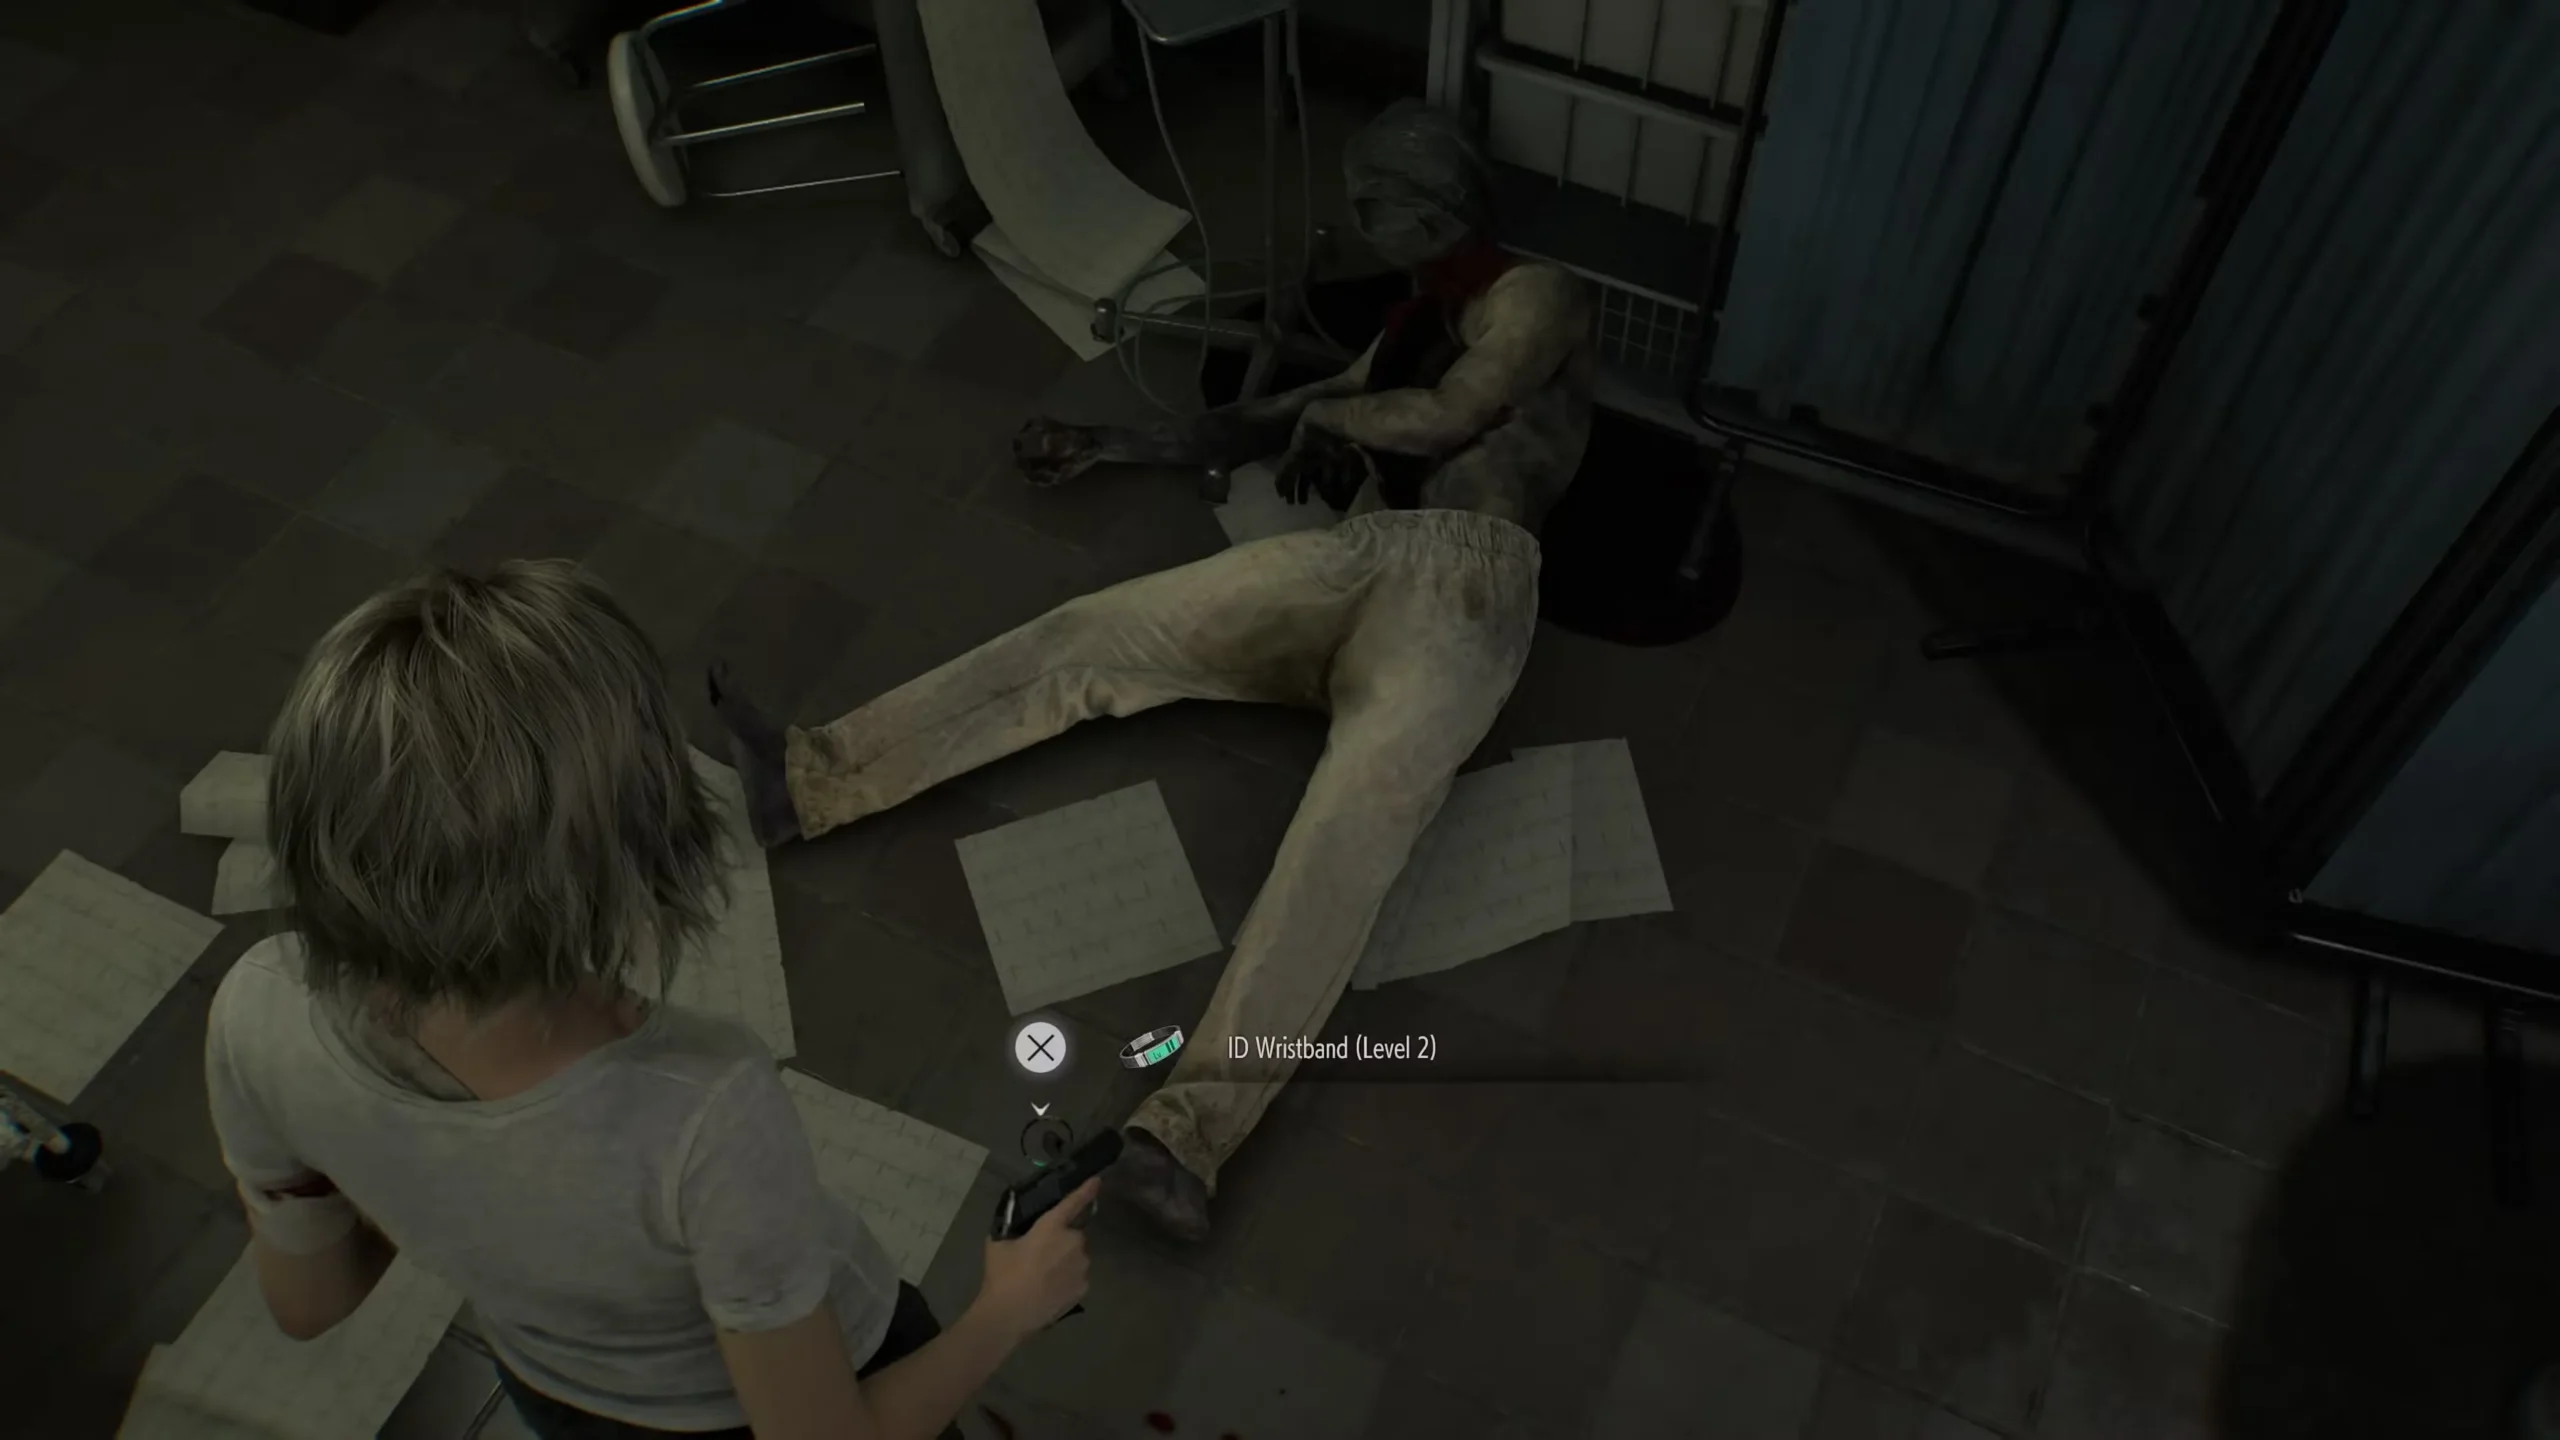
Kill the Reanimated Zombie & Loot the Wristband
The revived zombie fights back. Aim for the head — it will go down after a few solid hits. Once it falls, interact with the corpse to collect the ID Wristband (Level 2) from its wrist. This is the only item that lets you access the Isolation Ward. Don’t leave the room before picking it up.

Where Is the Isolation Ward Security Door?
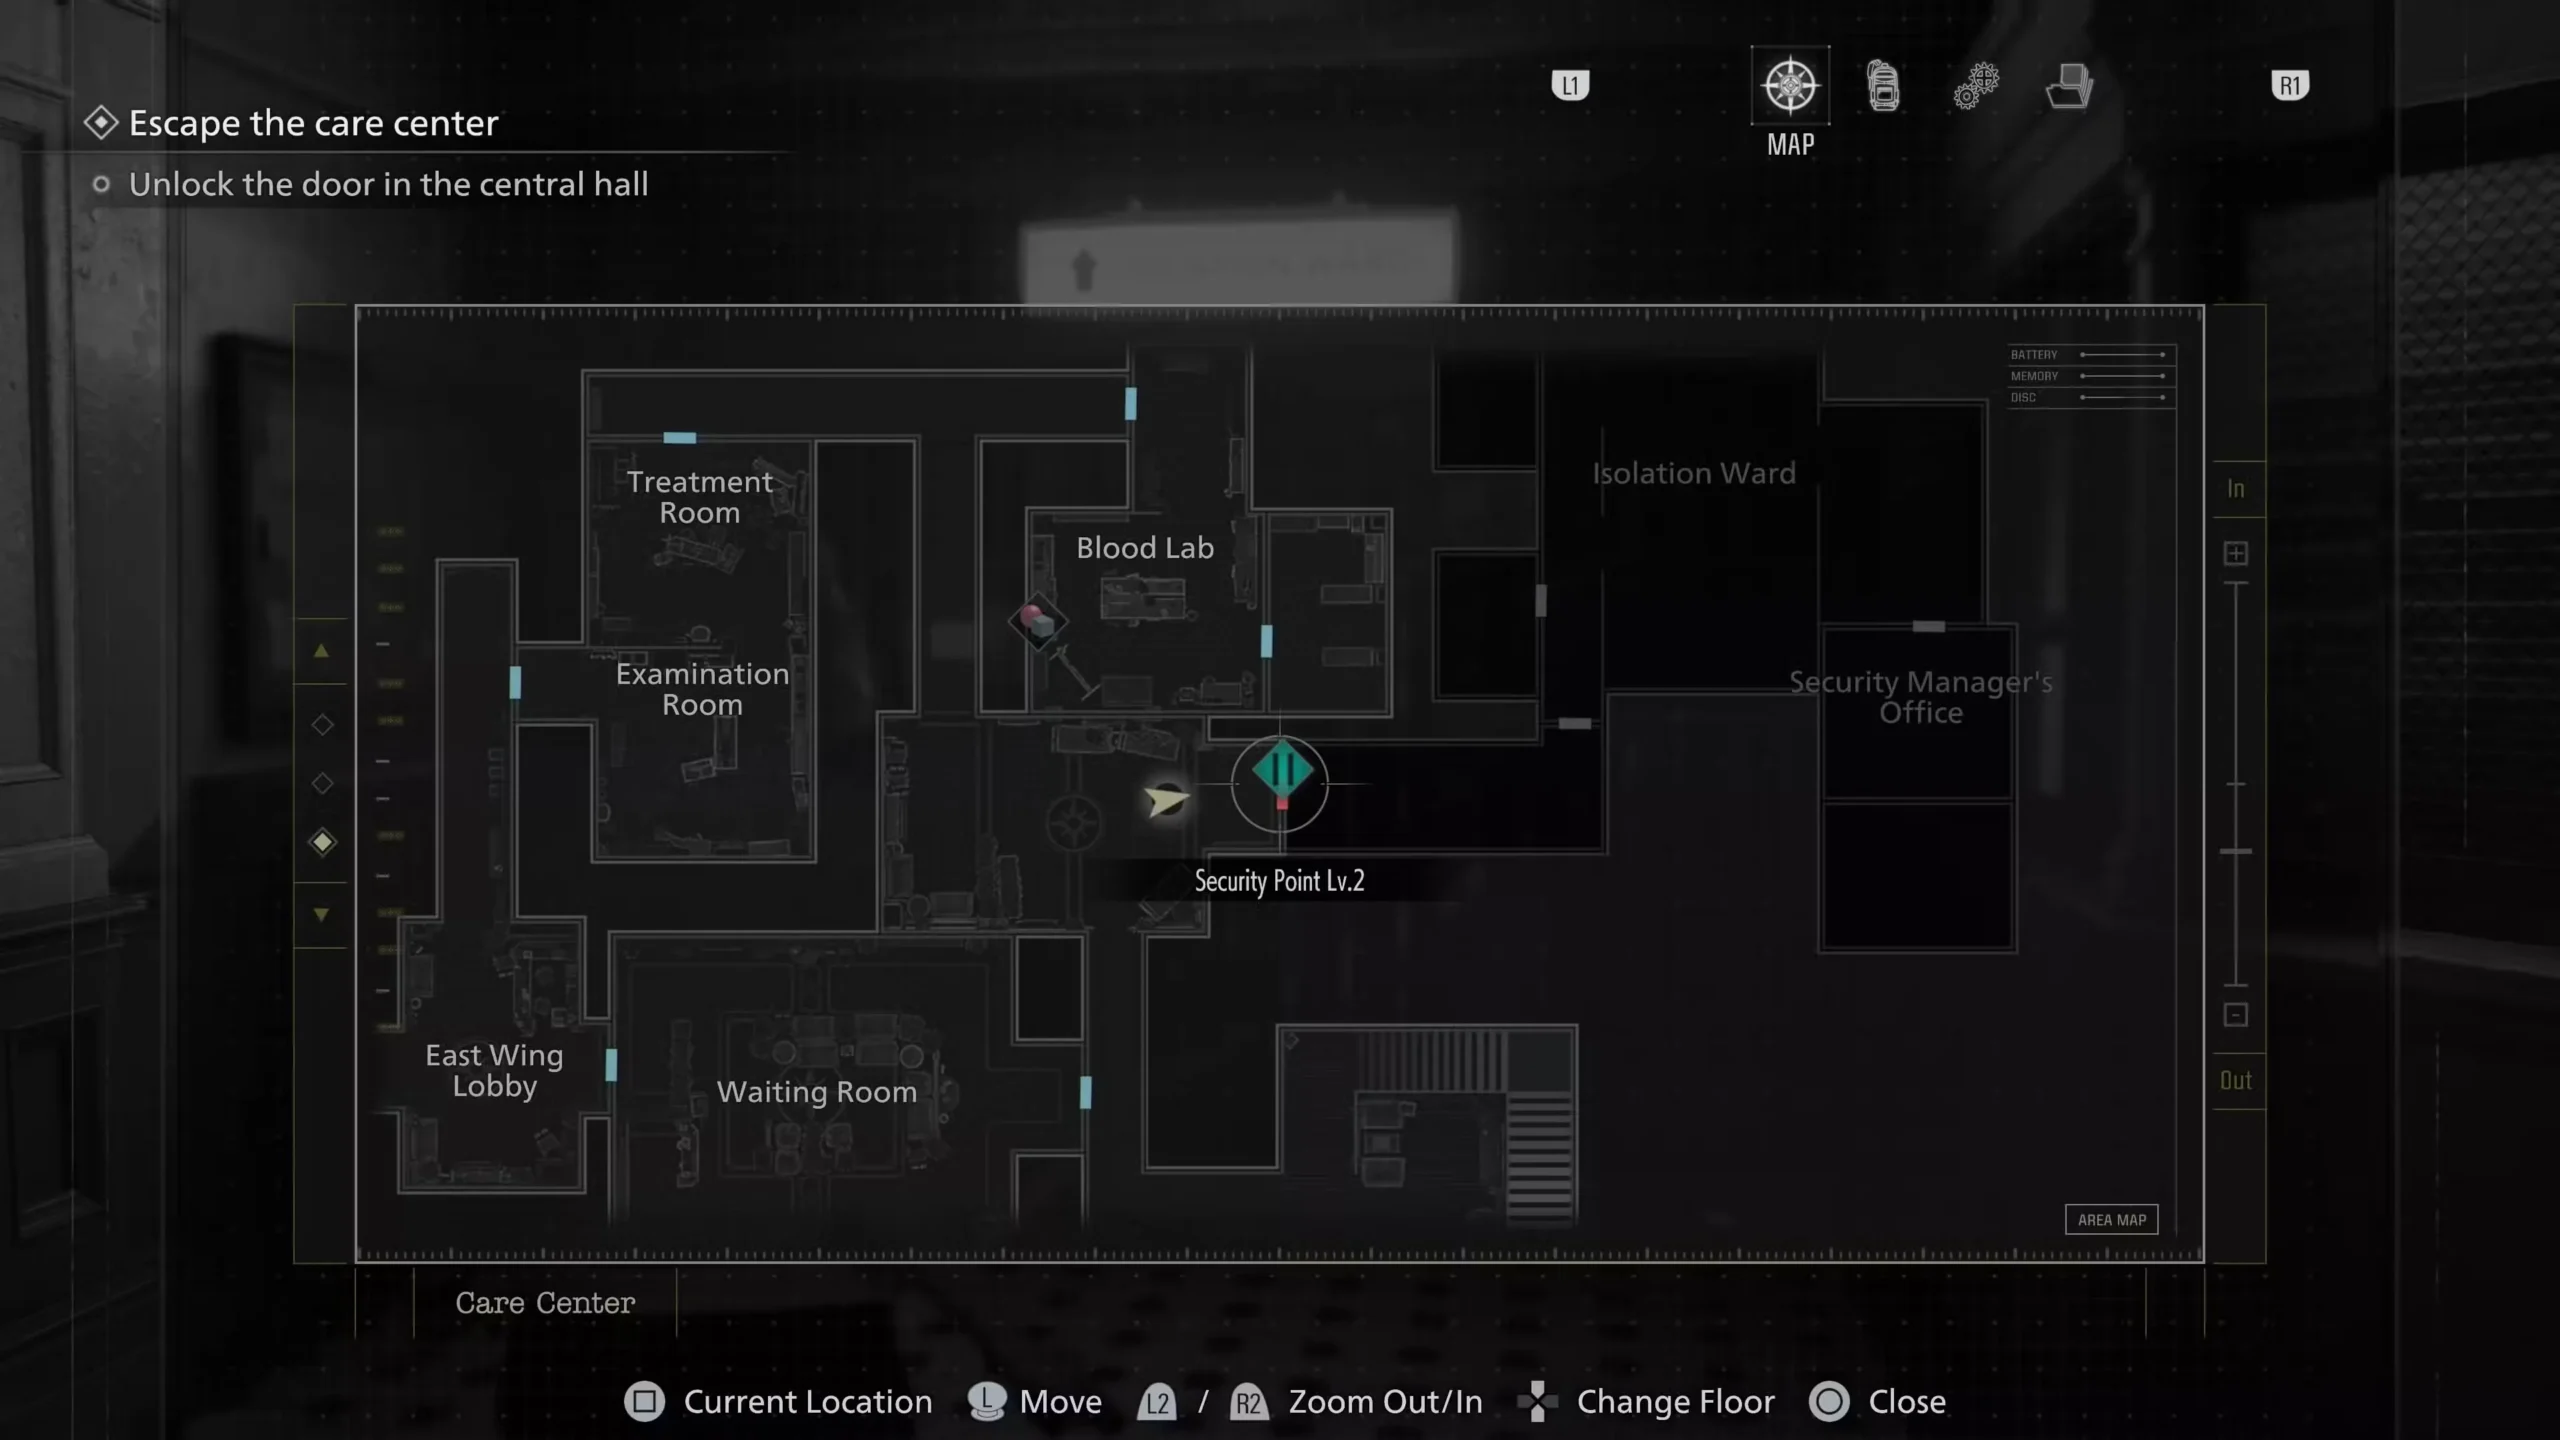
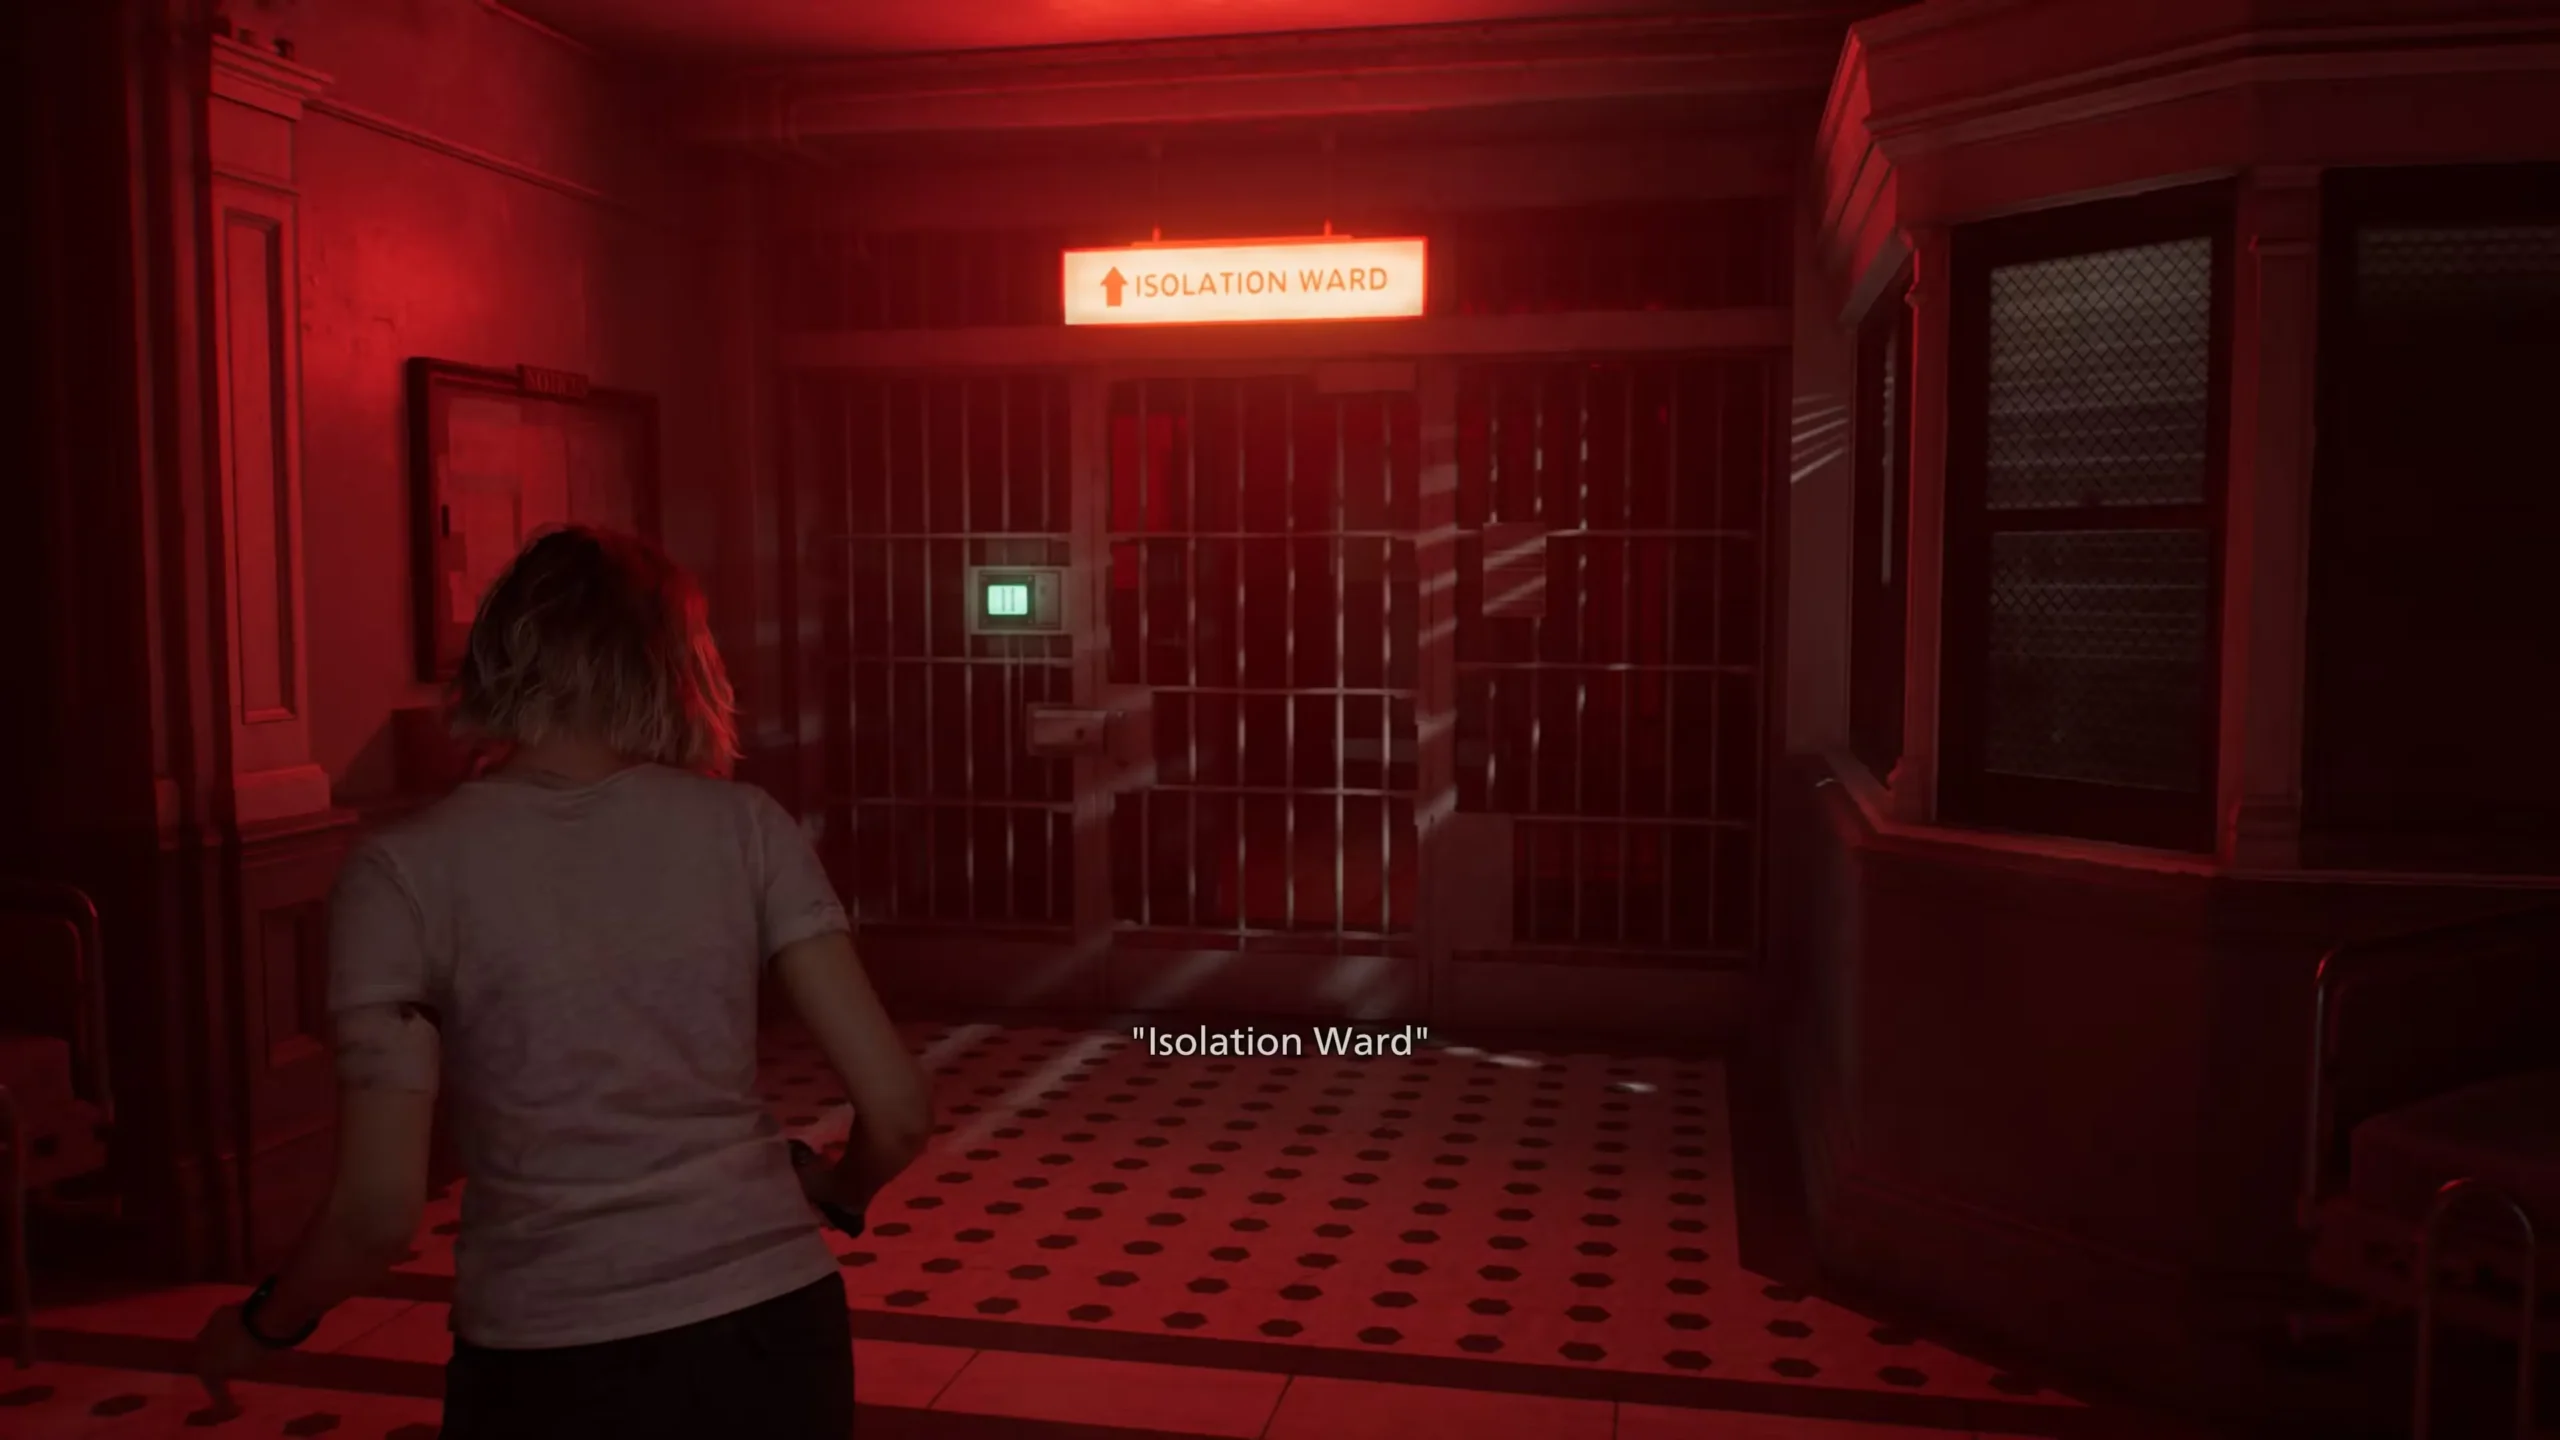
Once you have the Level 2 ID Wristband in hand, head back to the ground floor of the East Wing. The Isolation Ward security door is located in the north-east corridor, between the Blood Lab and the Waiting Room. You’ll recognize it immediately — it’s the green-lit gate glowing in the red-bathed hallway.
Approach the door and use your Level 2 wristband on the scanner. The gate will slide open.
What’s Inside the Isolation Ward?
The Isolation Ward is far more than a locked corridor — it’s a crucial story zone packed with collectibles, enemies, and a key item chain that leads to the final Star Quartz needed to escape the Care Center.
Pro Tip: Before bringing Emily through the Isolation Ward to the puzzle box, clear every enemy along the route. You cannot fight while carrying her, so any remaining zombies become a serious obstacle. You can set Emily down temporarily on the couch in the Guard Office safe room if you need to deal with stragglers.
Security Manager’s Office: Getting the Level 3 Wristband
At the far end of the Isolation Ward is the Security Manager’s Office. Examine the note on the desk to trigger a cutscene. You’ll automatically receive the ID Wristband (Level 3) from the body slumped at the desk. However, the puzzle box in this room is sealed with braille text that Grace cannot read on her own.
The solution is to find Emily — the blind girl held in a cell in the Guard Office. With Level 3 clearance, you can unlock her cell, carry her to the Security Manager’s Office, and have her read the puzzle box. Once she does, a series of zombie waves will spawn inside the Isolation Ward that you must eliminate before she completes the code. The reward: the Star Quartz, the final piece needed to open the Quartz door and escape the Care Center.
For help solving this final puzzle, see our RE Requiem Chairman’s Office Puzzle Box guide and our guide on RE Requiem East Wing Keycard location.
Recommended Order to Avoid Backtracking
The Care Center is a large, interconnected map. Following the optimal path below minimizes unnecessary runs through zombie-infested corridors:
- Enter the East Wing using the East Wing Keycard (found in the Parlor). Check our West Wing Keycard guide if you’re still navigating early locks.
- Explore the Examination Room — note the corpse but don’t attempt to revive it yet.
- Find the Level 1 ID Wristband near Lead Researcher’s Office (2F).
- Enter the West Wing via the Level 1 security door south of the Kitchen.
- Grab the Wrench from the Custodian’s Office and save your game. Need the Care Center fuse? See our Care Center fuse location guide.
- Solve the Organ Transport Box in the Garage to get the Artificial Lungs. Full solution in our Organ Transport Box guide.
- Use the Wrench to open Cold Storage and grab the Artificial Heart.
- Return to the Examination Room, insert both organs, defeat the zombie, loot Level 2 Wristband.
- Use the Level 2 Wristband on the Isolation Ward security door (East Wing ground floor, north-east).
- Explore the ward, grab files, proceed to Security Manager’s Office for Level 3 Wristband.
- Retrieve Emily, bring her to the puzzle box, defeat the enemy waves, collect the Star Quartz.
Safe codes nearby? While working through the East Wing, don’t miss the Examination Room safe code and the Bar & Lounge safe code — both yield Antique Coins and valuable resources for upgrades in the Parlor. Also check our guide on how to destroy the sturdy padlock in the Researcher’s Office for hidden loot nearby.
Common Problems & How to Fix Them
The Isolation Ward door won’t open — what am I doing wrong?
You’re almost certainly still holding the Level 1 Wristband, not Level 2. The green security lock on the Isolation Ward requires Level 2 clearance specifically. Make sure you’ve completed the organ puzzle in the Examination Room and looted the Level 2 Wristband from the defeated zombie before trying this door again.
I can’t find the Organ Transport Box. Where is it exactly?
The Organ Transport Box is in the Garage in the West Wing — accessible after you pass through the Custodian’s Office with Level 1 clearance. It’s on the floor near the bulldozer. You’ll need to handle the bulldozer zombie encounter first. The puzzle solution comes from the Leatherbound Notebook inside the Lead Researcher’s Office puzzle box. See our dedicated Organ Transport Box guide for the exact switch combination.
The Cold Storage handwheel broke — how do I open the door?
This is intentional. The handwheel breaks as soon as you try it, leaving a hexagonal protrusion. You need the Wrench from the Custodian’s Office (West Wing, Level 1 door) to force the door open. Full details in our guide on opening the door without a handwheel.
The revived corpse woke up other zombies — do I need to kill them all?
You only need to kill the main revived corpse (the one with the wristband) to get the Level 2 Wristband. However, the other waking zombies — including possible Blisterheads — will remain active and can ambush you later. It’s recommended to clear the room before reviving the corpse so the encounter is more manageable.
Can I enter the Isolation Ward as Leon?
The Isolation Ward is specifically part of Grace’s section of the Care Center. Leon’s gameplay in the building is largely combat-focused and covers different areas. The wristband clearance system and organ puzzle are Grace-exclusive mechanics in RE9.
What is the Isolation Ward security door exact location on the map?
It is in the north-east corner of the East Wing’s ground floor, situated in the red-lit corridor between the Blood Lab to the west and the Waiting Room to the south. When you enter the East Wing from the Central Hall, proceed north past the Examination Room and continue through the corridor — the green-lit security gate will be on your left.
📖 More RE9 Guides on GamingProMax
- How to Open the Organ Transport Box — RE Requiem
- How to Open the Cold Storage Door Without a Handwheel
- How to Destroy the Sturdy Padlock in the Researcher’s Office
- Level 1 ID Wristband Location — Resident Evil Requiem
- Examination Room Safe Code — Resident Evil Requiem
- Bar & Lounge Safe Code — Resident Evil Requiem
- RE Requiem East Wing Keycard Location
- RE Requiem Chairman’s Office Puzzle Box Solution
- Resident Evil Requiem West Wing Keycard Location
- Resident Evil Requiem Care Center Fuse Location
Play Resident Evil Requiem
Resident Evil Requiem is available now on PlayStation 5, Xbox Series X|S, Nintendo Switch 2, PC (Steam & Epic Games). Grab your copy from an official storefront below: