If you’ve been struggling with the Marked for Death quest in Arc Raiders, you’re not alone. This particular mission from Esperanza trader Tian Wen sends you into the Buried City with minimal guidance—just some vague instructions and a whole lot of hope. Unlike other games that hold your hand with waypoint markers, Arc Raiders expects you to use your instincts and detective skills.
The good news? Once you know where to look, this quest becomes straightforward. Let me walk you through exactly where to find Tian Wen’s cache and those sneaky footprint clues so you can wrap this up and claim your rewards.
What is the Marked for Death Quest in Arc Raiders?
Tian Wen needs you to investigate a cache hidden somewhere in the Buried City. The quest description gives you the general area, but pinpointing the exact location requires some exploration. This is typical for Arc Raiders’ quest design—you’re essentially a scavenger hunting through dangerous territory with limited information.
The mission involves two main objectives: locating the cache itself and then finding clues nearby. Sounds simple, but when you’re dodging Bastions, Bombardiers, and hostile players, things get complicated fast.
Finding Tian Wen’s Cache at Su Durante Warehouse
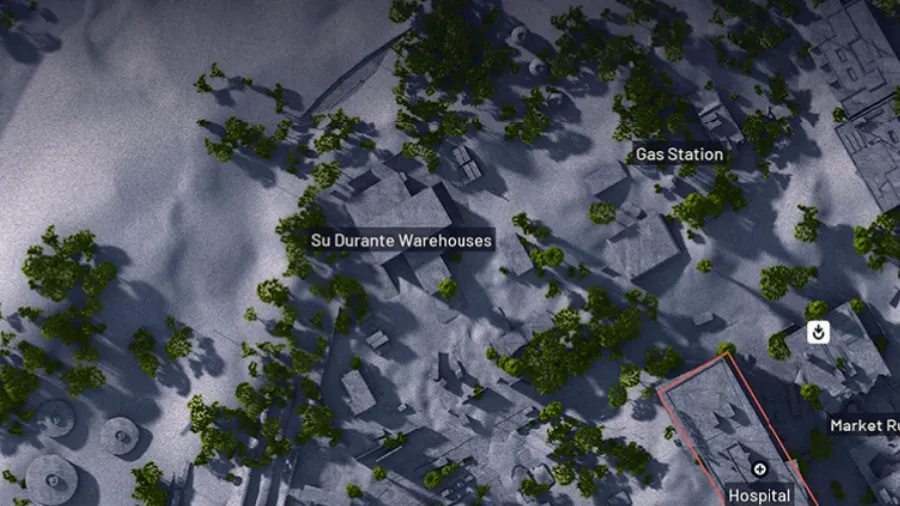
The Location Breakdown
Your destination is the Su Durante Warehouse in the northern section of the central Buried City area. While the warehouse itself appears as a marked POI on your map, the cache location isn’t highlighted—classic Arc Raiders style.
Here’s the step-by-step:
- Navigate to the northern part of the central city zone in Buried City
- Locate Su Durante Warehouse (it’s marked on your map as a point of interest)
- Don’t go inside the building—this is a common mistake players make
- Head around to the back of the warehouse structure
- Look for a crate pressed against the exterior wall
- Interact with the crate to complete the first quest objective
The cache is relatively exposed, so keep your head on a swivel. The Buried City attracts both AI enemies and player Raiders looking for valuable loot, so you might encounter resistance. If you’re just trying to complete the quest efficiently, consider bringing a basic loadout to minimize losses if things go sideways.
Pro Tips for This Section
Planning your loadout: If quest completion is your only goal, go light. There’s no requirement to extract with items, so losing gear to another player or a Bastion won’t fail the mission. However, if you’re planning to hit other hotspots while you’re in the area, bring proper equipment.
Extraction strategy: There’s a Raider Hatch near the Collapsed Supermarket, close to the warehouse. If you have a Raider Hatch Key, this provides a relatively safe extraction point after completing your objectives.
Nearby resources: Since you’re already in this area, consider gathering resources like Rusted Gears or Mechanical Components if you spot them—Buried City is rich with crafting materials.
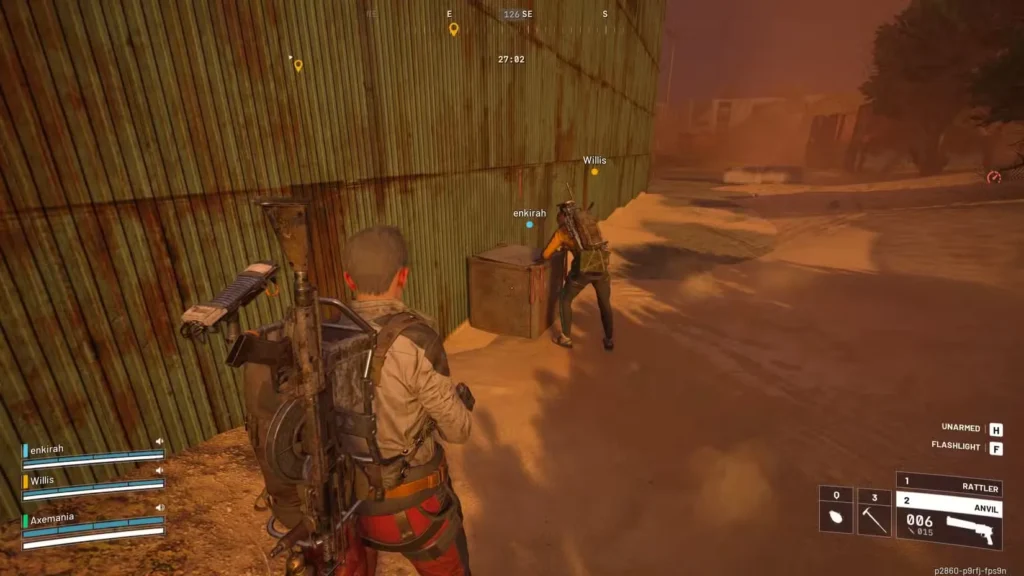
How to Follow the Footprint Clues in Marked for Death
Once you’ve interacted with the cache, the quest updates to find “clues” nearby. Here’s what you’re actually looking for:
What the Clues Look Like
The clues are footprints in the sand near Tian Wen’s cache. They’re surprisingly easy to miss if you’re not actively scanning the ground, especially during combat or when you’re rushing.
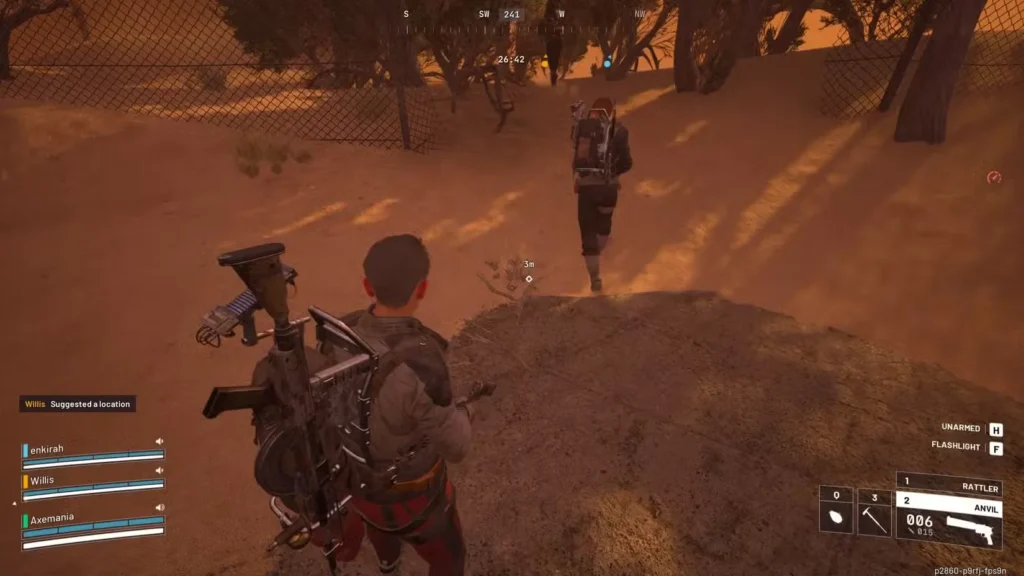
Following the Trail
- Examine the area around the cache crate you just looted
- Look for footprint impressions in the sandy ground—they lead away from the cache
- Follow the trail toward a nearby thicket (a cluster of bushes and vegetation)
- Head past the broken fence section
- Search the bushes carefully for an interactable box
- Interact with the box to complete the quest
The footprints lead you through some vegetation, which can obscure your view. If you’re having trouble spotting them, try adjusting your camera angle or moving around slowly. The final box is tucked among the bushes, so it requires a bit of careful searching.
Marked for Death Quest Rewards: Are They Worth It?
Here’s the best part about Marked for Death—you don’t need to extract to complete it. As soon as you interact with that second box, the quest is done. Even if you get eliminated by hostile players, AI enemies, or environmental hazards afterward, you’ll still receive your rewards when you return to Esperanza.
What You’ll Earn
When you return to Tian Wen at Esperanza, you’ll receive:
- Shotgun Choke II: Reduces base weapon dispersion by 20%
- Angled Grip II: Reduces horizontal recoil by 30%
Both attachments are valuable for weapon upgrades, especially if you’re working on optimizing your favorite firearms. The accuracy and recoil improvements make them practical for both PvE encounters against ARC machines and PvP firefights against other Raiders.
Additionally, each attachment sells for 2,000 Coins if you’d rather have the currency. If you’re farming coins, this quest provides decent value for relatively minimal effort once you know where to go.
Common Mistakes When Completing Marked for Death
Searching inside the warehouse: Many players waste time scouring the interior of Su Durante Warehouse. Remember, the cache is outside against the exterior wall.
Missing the footprints: They’re on the ground and can blend with the sandy terrain. Take your time and scan methodically rather than rushing.
Bringing expensive gear: Unless you’re planning to farm the area extensively, there’s no reason to risk valuable equipment. The quest itself requires no combat if you’re careful.
Forgetting to check for nearby players: Buried City is a hotspot. Before you interact with objectives, scan the area for hostile Raiders who might be looking for an easy elimination.
Making the Most of Your Trip
Since you’re already heading to Buried City for this quest, consider stacking additional objectives:
- Check if you have other quests in the area that you can complete simultaneously
- Gather crafting materials like Rusted Tools or Prickly Pear
- Look for Security Lockers that might contain valuable loot
- Farm experience to work toward max level
If you’re playing with friends through crossplay, coordinate to cover each other while completing objectives. One person can watch for threats while another interacts with quest items.
Is Marked for Death Worth Completing in Arc Raiders?
Marked for Death exemplifies Arc Raiders’ approach to questing—minimal handholding, environmental storytelling, and rewards for players willing to explore carefully. The lack of explicit markers forces you to engage with the game world rather than mindlessly following waypoints, which creates a more immersive experience once you get used to it.
The quest rewards are practical, the location isn’t too dangerous if you’re cautious, and the no-extraction-required completion means you can knock this out relatively risk-free. Just remember: back of the warehouse for the cache, follow the footprints to the bushes, and you’re done.
Now get out there and show Tian Wen you can track down a cache better than any ARC machine could. And maybe grab some mechanical components while you’re at it—you never know when you’ll need them for workbench upgrades.
Available on PlayStation and Xbox, Arc Raiders continues to challenge players with its unique blend of PvPvE gameplay. Good luck out there, Raider!