The With a Trace quest in Arc Raiders is one of those missions that sounds straightforward but leaves you wandering around wondering what exactly you’re supposed to be investigating. Shani sends you out to find signs of ARC activity with barely any specifics, which is classic extraction shooter design—figure it out yourself or die trying.
The good news? This quest takes place on the western edge of Blue Gate, away from the high-traffic central areas where you’re more likely to run into aggressive players. Even better, you don’t need to extract with any items to complete it, so if things go south, you’ll still get credit. Let me walk you through both objectives so you can knock this out efficiently.
Check full Arc Raiders Guide Here
What is the With a Trace Quest in Arc Raiders?
Shani needs information about recent ARC activity in the Blue Gate region. Your job is to investigate two specific locations and interact with evidence. There’s no combat requirement, no extraction needed—just get to the spots, interact with the objectives, and you’re done.
This makes With a Trace one of the safer quests in Arc Raiders, especially if you approach it strategically. The western map edge sees far less player traffic than hotspots like Buried City or contested loot zones, so you can often complete this without firing a single shot.
Objective 1: Finding Signs of ARC Activity at Barren Clearing

Getting to Barren Clearing
Your first destination is Barren Clearing in the Blue Gate area. This minor point of interest sits at the western edge of the map, making it relatively isolated from the chaos that erupts in more central locations.
The POI is clearly labeled on your map, which is helpful, but the specific objective you need to interact with isn’t marked. You’ll need to do some detective work once you arrive.
What You’re Looking For
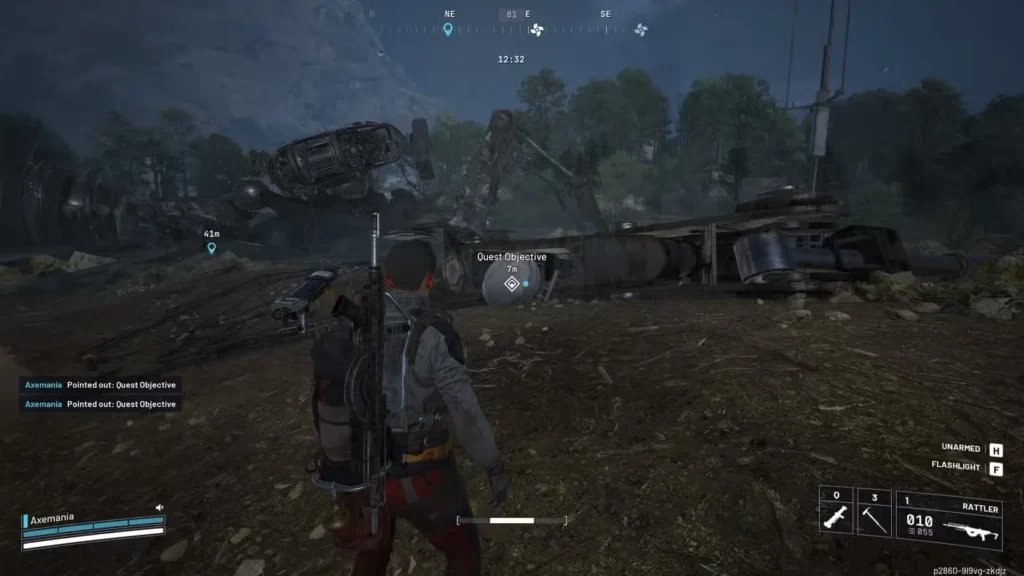
Once you reach Barren Clearing, scan the area for the Baron Husk—the massive, destroyed remains of an enormous ARC machine. It’s hard to miss given its sheer size, but the specific interaction point is more subtle.
Here’s your step-by-step:
- Locate the Baron Husk (the giant destroyed ARC in the area)
- Find one of the severed mechanical legs near the husk remains
- Look for the ball joint of this severed leg
- Approach until you see the gold/yellow “Investigate” prompt
- Interact with the ball joint to complete the first objective
The investigate prompt only appears when you’re close enough, so if you don’t see it immediately, walk around the Baron Husk’s leg components until it pops up. The ball joint is typically where the leg connects to the main body structure.
Tips for This Location
Loadout considerations: Since there’s no combat requirement and you don’t need to extract with items, bring a minimal or free loadout. Save your premium gear for quests that actually require firepower.
Resource farming: Barren Clearing is decent for scavenging ARC materials. If you’re working on crafting projects or need Rusted Gears, take a few minutes to collect materials from smaller ARC bots in the area.
Player encounters: The western edge sees less traffic, but you’re not completely safe. Stay alert for other players who might be doing the same quest or farming materials. If you hear gunfire or see movement, consider waiting it out or repositioning.
Objective 2: How to Inspect the Communications Device at Adorned Wreckage
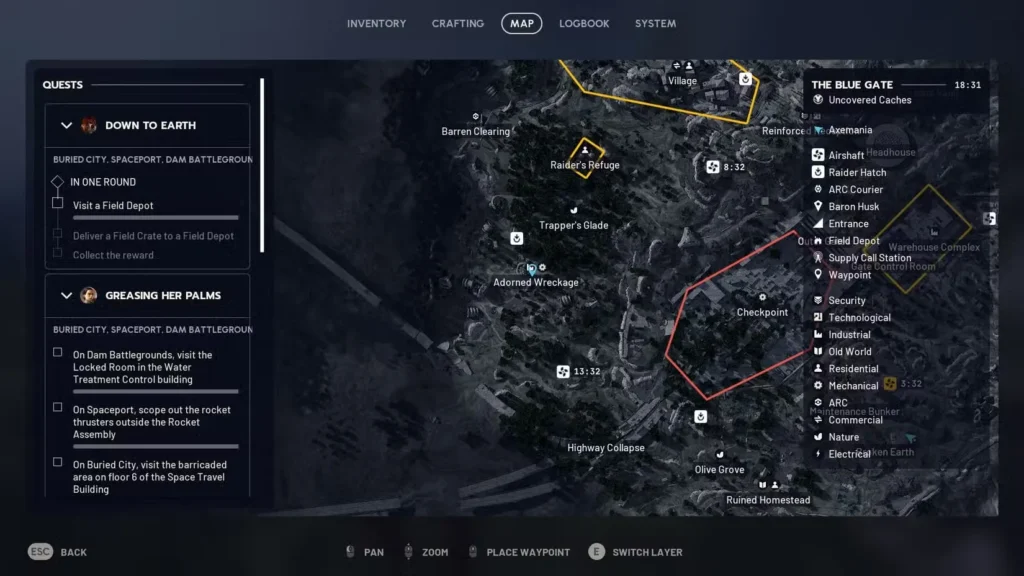
Navigating to Adorned Wreckage
After completing the first objective, head south from Barren Clearing to reach the Adorned Wreckage. It’s a short distance, making this quest convenient since both objectives are clustered together rather than forcing you to traverse the entire map.
The close proximity of these two locations means you can complete With a Trace relatively quickly if you move efficiently and avoid unnecessary engagements.
Finding the Communications Device
The Adorned Wreckage contains scattered debris and wreckage pieces, but you’re looking for something specific:
- Search for a piece of wreckage with an antenna attached
- Notice the cables running from this antenna to larger debris in the POI’s center
- Locate a small computer terminal sitting on a table near this wreckage
- Interact with the computer to complete the second objective
The computer terminal is the key interaction point. It’s not particularly large or flashy, so scan the area carefully. The antenna and cables serve as visual guides to help you narrow down the search area.
If you’re having trouble spotting it, look for furniture—specifically tables or desk-like surfaces—near the wreckage with visible antenna equipment.
Does With a Trace Require Extraction in Arc Raiders?
Here’s what makes With a Trace particularly forgiving: you don’t need to survive or extract after completing the objectives. The moment you interact with that communications device at Adorned Wreckage, the quest is marked complete in your log.
This means even if you:
- Get eliminated by hostile players
- Die to ARC machines like Bastions or Bombardiers
- Fall victim to environmental hazards
- Lose connection or experience a crash
…you’ll still receive your rewards when you return to Esperanza. This design choice makes With a Trace one of the lower-stress quests in the game, especially compared to missions like Marked for Death that send you into more dangerous territories.
Arc Raiders With a Trace Quest Rewards
When you return to Shani at Esperanza, you’ll receive two valuable items:
Looting Mk. 2 Augment
This augment provides:
- Increased carrying capacity for your inventory
- An additional Safe Pocket slot for protecting valuable items
If you’re unfamiliar with Safe Pockets, they’re special inventory slots that protect items from being lost when you die. Getting an additional Safe Pocket slot is extremely valuable for players who regularly venture into high-risk areas or carry valuable blueprints and rare materials.
The carrying capacity boost also helps with inventory management, allowing you to gather more resources per run before needing to extract.
Medium Shield
This shield upgrade offers:
- More health than a Light Shield
- Better damage resistance
- Increased weight (slight mobility trade-off)
The Medium Shield sits between Light and Heavy shields in the shield hierarchy. It provides solid protection without the significant mobility penalty that Heavy Shields impose. For most players, Medium Shields represent the sweet spot between survivability and maneuverability.
Should You Keep or Sell?
Both rewards are worth 2,000 Coins if sold, but here’s my advice: keep them. The crafting costs and materials required to obtain these items later far exceed the coin value. Plus, both items actively improve your efficiency in future raids:
- The Looting Mk. 2 Augment helps you farm coins faster by letting you carry more valuable loot per run
- The Medium Shield increases your survival rate, reducing gear losses from deaths
There are much more efficient ways to earn 4,000 Coins than selling these quest rewards. Consider these items as permanent upgrades to your capabilities rather than quick cash.
Tips for Completing With a Trace Faster
Route optimization: Start at Barren Clearing, complete the first objective, then move south to Adorned Wreckage. This minimizes backtracking and keeps you in the safer western portion of the map.
Timing your run: Consider doing this quest during off-peak hours or earlier in a raid cycle when fewer players have spawned in the area.
Stacking objectives: Check if you have other quests in Blue Gate that you can complete simultaneously. Missions like A Bad Feeling might overlap geographically, letting you knock out multiple objectives in one trip.
Resource collection: Since you’re already in the western regions, consider gathering organic materials or mushrooms if you spot them along the way.
Playing with teammates: If you’re running crossplay with friends, coordinate so one person can watch for threats while others interact with objectives.
Common Mistakes When Completing With a Trace
Bringing expensive gear: This is an investigation quest with no combat requirements. Don’t risk valuable equipment unless you’re planning to farm the area extensively afterward.
Searching the wrong structures: At Adorned Wreckage, players often waste time examining the large central debris pile. The communications device is near the smaller wreckage with the antenna, not the main structure.
Getting distracted by loot: Blue Gate has scattered resources, but don’t get tunnel vision on looting at the expense of quest completion. Finish the objectives first, then decide if you want to scavenge.
Engaging unnecessary fights: Unless you’re being directly threatened, avoid combat. Every gunfight risks alerting other players to your position and increases your chances of dying before completing objectives.
What to Do at Blue Gate After Completing With a Trace
Since you’re already heading to the western edge, consider maximizing the trip’s value:
- Farm smaller ARC bots for experience if you’re working toward max level
- Collect Rusted Tools from the area
- Check for any Security Lockers you might have missed
- Gather crafting materials for workbench upgrades
If you’re new to the game, this quest serves as a good introduction to the Blue Gate region’s layout and hazards without throwing you directly into the meat grinder that is the central map areas.
Is With a Trace Worth Doing in Arc Raiders?
With a Trace represents one of the more player-friendly quests in Arc Raiders. The objectives are straightforward once you know where to look, the locations are relatively safe, and the no-extraction requirement means even new players can complete it without too much frustration.
The rewards are genuinely useful rather than vendor trash—that additional Safe Pocket slot alone makes this quest worth prioritizing early in your progression. Combined with the Medium Shield, you’re getting tangible upgrades that will serve you well in future raids.
Just remember: Baron Husk ball joint at Barren Clearing, then computer terminal at Adorned Wreckage. Keep your head down, complete the objectives, and you’re done. Even if you don’t make it out alive, Shani will still reward you when you respawn.
Now get out there and show Shani you can track ARC activity better than any machine learning algorithm. And if you’re looking for more quest guidance, check out our Marked for Death guide for another relatively safe quest completion.
Available on PlayStation and Xbox, Arc Raiders continues to challenge players with its minimalist quest design. Good hunting, Raider!