TL;DR – GTA 6 Don Gone Walkthrough
- Start the mission: Complete Swamped, then head to Donnie’s trailer in Key Lento. Brian wants Jason to remove anything connecting Donnie to his smuggling business.
- Collect six belongings: Find Donnie’s photo, flight schedule, clothes, ID, phone message, and map. Use Focus Mode to highlight anything you missed.
- Missable sunglasses: Check the bathroom for Donnie’s aviator sunglasses before leaving the trailer.
- Deal with the Aviators: Three men from The Rusty Anchor confront Jason outside. You can fight them or escape in Donnie’s car.
- Don’t miss the revolver: Open Donnie’s car trunk and collect his unique H&L .38 Revolver before destroying the vehicle.
- Finish the mission: Drive out of Key Lento, destroy Donnie’s car with gasoline or by sinking it, and leave the area.
To complete Don Gone in GTA 6, collect Donnie’s bag and six belongings from his trailer, drive his car out of Key Lento, and destroy it. Before getting rid of the vehicle, open the trunk to collect Donnie’s unique H&L .38 Revolver. You cannot recover this specific weapon variant if you destroy the car without taking it.
Don Gone is a Chapter 1 story mission in Grand Theft Auto VI that begins immediately after Swamped. Following Donnie’s death, Brian Heder wants Jason Duval to make it look as though Donnie packed his belongings and left town.
The mission has no major shootouts or complicated puzzles. However, finding all six items inside the trailer can be confusing because several blend into the clutter. The game also introduces a confrontation with three familiar enemies before Jason can leave.
There are two optional items worth collecting: Donnie’s aviator sunglasses inside the trailer and his unique revolver in the car’s trunk. Missing the revolver is especially costly because the vehicle must be destroyed to finish the mission.
This GTA 6 Don Gone walkthrough covers every belonging location, the Aviators encounter, the free weapon, all car destruction methods, and what to do before continuing Chapter 1.
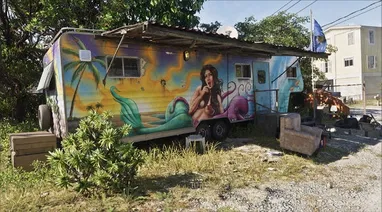
GTA 6 Don Gone Mission Overview
| Mission Details | Information |
|---|---|
| Mission Name | Don Gone |
| Starting Objective | Head to Donnie’s Trailer |
| Chapter | Chapter 1: Just Like Paradise |
| Story Recap Position | 18th main mission |
| Playable Character | Jason Duval |
| Mission Giver | Brian Heder |
| Starting Location | Donnie’s Trailer, Key Lento |
| Unlock Requirement | Complete Swamped |
| Required Belongings | Six |
| Main Enemies | Three Aviators |
| Mission Vehicle | Donnie’s Dinka ’85 Blista |
| Missable Weapon | Donnie’s H&L .38 Revolver |
| Optional Clothing | Donnie’s Aviator Sunglasses |
| Reported Cash Payment | $200 through BuckMe |
| Next Main Mission | Recalibration |
Don Gone is the eighteenth mission in the commonly used Chapter 1 story recap order. Some chronological mission lists assign it a later number because they count additional story activities separately.
It is a mandatory mission required for story completion.
How to Unlock Don Gone in GTA 6
Don Gone becomes available automatically after completing Swamped.
You do not need to wait several in-game days or finish another character’s missions.
At the end of Swamped, Brian decides to retire from his criminal activities after the conflict with the Kingfishers.
However, there is still unfinished business involving Donnie.
Brian wants Donnie’s trailer cleared out and his car destroyed so nobody can connect Donnie’s disappearance to the smuggling operation.
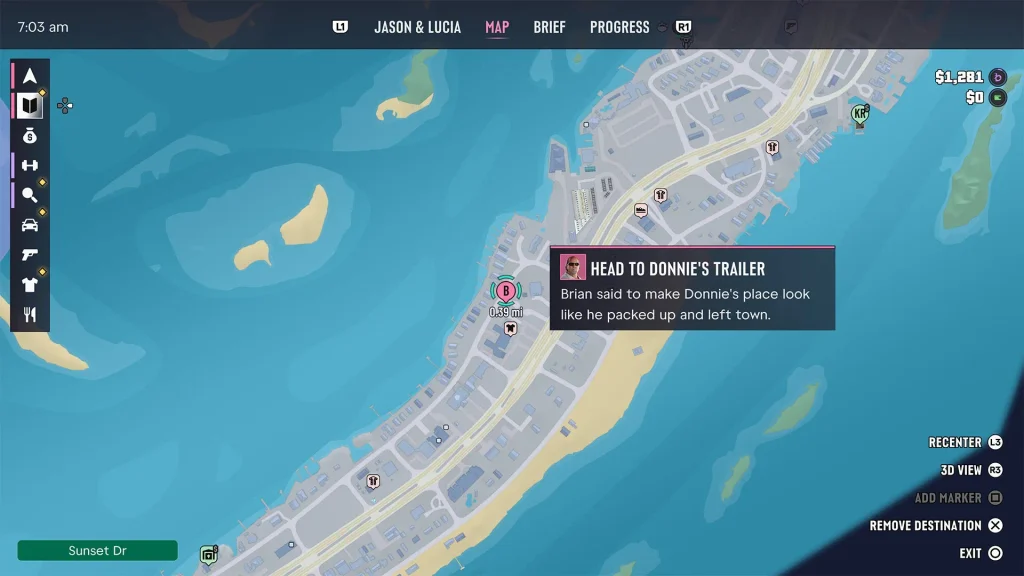
How to Start Don Gone
- Complete the Swamped mission.
- Wait for the next story objective to become available.
- Open the map while controlling Jason.
- Find Head to Donnie’s Trailer under the story objectives.
- Travel to Donnie’s trailer in Key Lento.
- Follow Brian’s instructions to enter the property.
Donnie’s trailer is the same location used during earlier narcotics deliveries.
If you have used the trailer to sell stolen goods, the property should already be familiar.
For the previous mission, follow our GTA 6 Swamped walkthrough to escape the Kingfishers camp, rescue Lori, and complete the helicopter and airboat chase.
GTA 6 Don Gone Walkthrough: All Mission Objectives
The mission has four main objectives:
- Find and collect Donnie’s bag.
- Pack Donnie’s belongings.
- Get in the car and leave Key Lento.
- Destroy Donnie’s car.
There are also optional interactions, including lowering Donnie’s flag, collecting his sunglasses, and examining items inside the trailer.
The most important rule is simple: do not destroy Donnie’s car until you have collected the revolver from its trunk.
1. Lower Donnie’s Flag Outside the Trailer
When Jason arrives at Donnie’s trailer, Brian explains that everything needs to look as though Donnie left voluntarily.
One detail worth checking before going inside is the flag outside the property.
Donnie used to keep it flying when he was home.
Leaving the flag raised could make the disappearance look suspicious.
How to Lower Donnie’s Flag
- Arrive at Donnie’s trailer.
- Look for the flagpole outside the property.
- Approach it until the interaction prompt appears.
- Select the option to lower the flag.
- Wait for Jason to complete the interaction.
Lowering the flag is an optional action noted in the launch walkthroughs. It fits Brian’s plan to make Donnie’s disappearance look ordinary.
It may also contribute positively toward Jason’s Professional Criminal Profile.
Tip: If police are actively searching the area, the game may prevent you from lowering the flag. Clear the wanted situation before trying again.
2. Find Donnie’s Bag Inside the Trailer
The first required item is Donnie’s bag.
The bag is on the bed inside Donnie’s trailer.
You must pick it up before packing the rest of his belongings.
How to Collect Donnie’s Bag
- Approach the entrance to Donnie’s trailer.
- Open the door using the displayed interaction.
- Enter the living area.
- Walk toward Donnie’s bedroom.
- Find the bag lying on the bed.
- Approach it until the pickup prompt appears.
- Press Triangle on PS5 or Y on Xbox when prompted.
Once Jason collects the bag, the objective changes to Pack Donnie’s Belongings.
You now need to find six items around the trailer.
3. GTA 6 Don Gone: All Six Belongings Locations
Donnie’s trailer is full of clothes, papers, and personal items. Only six specific belongings are required for the main objective.
The six items are Donnie’s photo, flight schedule, clothes, ID, phone message, and map.
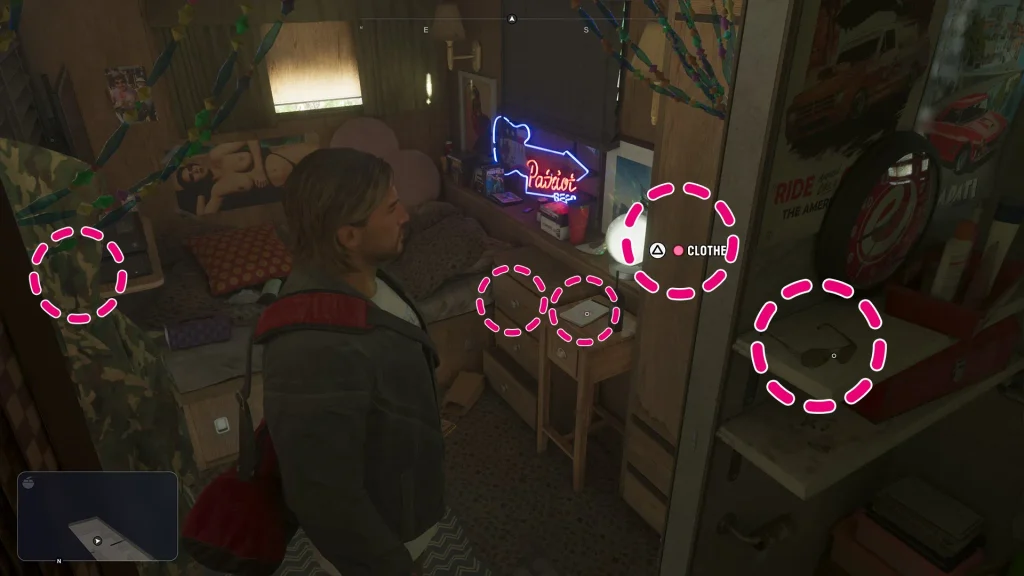
All Donnie’s Belongings Locations
| Item | Exact Location |
|---|---|
| 1. Photo | On the bedroom wall, above the bed and beside the TV. |
| 2. Flight Schedule | On the nightstand beside the bed, beneath the Patriot Beer neon sign. |
| 3. Clothes | On the shelf facing the bed, near the bedroom storage area. |
| 4. Donnie’s ID | On the shelf to the right of the trailer entrance, across from the refrigerator. |
| 5. Phone Message | Play the message on Donnie’s phone inside the trailer. |
| 6. Map | Attached to the refrigerator door in the kitchen. |
You can collect these belongings in any convenient order after picking up the bag.
The easiest approach is to clear the bedroom first, then search the living area and kitchen.
How to Use Focus Mode to Find Donnie’s Belongings
If you cannot locate an item, use Jason’s Focus ability.
- PS5: Click L3 + R3 together.
- Xbox Series X|S: Click LS + RS together.
Focus Mode highlights nearby objects connected to the objective.
This is especially helpful for the ID, clothes, and smaller papers that can blend into the trailer’s clutter.
Best tip: Use Focus Mode before searching every drawer manually. It can save several minutes.
4. Collect Donnie’s Photo and Flight Schedule
Start by checking the bedroom.
Two of the required belongings are close to Donnie’s bed, making them easy to collect immediately after picking up the bag.
Donnie’s Photo Location
- Stand beside the bed.
- Look toward the television.
- Find the photograph hanging on the wall.
- Approach it and use the interaction prompt.
- Pack the photo into the bag.
The photograph is above the bed, beside the TV.
Do not confuse it with other decorations or posters around the trailer.
Donnie’s Flight Schedule Location
- Remain in the bedroom.
- Look for the Patriot Beer neon sign.
- Check the nightstand beneath it.
- Find Donnie’s flight schedule.
- Pick it up and add it to the bag.
The flight schedule is an important piece of evidence connecting Donnie to the smuggling operation.
It contains appointments and locations associated with his deliveries.
You can examine the note before packing it if you want more background on Donnie’s activities.
5. Find Donnie’s Clothes and ID
Two more items are inside the trailer’s storage areas.
Donnie’s Clothes Location
Look for the clothing on the shelf facing the bed.
- Stand near Donnie’s bed.
- Turn toward the opposite shelf or wardrobe area.
- Look for the highlighted clothes.
- Approach and collect them.
The item can be easy to miss because the trailer contains several other pieces of clothing.
Use Focus Mode if the correct pile is not obvious.
Donnie’s ID Location
Donnie’s ID is on the shelf to the right of the trailer entrance.
- Return toward the front of the trailer.
- Look at the shelving unit near the entrance.
- Check the shelves across from the refrigerator.
- Find the ID interaction.
- Collect Donnie’s identification.
The ID reveals Donnie’s legal name as Donald Carter.
It is another item Brian wants removed before anyone starts asking questions.
6. Play Donnie’s Phone Message and Collect the Map
The final two required interactions are around the kitchen and living area.
Phone Message Location
Look for Donnie’s phone or answering machine inside the trailer.
- Walk toward the kitchen area.
- Look for the phone on the nearby surface.
- Approach it until the Play Message option appears.
- Activate the message.
- Allow it to finish playing.
Unlike the other belongings, the phone message is completed by playing it rather than picking up a physical item.
Important: If your item count appears stuck even though you collected all the visible objects, check whether you have played the phone message.
Donnie’s Map Location
The map is attached to the refrigerator in the kitchen.
- Walk toward the refrigerator.
- Look at its front door.
- Find the map attached to it.
- Approach the map.
- Use the displayed interaction.
- Pack it with the other belongings.
Once all six required interactions are finished, Jason is ready to leave the trailer.
7. Missable Item: Donnie’s Aviator Sunglasses Location
Before leaving Donnie’s trailer, check the bathroom for his aviator sunglasses.
The sunglasses are an optional clothing pickup that can be missed if you immediately head outside after packing the required belongings.
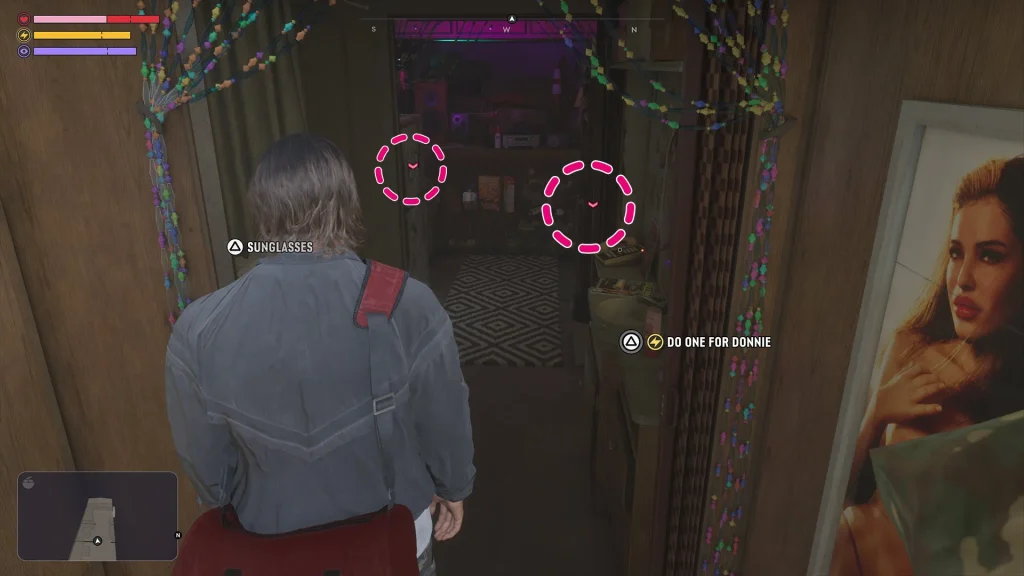
How to Get Donnie’s Sunglasses
- Finish collecting the required belongings.
- Return toward the bedroom area.
- Enter the bathroom.
- Check the shelf inside.
- Look for Donnie’s aviator sunglasses.
- Use the pickup interaction.
Jason can wear the glasses after collecting them.
However, they may be knocked off during the confrontation outside.
Important: If Jason loses the sunglasses during the fight, check the ground afterward and pick them up again.
It is worth collecting them before completing the mission, especially if you want to keep unique clothing associated with story characters.
8. Optional Choice: Do One for Donnie
There is another optional interaction inside the trailer.
Jason can take a line of cocaine left behind by Donnie.
The interaction is labeled Do One for Donnie.
Effect of the Optional Drug Interaction
| Choice | Effect |
|---|---|
| Use the cocaine | Reduces Jason’s health and temporarily boosts stamina. |
| Leave it alone | No temporary health or stamina change. |
Neither option changes the main story outcome.
There is no documented additional cash reward or unique item for choosing the interaction.
Recommended choice: Skip it. You do not need the temporary stamina boost to complete Don Gone.
9. Fight or Escape the Three Aviators Outside Donnie’s Trailer
After collecting Donnie’s belongings, Jason leaves the trailer.
Three men are waiting outside.
They are the same Aviators Jason encountered during the fight at The Rusty Anchor in Coming Home.
The men have been looking for Donnie and are angry that he has not answered their calls.
Recognizing Jason, they confront him.
Option 1: Fight the Aviators
You can stay and defeat all three men using melee combat.
This is the normal route shown in several mission walkthroughs.
- Leave the trailer after packing the belongings.
- Wait for the Aviators to approach.
- Keep your distance from the group.
- Block incoming punches.
- Counterattack after an enemy misses.
- Focus on one opponent at a time.
- Continue until the attackers are defeated.
The Aviators are more aggressive than during their earlier encounter at the bar.
Do not stand still while all three are attacking.
GTA 6 Aviators Fight Controls
| Action | PS5 | Xbox Series X|S |
|---|---|---|
| Punch | Square | X |
| Block | Hold X | Hold A |
| Move | Left Stick | Left Stick |
Use the on-screen controls if your controller layout has been customized.
Blocking and counterattacking is safer than repeatedly throwing punches without defending.
Option 2: Escape Without Fighting
You can avoid the fight by running directly to Donnie’s car.
Detailed launch walkthroughs confirm that Jason can get into the car and drive away without defeating the Aviators.
- Leave the trailer.
- Ignore the attackers if the route is clear.
- Run toward Donnie’s parked car.
- Enter the driver’s seat.
- Drive away from the property.
This is the fastest option if you only want to complete the mission.
However, if you want to check for sunglasses that fell during the confrontation, it is easier to do so after defeating the attackers.
Best Way to Handle the Aviators
Use melee combat if you want to finish the confrontation without attracting police attention.
Avoid pulling out a firearm unnecessarily.
If you start shooting near the trailer, you may attract the police and create an additional wanted-level objective.
Best choice for a quick walkthrough: Escape in Donnie’s car. Fighting the Aviators is not required for mission completion.
10. Put Donnie’s Bag in the Car Trunk
After dealing with the Aviators, you must load Donnie’s belongings into his vehicle.
The car is a Dinka ’85 Blista.
It is parked outside Donnie’s trailer.
How to Store Donnie’s Bag
- Approach Donnie’s Blista.
- Walk toward the rear of the vehicle.
- Open the trunk when the interaction appears.
- Use the Stow Bag interaction.
- Wait for Jason to place Donnie’s belongings inside.
Do not close the trunk and leave immediately.
There is a unique weapon inside that you should collect before driving away.
11. GTA 6 Don Gone Unique Revolver: H&L .38 Location
Donnie’s H&L .38 Revolver is inside the trunk of his Blista.
This is the most important missable item in Don Gone.
The weapon is a unique variant of the standard H&L .38, and you cannot recover this specific version after destroying Donnie’s car without collecting it.
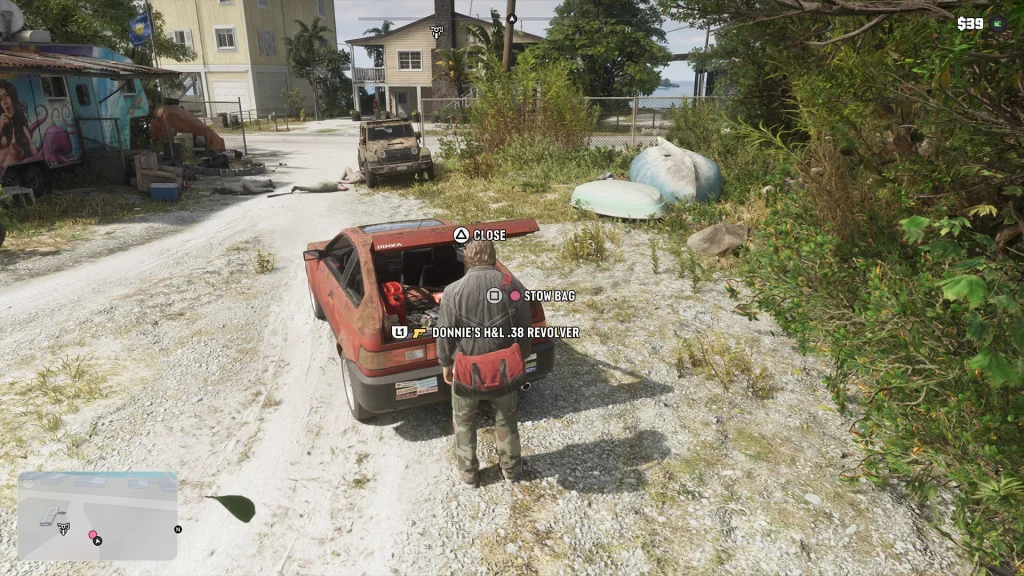
How to Get Donnie’s H&L .38
- Approach Donnie’s car outside the trailer.
- Walk to the rear of the vehicle.
- Open the trunk.
- Stow Donnie’s belongings if you have not already.
- Look inside the trunk for the revolver.
- Wait for the pickup interaction to appear.
- Collect Donnie’s H&L .38.
- Confirm that the weapon is added to Jason’s collection.
You can collect the revolver before or after storing the bag, as long as you do it before destroying the vehicle.
After collecting it, the weapon is registered as an owned unique variant.
Owned weapons can be recovered through suitable weapon lockers if you lose access to them later.
Donnie’s H&L .38 Missable Warning
Once Donnie’s car has been destroyed, the revolver in its trunk is gone.
GTA 6 does not provide the normal mission replay system available in GTA 5 for replaying earlier story missions.
If you miss this weapon, you cannot simply restart Don Gone through the replay menu afterward.
The safest approach is to collect it during the original mission.
If you want a backup, make a manual save before beginning the mission rather than relying entirely on autosaves.
12. Leave Key Lento in Donnie’s Blista
After collecting the revolver and storing the bag, get into Donnie’s car.
Your objective changes to Leave Key Lento.
Brian wants the car destroyed far away from the trailer so the scene looks like Donnie disappeared on his own.
How to Leave Key Lento
- Get into Donnie’s Blista.
- Open the map.
- Follow the pink route out of Key Lento.
- Drive along the main road toward the outskirts.
- Continue until the objective updates.
- Look for a quiet location away from traffic.
- Stop the car safely.
The normal guided route takes Jason north out of Key Lento.
You do not need to reach a specific garage or junkyard.
The game accepts different locations for the destruction as long as you are far enough from the original property.
Getting Rid of Police Attention
If the earlier Aviators encounter triggered a wanted level, you may need to lose the police first.
Drive away from active patrols, break line of sight, and wait for the immediate pursuit to end.
Destroying the car while officers are watching can create another unwanted encounter.
Tip: Find an isolated location before destroying the vehicle. This is safer than setting it on fire in the middle of a busy road.
13. How to Destroy Donnie’s Car in GTA 6
The easiest ways to destroy Donnie’s car are burning it with gasoline, sinking it in the ocean, or damaging the engine until the vehicle explodes.
All three methods can finish the mission.
However, the gasoline method is the most straightforward because Donnie already has a gas can in the trunk.
Method 1: Burn Donnie’s Car With Gasoline
- Drive the Blista out of Key Lento.
- Stop in a quiet location away from traffic.
- Exit the car.
- Open the trunk.
- Confirm that you already collected Donnie’s H&L .38.
- Take the gas can from the trunk.
- Walk around the vehicle while pouring gasoline.
- Follow the displayed prompt to ignite the fuel.
- Move a safe distance away from the burning car.
- Wait for the destruction objective to register.
The documented default gasoline interaction uses R1 on PS5 or RB on Xbox to pour fuel when prompted.
Follow the in-game controls for igniting it.
Important: Do not stand beside the car after setting it on fire. The explosion can injure or kill Jason.
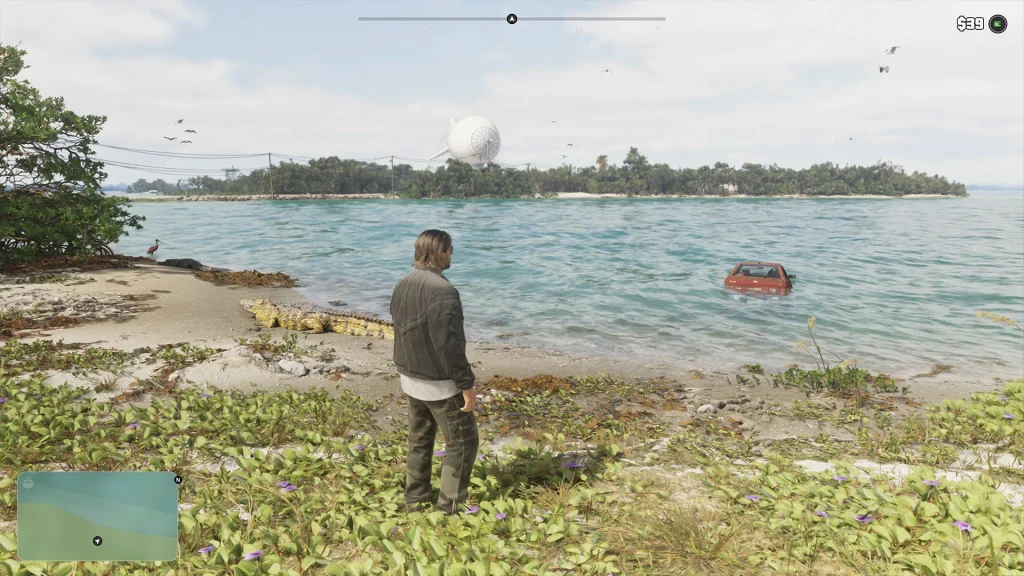
Method 2: Drive Donnie’s Car Into the Ocean
If you do not want to use gasoline, you can sink the Blista.
- Leave Key Lento in Donnie’s car.
- Find a suitable location along the coast.
- Make sure Donnie’s revolver is already in your inventory.
- Drive toward the water.
- Leave or exit the vehicle safely as it enters the ocean.
- Move away from the sinking car.
- Wait for the destruction objective to complete.
This method works because the mission does not require a specific explosion.
The car simply needs to be permanently destroyed or disabled.
Best tip: Make sure Jason can reach shore safely. Do not drive into deep water while trapped inside the vehicle.
Method 3: Destroy Donnie’s Car by Shooting the Engine
Some launch walkthroughs also confirm that shooting the car until it becomes destroyed can complete the objective.
- Drive to an isolated location outside Key Lento.
- Collect the revolver from the trunk.
- Exit the car.
- Move far enough away to avoid explosion damage.
- Aim at the engine area.
- Fire until the vehicle is destroyed.
- Leave the area once the objective updates.
This method consumes ammunition and can attract police attention.
Recommended method: Use the gas can from the trunk. It is already available and does not require spending ammunition.
14. Leave the Area and Finish Don Gone
After destroying Donnie’s car, Jason must leave the scene.
Walk or travel far enough away from the wreck.
Once the objective clears, Jason calls Brian and confirms that the cleanup is finished.
Brian reflects on Donnie’s life and their years working together.
The mission concludes after the conversation.
Don Gone is now complete.
GTA 6 Don Gone Rewards and Missable Items
The biggest reward from Don Gone is Donnie’s unique H&L .38 Revolver.
Some launch walkthroughs also report that Brian sends Jason $200 through BuckMe after completing the cleanup.
However, other mission guides list only the unique weapon as the reward.
| Reward or Item | Details |
|---|---|
| Donnie’s H&L .38 | Unique weapon variant in the trunk of Donnie’s car. Missable. |
| Donnie’s Aviator Sunglasses | Optional clothing pickup in the trailer bathroom. |
| Reported $200 Payment | Some walkthroughs document a BuckMe payment from Brian afterward. |
| Professional Profile Progress | May be affected by optional cleanup actions and how you handle the Aviators. |
| Story Progression | Advances Chapter 1 toward Recalibration. |
| Gold Medal Objectives | None documented. |
How to Check Brian’s Reported $200 Payment
If Brian’s payment appears after completing the mission, it arrives through BuckMe.
- Finish Don Gone and the final phone call.
- Open Jason’s phone.
- Launch BuckMe.
- Check the Checking Account transactions.
- Look for an incoming payment from Brian.
Do not confuse this with delayed payments from earlier smuggling missions.
The unique weapon pickup is the most consistently documented reward.
Important: Recover Any Unpaid Goods From Donnie’s Trailer
If you previously used Donnie’s trailer as a fence, check whether you have any merchandise still awaiting payment.
Some players report that Donnie’s drop-off service becomes unavailable after the events of Swamped.
In certain cases, deposited goods can be reclaimed from the trailer and sold to another fence.
How to Check for Unpaid Goods
- Visit Donnie’s trailer during the mission.
- Check the old drop-off container behind the property.
- Look for an interaction involving stored goods.
- Recover any unpaid merchandise if that option is available.
- Take the items to another suitable fence.
Important: This recovery option depends on whether you had goods deposited before Donnie’s disappearance.
It is not a guaranteed extra reward for every player.
If you did not leave any merchandise with Donnie, there is nothing additional to collect.
GTA 6 Don Gone Not Working: Common Mission Problems
Don Gone Marker Is Missing
Complete Swamped and finish the closing story sequence.
Then look for Head to Donnie’s Trailer in the Story section of the map.
The mission begins at Donnie’s property in Key Lento.
Unable to Find the Last Belonging
Use Focus Mode by clicking both analog sticks together.
Check the bedroom, refrigerator, and the shelf near the entrance.
If you have collected all visible objects, make sure you played the message on Donnie’s phone.
The phone message counts as one of the six required interactions.
Cannot Find Donnie’s ID
The ID is on the shelf to the right of the entrance, across from the refrigerator.
It is not inside the car.
Approach the shelf and activate Focus Mode if necessary.
Cannot Find Donnie’s Sunglasses
Check the bathroom inside the trailer.
The sunglasses are on a shelf and are separate from the six required belongings.
If they were knocked off during the Aviators fight, look on the ground outside afterward.
The Aviators Keep Defeating Jason
Block their punches and counterattack instead of fighting all three at once.
Alternatively, run directly to Donnie’s car and escape.
Defeating the Aviators is not required to complete the mission.
The Revolver Is Missing From the Weapon Wheel
Check whether you collected it from Donnie’s trunk.
It is not automatically awarded when you pick up Donnie’s bag.
Once collected as an owned unique weapon, it can be recovered from appropriate weapon lockers if lost.
If the car was destroyed before you collected the revolver, the mission’s copy of the weapon cannot be recovered through the trunk.
Destroy Donnie’s Car Objective Will Not Complete
Make sure you have driven far enough away from Key Lento.
The mission requires the car to be destroyed away from the original trailer.
Stop in an isolated location, use gasoline or another destruction method, and wait for the objective to update.
Mission Does Not End After the Car Explodes
Jason may still be too close to the wreck.
Leave the destruction area and wait for the call to Brian.
The mission completes after Jason confirms that the cleanup is finished.
Best GTA 6 Don Gone Tips Before Finishing Chapter 1
Collect the Unique Revolver Before Destroying the Car
This is the most important step in Don Gone.
Check the trunk as soon as you load the belongings so you do not forget the weapon later.
Use Focus Mode Instead of Searching Randomly
All six required items are inside the trailer, but several are small.
Focus Mode highlights them and makes the collection objective much easier.
Check the Bathroom for the Sunglasses
The sunglasses are not part of the mandatory six-item checklist.
Collect them separately before leaving.
Avoid Unnecessary Gunfire Against the Aviators
The three men can be defeated in melee combat or bypassed entirely.
Using a firearm may turn a short encounter into a police pursuit.
Destroy the Car Somewhere Quiet
Leaving Key Lento is part of the objective.
Choose an isolated location to burn or sink the Blista rather than destroying it beside the trailer.
Finish Optional Chapter 1 Activities Before Tourist Trap
After Don Gone, the story is approaching the end of Chapter 1.
Several activities around Key Lento become unavailable after the story passes the point of no return.
Complete any remaining house activities, collectibles, or optional missions you want before starting Tourist Trap.
What Comes After Don Gone in GTA 6?
After Don Gone, Brian has another task connected to Donnie’s missing shipment.
The optional activity Donnie’s Lost Drugs involves recovering cocaine from a sunken boat off the northern coast of Key Lento.
The boat is found in the southeastern part of the marked underwater search area, and the recovered drugs can be sold at Brian’s Lockup for a reported $1,200.
The next major story mission is Recalibration.
Lucia contacts Jason because Cal is behaving strangely, leading to another meeting at their house.
Recalibration is followed by Tourist Trap, which begins the final stretch of Chapter 1.
Before continuing: Make sure you collected Donnie’s revolver and sunglasses, completed any optional activities you care about, and checked for unpaid goods at Donnie’s trailer.
For the full story order and important missables, follow our GTA 6 Chapter 1 walkthrough and missables guide.
If you still need to complete the earlier Kingfishers mission, our GTA 6 Swamped walkthrough covers the helicopter pursuit, Lori rescue, and boat jump.
For more help with combat, Focus Mode, wanted levels, saving, and money management, see our GTA 6 beginner’s guide.

