If you’re diving into the Divinecraft Dungeons in Where Winds Meet, Coppergold Hollow is one of the first puzzle-heavy challenges you’ll encounter. Don’t let its “early dungeon” status fool you though—this place will test your timing and pattern recognition skills, especially in that final room.
The good news? Once you understand the core mechanic (matching rotating statues to fixed ones), everything clicks into place. Let me walk you through every room, puzzle, and chest location so you can clear Coppergold Hollow without breaking a sweat.
What is Coppergold Hollow in Where Winds Meet?
Coppergold Hollow is a Divinecraft Dungeon focused entirely on Meridian Touch mechanics and statue rotation puzzles. Unlike combat-heavy dungeons, this one’s all about observation and timing. You’ll be matching rotating statues to stationary ones by freezing them at the perfect moment using Meridian Touch.
It’s relatively short compared to other dungeons (looking at you, Mist-Shrouded Prison), but the time pressure in the final room can catch you off guard if you’re not prepared. For more dungeon locations and rewards, check out our complete Divinecraft Dungeon guide.
Coppergold Hollow Location in Where Winds Meet
Finding Coppergold Hollow is pretty straightforward once you know where to look:
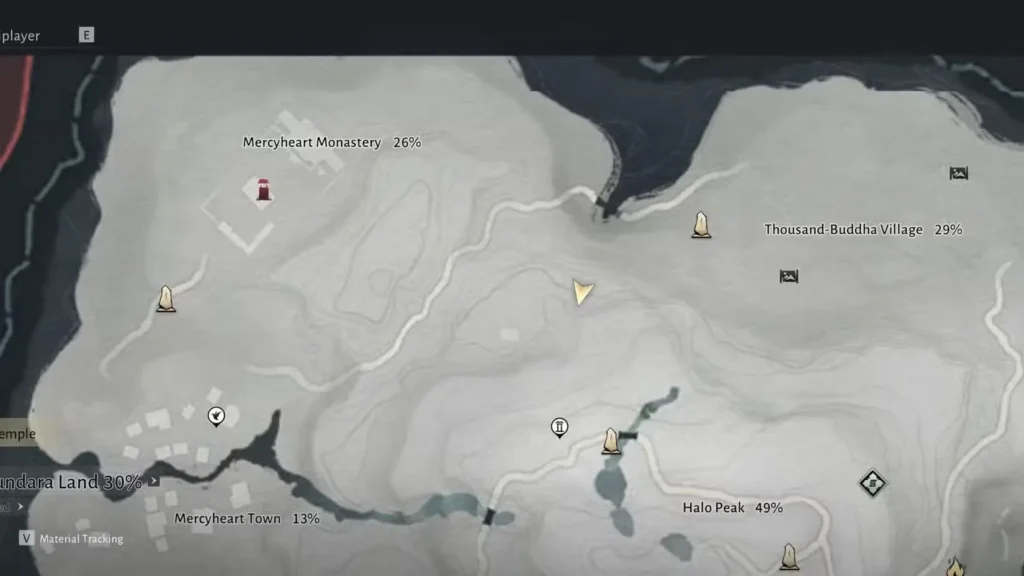
Region: Sundara Land, Qinghe
Nearest Landmarks: Situated between Halo Peak and Thousand-Buddha Village
The entrance sits near two key boundary stones:
- Thousand-Buddha Vale Boundary Stone (slightly southwest of the entrance)
- Path of Void Boundary Stone in Halo Peak (north of the entrance)
When you arrive, you’ll see a large sealed door at the top of some stone stairs. There’s a rotating lever right outside—interact with it to open the entrance and head inside.
Important: Make sure you’ve unlocked Meridian Touch before attempting this dungeon. Without it, you literally cannot progress past the first room.
How to Complete Coppergold Hollow Dungeon
Let’s break down each room and puzzle so you know exactly what to do.
Coppergold Hollow Room #1: Tutorial Puzzle
This first room is basically a tutorial for the entire dungeon. It’s simple by design, so use it to get comfortable with the timing.
How to solve:
- Step onto the golden gear plate in the center
- Watch the left statue start rotating while the right one stays still
- Wait until the left statue faces the exact same direction as the right statue
- Use Meridian Touch to freeze it in that position
- The door opens—easy!
This room teaches you the fundamental mechanic you’ll use throughout the entire dungeon. The key is patience. Don’t rush the timing, or you’ll have to reset and try again.
Coppergold Hollow Room #2: Double-Level Challenge
Room two steps things up with both upper and lower levels. You’ll need to solve two separate puzzles here, and I recommend tackling the lower level first.
Puzzle 1: Lower Level Statues
Head to the lower area and find the golden plate. This one controls two statues positioned across from each other.
Solution:
- Step on the plate to make both statues rotate together
- Freeze them using Meridian Touch when they’re facing each other directly
- A door behind you opens, revealing Chest #1
Grab that loot before moving on.
Puzzle 2: Upper Level Statues
After collecting the first chest, the lower statues reset automatically. Head up to the upper level where you’ll find another pair of statues.
Solution:
- The upper plate controls the top pair of statues
- These need to match the poses of the lower statues
- Rotate the upper statues until they mirror the bottom pair exactly
- Use Meridian Touch to lock them in place
- The door to Room #3 opens when both upper statues match the lower ones
This puzzle requires you to check the lower level’s statue positions before adjusting the upper ones. Take a mental note of their orientation before heading back up.
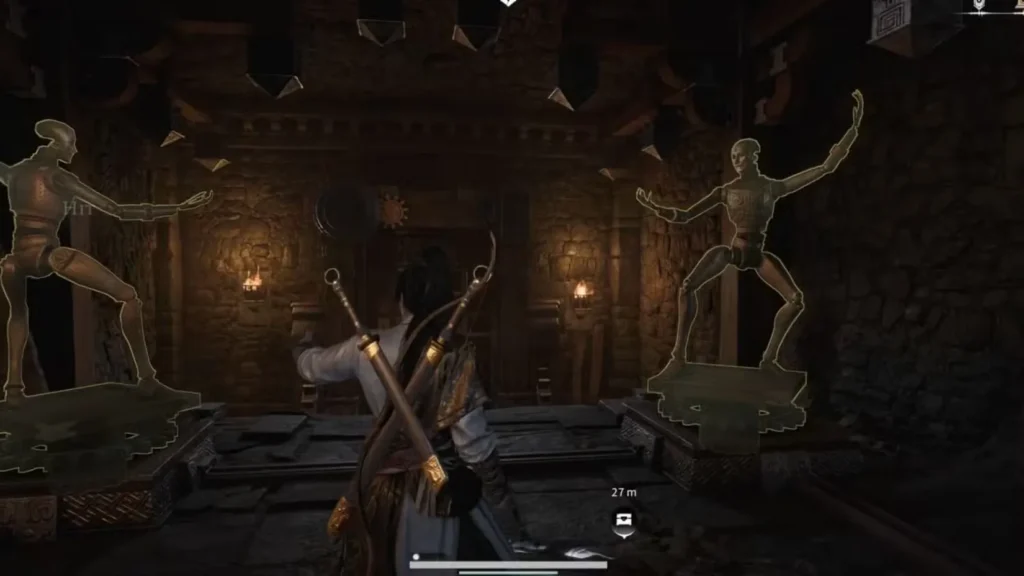
Coppergold Hollow Room #3: The Final Challenge
Alright, this is where Coppergold Hollow gets real. The final chamber has three puzzle sections, and the last one is timed, so you’ll need to move quickly.
Side Puzzles: Northwest and Southeast Corners
Before tackling the main puzzle, clear out the two side areas for bonus chests.
Northwest Corner:
- Rotate the controllable statue to match the fixed statue behind the locked gate
- When aligned correctly, the gate opens and you can grab Chest #2
Southeast Corner:
- Same deal—match the rotating statue to the stationary one
- Collect Chest #3 when the gate opens
These are optional but recommended, especially if you’re working on leveling up fast or need materials for gear management.
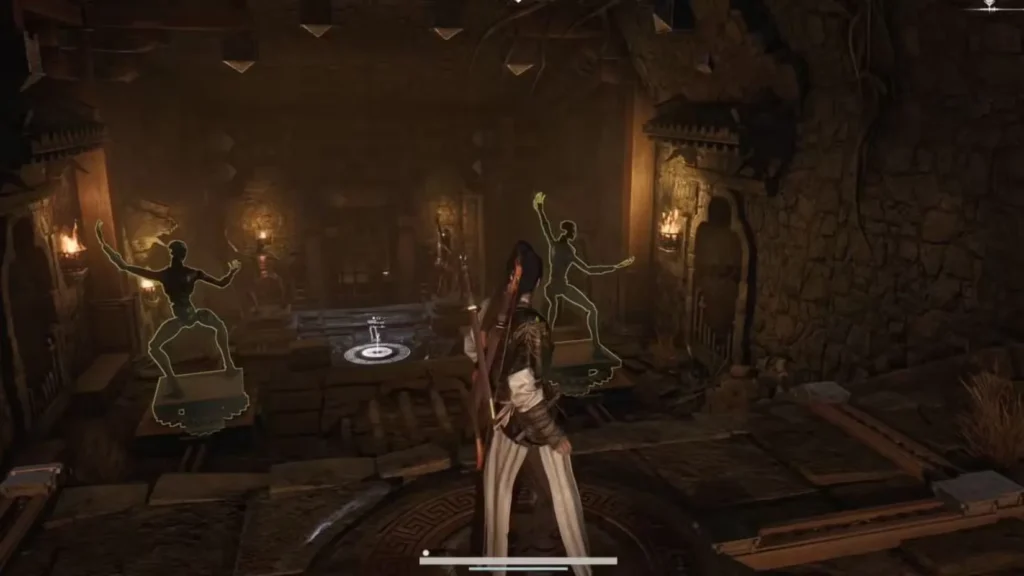
Final Puzzle: All Four Statues
After clearing the side rooms, reset any frozen statues by stepping off the plates. Now comes the big finale.
The Setup:
- Four rotating statues in the center
- Four fixed statues positioned behind each rotating one
- Each rotating statue must match its corresponding fixed counterpart
- Time pressure: If you take too long, frozen statues will unfreeze
The Strategy: I recommend working counterclockwise for maximum efficiency. Here’s the step-by-step:
- Start with the first rotating statue
- Match it to the fixed statue directly behind it
- Use Meridian Touch to lock it
- Immediately move to the next statue (counterclockwise)
- Repeat until all four are aligned
- Speed is key—don’t hesitate between statues
When all four statues align correctly, the final door slides open. Walk through to claim Chest #4 and officially complete the Coppergold Hollow dungeon!
Tips for Coppergold Hollow Success
Based on my runs through this dungeon, here are some helpful tips:
- Master Meridian Touch timing before entering—practice makes perfect
- Don’t panic in Room #3—the time limit is tight but manageable if you move with purpose
- Clear the side chests first in the final room so you’re not distracted during the timed puzzle
- Reset deliberately—if you mess up, step off the plate to reset all statues rather than trying to fix individual ones
- Work counterclockwise in the final puzzle—it feels more natural and efficient
If you’re struggling with other Mystic Arts challenges, check out our guides on how to unlock the Infernal Twinblades or how to get the Flaming Meteor mystic skill.
Coppergold Hollow Rewards
Completing Coppergold Hollow nets you four chests total, containing materials useful for character progression. While the loot isn’t the most spectacular in the game, it’s solid for an early dungeon and worth the 10-15 minutes it takes to clear.
The real value is learning the Meridian Touch mechanics, which you’ll use in more complex dungeons later. Think of this as essential training for tougher challenges ahead, like the Echoes in Shrine dungeon.
Frequently Asked Questions (FAQs)
Where is Coppergold Hollow in Where Winds Meet?
Coppergold Hollow is located in Sundara Land, Qinghe, between Halo Peak and Thousand-Buddha Village. The entrance sits near the Thousand-Buddha Vale Boundary Stone (southwest) and the Path of Void Boundary Stone in Halo Peak (north). Look for stone stairs leading to a sealed door with a rotating lever outside.
Do I need Meridian Touch to complete Coppergold Hollow?
Yes, Meridian Touch is absolutely required. Without this ability unlocked, you cannot freeze the rotating statues, making it impossible to progress past even the first room. Make sure you’ve obtained Meridian Touch during the main story before attempting this dungeon.
How long does it take to complete Coppergold Hollow dungeon?
Coppergold Hollow typically takes 10-15 minutes to complete, depending on your familiarity with the statue rotation mechanics. The first two rooms are quick once you understand the pattern. Room three takes the longest due to the side puzzles and the timed final challenge, but it’s still one of the shorter Divinecraft Dungeons in the game.
What happens if I fail the final timed puzzle in Coppergold Hollow?
If you take too long during the final four-statue puzzle, your frozen statues will unfreeze and you’ll need to start that section over. Simply step off the golden plate to reset all statues to their starting positions, then try again. The good news is that the time limit is generous enough that you shouldn’t fail if you move deliberately and don’t overthink it.
Coppergold Hollow is an excellent introduction to puzzle-based dungeons in Where Winds Meet. The statue rotation mechanic might seem tricky at first, but once you nail the timing, it becomes second nature.
Remember: observation beats speed in the first two rooms, but the final room requires both. Take your time learning the patterns, clear those side chests, and then tackle the final puzzle with confidence.
Ready to tackle more challenges? Check out our beginner tips and tricks guide, learn about the best Mystic Arts to unlock first, or dive into our complete cooking guide to keep your character in top shape.
Now available on PlayStation and PC—go show those statues who’s boss!