The Eyes in the Sky quest throws you a curveball compared to earlier missions in ARC Raiders. While the objective sounds straightforward—place LIDAR Scanners at the highest points in three different regions—the game intentionally leaves you guessing about where these “tallest points” actually are.
If you’ve been thoroughly exploring the Dam Battlegrounds, Buried City, and Spaceport areas, you might already have a mental map of the towering structures in each zone. But even seasoned players can struggle to pinpoint the exact installation spots without some guidance.
The real challenge isn’t just finding these locations—it’s dealing with the PvP chaos and hostile ARCs while trying to complete your objective. Let’s break down each location so you can finish this quest efficiently.
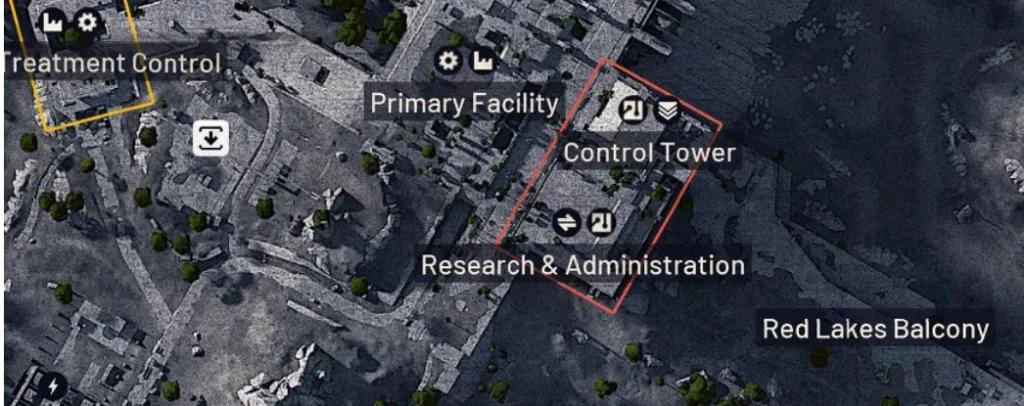
Dam Battlegrounds – Install LIDAR Scanner at Control Tower Rooftop
Location: Center of the map on the Control Tower roof
How to Reach Control Tower Rooftop at Dam Battlegrounds
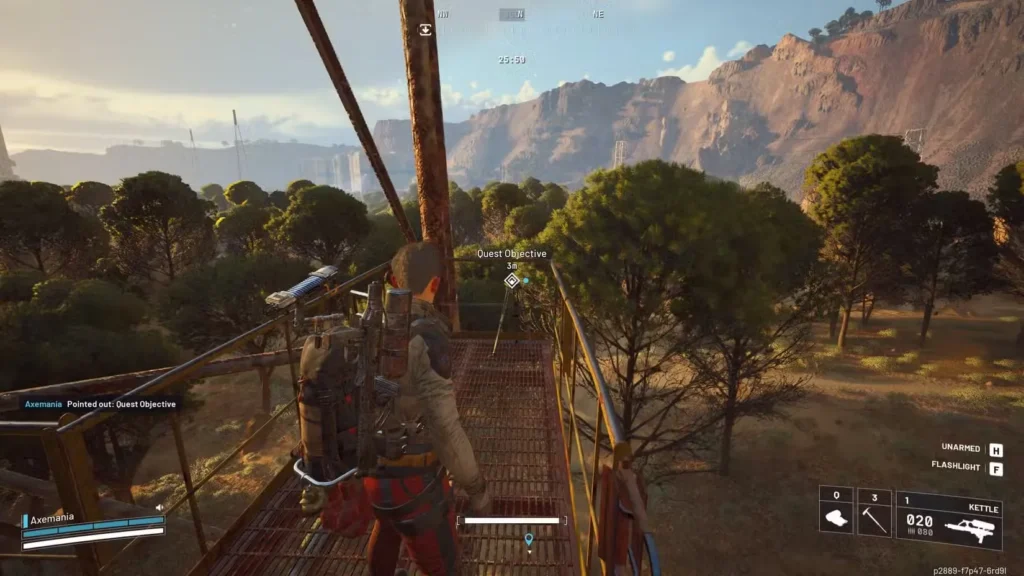
The first LIDAR Scanner needs to be planted on top of the Control Tower, which sits smack in the middle of Dam Battlegrounds. This is one of the map’s most contested hotspots, so expect company—both human and robotic.
Step-by-step approach:
- Start at the Red Lakes elevator entrance near the tower’s base
- Enter through the door and locate the elevator shaft inside
- Watch for defensive turrets guarding the zipline access point
- Use the zipline to reach the rooftop level
- Clear any ARCs patrolling the roof before proceeding
- Find the tripod in the east corner of the building
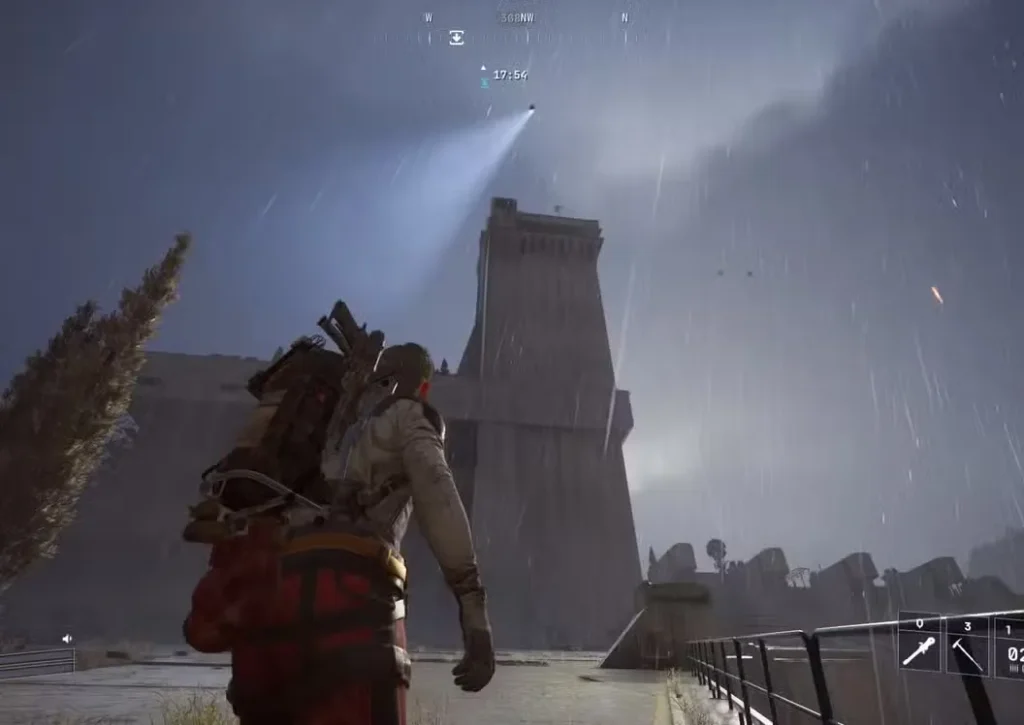
The zipline behind the breachable door is your ticket to the top, but don’t rush in blindly. Scout the area first—those turrets can shred your health before you realize what’s happening. Since the Control Tower attracts loot-hungry players, come prepared for potential firefights.
Pro tip: If you’re running low on mechanical components or other crafting materials, the Control Tower area often has decent loot—just be ready to fight for it.
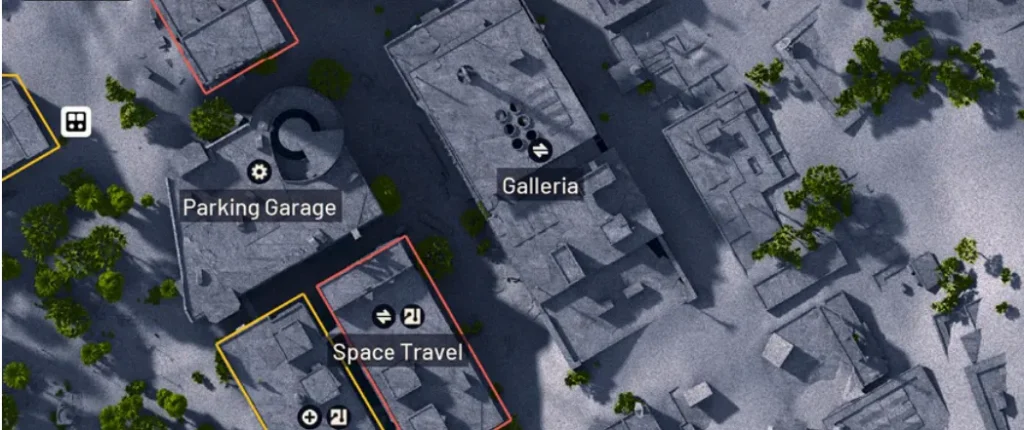
Buried City – Install LIDAR Scanner on Galleria Sign
Location: On top of the massive Galleria sign
How to Climb to Galleria Sign in Buried City
The Galleria building in Buried City features one of the map’s most recognizable landmarks—a giant sign that towers over the surrounding structures. This is another high-traffic area where you’ll need to stay alert.
How to get there:
- Navigate to the Galleria building in Buried City
- Fight or sneak through the ARC patrols and potential raiders
- Reach the rooftop of the building
- Locate the support pillar marked with the large “G”
- Deploy a Zipline (use Shani’s provided one or your own)
- Aim the Zipline at the top of the G structure
- Zip up and plant the LIDAR Scanner

The vertical nature of this location makes ziplines essential. Shani gives you one for the quest, but having a backup never hurts. If you’re caught without one, you can loot supplies from nearby areas or craft one if you have the materials.
Loadout recommendation: Even though this quest doesn’t require combat, bring at least a budget loadout with a Ferro shield. You’ll want protection against both ARCs and opportunistic players. Check out our shield guide to understand your defensive options.
Spaceport – Install LIDAR Scanner at Communications Tower
Location: East side of Spaceport map on the Communications Tower
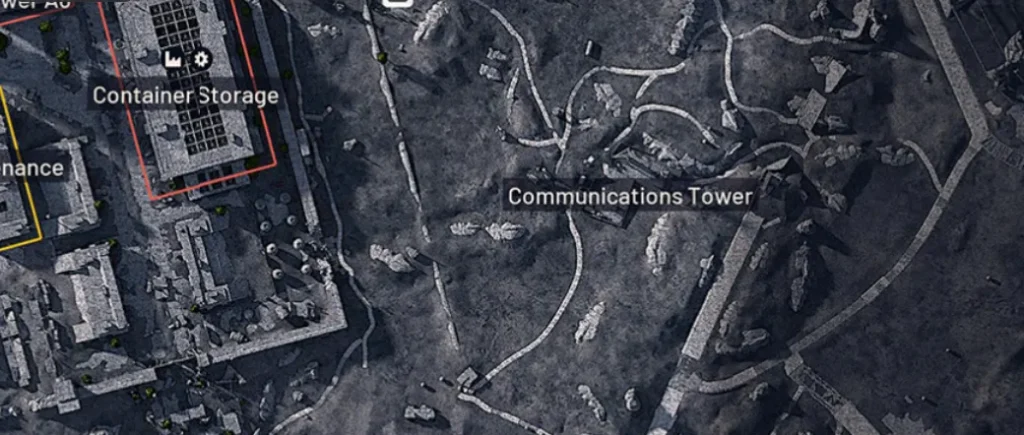
Spaceport Communications Tower – Easiest but High PvP Risk
The final LIDAR Scanner location is technically the simplest to reach—it’s just a ladder climb up the Communications Tower on Spaceport’s eastern edge. However, “simple” doesn’t mean “safe.”
What to expect:
- Locate the Communications Tower on the east side of Spaceport
- Use the ladder to climb to the top
- Plant the scanner at the peak
The catch: You’re completely vulnerable while climbing. Any player with decent aim can pick you off, and flying ARC bots can spot you from a distance. The ladder climb leaves you totally exposed with limited options for defense.
Quick escape tip: If you start taking fire while climbing, tap your sprint button to rapidly slide down the ladder. It’s faster than climbing down normally and might save your life.
Consider timing your climb when fewer players are in the area. You can also have teammates provide covering fire if you’re running with a squad. Learn more about playing with friends to coordinate these kinds of missions.
Eyes in the Sky Quest Rewards
After successfully planting all three LIDAR Scanners, you’ll receive some genuinely useful items:
Eyes in the Sky Quest Rewards and XP
- Tagging Grenade – Marks all enemies caught in the blast radius, revealing them to you and your entire team (fantastic for coordinated pushes)
- Vita Spray – Provides continuous health regeneration when activated (clutch for surviving extended fights)
- Red Light Stick – Illuminates dark areas (useful for exploring unlit buildings and underground sections)
The Tagging Grenade is arguably the most valuable reward here. In a game where information wins fights, being able to mark multiple enemies for your team creates massive tactical advantages. The Vita Spray also pairs well with aggressive playstyles since you can heal through damage during pushes.
Additional Tips for Quest Success
Preparation Before Starting
Before you head out to plant scanners, make sure you’re properly equipped:
- Stock up on healing items – You can find mushrooms and prickly pears for natural healing
- Bring a zipline or two – Essential for the Galleria sign
- Pack light but effective weapons – You want mobility but also firepower for emergencies
- Use Safe Pockets – Protect valuable items in case you die
Timing Your Attempts
The time of day (in-game) and server population can dramatically affect your success rate. Early morning raids or off-peak hours typically see fewer players, giving you more breathing room to complete objectives.
What If You Die?
If you get taken out before completing the quest, don’t panic. You’ll respawn and can try again. However, if you lose important gear, you might need to restock before making another attempt. Our extraction guide can help you safely get in and out of dangerous zones.
Why This Quest Matters for Progression
Eyes in the Sky represents a step up in quest complexity. Unlike simpler fetch quests like Trash into Treasure or Greasing Her Palms, this one forces you to navigate high-traffic areas and exposed positions.
Completing quests like this not only unlocks useful rewards but also helps you level up faster and understand map layouts better. The experience you gain from successfully infiltrating hotspots like the Control Tower will serve you well in future raids.
Optimal Quest Completion Order
Intro: The Eyes in the Sky quest doesn’t require completing all three scanners in one raid. You can tackle each location separately and in any order. However, choosing the right sequence can save time, reduce risk, and maximize efficiency.
Route 1: Safest Path (Spaceport → Dam → Buried City)
Start with Spaceport’s Communications Tower—the easiest and least contested location. Simply climb the yellow ladder to reach the platform. Next, tackle Dam Battlegrounds Control Tower while building confidence. Save Buried City’s Galleria for last since it requires a zipline and has the most PvP exposure. This route minimizes early deaths and lets you learn the mechanics on easier objectives first.
Route 2: Fastest Path (Dam → Spaceport → Buried City)
For experienced players, start at Dam Battlegrounds to get the hardest location done first. The Control Tower has high-value loot nearby, making it worth the risk. Move to Spaceport next for a quick, safe scanner placement. Finish with Buried City’s zipline ascent. This route works best during off-peak hours when Control Tower is less contested.
Route 3: Multi-Quest Efficiency
Stack Eyes in the Sky with other quests on the same maps. Combine Dam scanner placement with Medical Merchandise objectives, or sync Buried City with hospital-related quests. This approach maximizes your time topside and reduces total raids needed for quest progression.
Recommended Loadout for Eyes in the Sky
Intro: Since you don’t need to extract between scanner placements, you can optimize your loadout for mobility and survival rather than combat. Shani provides one zipline at quest start—you’ll only need it for Buried City’s Galleria sign.
Budget Loadout Option
Weapons: Ferro (primary) + Stitcher (secondary). Total cost: ~6,000 coins. The Ferro handles mid-range encounters and ARC threats with one-shot kills on flying units. The Stitcher covers close-quarters defense if you encounter hostile players.
Gear: Looting Mk.1 Augment (maximum inventory), Light Shield, 5x Bandages, 2-3 Shield Rechargers. Total kit cost under 15,000 coins—affordable even after failed raids.
Why This Works: You’re primarily climbing and interacting, not seeking fights. If you die, replacing this loadout won’t hurt your wallet.
Free Loadout Viability
Free loadouts work for Spaceport and Dam objectives since extraction isn’t required between locations. However, free loadouts don’t include safe pockets, meaning any valuable loot you find is at risk.
Best Use: Use free loadouts for initial scouting runs to learn scanner locations without financial risk. Switch to budget gear once you’re ready for efficient completion.
Best Weapons for Each Location
Dam Control Tower: Bring Ferro or Kettle for fighting through the building. Close-range weapons help deal with turrets and potential ambushes in tight corridors.
Spaceport Communications: Minimal combat expected—even a single weapon is sufficient. Prioritize mobility over firepower.
Buried City Galleria: Stitcher or SMG for close-range defense while climbing. The exposed rooftop makes you vulnerable during zipline ascent.
PvP Considerations at Each Scanner Location
Intro: Each scanner location has different PvP risk levels. Understanding exposure points helps you prepare defensive strategies and choose optimal completion times.
Control Tower Defense Tips
High Risk: Dam’s Control Tower is a popular PvP hotspot due to nearby high-value loot rooms. Expect other players, traps, and turrets.
Defense Strategy: Before taking the zipline up, listen for movement above. Destroy turrets from range if possible. After placing the scanner, don’t linger—the rooftop is exposed and other Raiders may be camping the zipline exit. Consider calling out “friendly, just questing” if you encounter players, as many will let quest runners pass.
Extraction Timing: Extract immediately after scanner placement. Don’t get greedy looting the key room unless you’re prepared for fights.
Galleria Sign Exposure Risk
Moderate Risk: The Galleria rooftop and zipline ascent leave you completely exposed. Players can see you climbing and may wait at the top or snipe from surrounding buildings.
Mitigation: Scan your surroundings before using the zipline. If you see other Raiders nearby, wait or choose a different raid window. The zipline is a one-way commitment—once you start climbing, you’re vulnerable until completion.
Squad Advantage: Having teammates cover your ascent drastically reduces risk. One player installs while others watch for threats.
Communications Tower Vulnerability
Low Risk: Spaceport’s Communications Tower is the least contested location. It’s in an open, low-traffic area with minimal valuable loot nearby.
Main Threat: Exposure while on the ladder. You’re visible from distance but rarely targeted. Complete this scanner first if you’re worried about PvP encounters.
Speed Strategy: This is the fastest scanner placement—under 30 seconds from arrival to extraction. Use it to build confidence before tackling riskier locations.
Common Mistakes to Avoid
Intro: Players frequently make preventable errors that cost them quest progress or valuable gear. Avoid these common pitfalls to complete Eyes in the Sky efficiently.
Mistake #1: Not Using Safe Pockets
The Problem: Bringing valuable loot or rare items without storing them in safe pockets. If you die before extracting, everything in your backpack is lost.
The Solution: Always equip an augment with a safe pocket before starting this quest. Place any valuable finds (blueprints, rare materials) in your safe pocket immediately. Free loadouts don’t have safe pockets—this alone is reason to bring budget gear instead.
Mistake #2: Installing Scanners During Peak Hours
The Problem: Attempting Control Tower or Galleria during prime time (evenings/weekends) when servers are full of PvP-focused players.
The Solution: Complete this quest during off-peak hours—early mornings or weekday afternoons. Fewer players mean safer scanner placements, especially at high-traffic Dam Battlegrounds. Night raids also have reduced player counts.
Mistake #3: Fighting at Scanner Locations
The Problem: Engaging in unnecessary PvP fights near scanner locations, risking death before objective completion.
The Solution: Your goal is scanner placement, not combat. Avoid fights unless absolutely necessary. If you encounter hostile players, assess whether fighting or fleeing maximizes your quest success chance. Often, running to extract and trying again in a new raid is faster than respawning after a fight loss.
Exception: If you’re ambushed at the scanner itself, defend yourself—but prioritize survival over kills.
Mistake #4: Not Extracting Between Locations
The Problem: Trying to complete multiple scanners in one raid, risking total loss if you die with quest progress incomplete.
The Solution: While technically possible to do multiple scanners per raid, the safest approach is one scanner per raid with immediate extraction after each placement. Quest progress saves automatically—each installed scanner counts even if you die before extracting. However, you still need to extract successfully to keep any loot and avoid gear loss.
Advanced Players: Experienced Raiders can stack Dam + Spaceport in one run since they’re relatively quick. Never attempt all three in a single raid unless you’re running with a full squad.
Step-by-Step Quest Walkthrough
Intro: Follow this complete quest sequence from acceptance to completion, including NPC dialogue and rewards.
Phase 1: Accept Quest from Shani
Location: Speak with Shani in Speranza after completing “A Lay of the Land” quest.
Quest Introduction: “Those LiDAR scanners you found work best when put in high locations. I’ve identified a few good spots around the Rust Belt; hope you’re surefooted.”
Upon Acceptance: Shani warns: “You’ll need to put the scanners pretty high up, so you may want to bring a zipline or two.” She provides one zipline automatically—you’ll need it for Buried City.
Objectives Received:
- Install LIDAR Scanner at Dam Battlegrounds Control Tower
- Install LIDAR Scanner at Spaceport Communications Tower
- Install LIDAR Scanner at Buried City Galleria sign
Phase 2: Complete First Scanner Installation
Recommended Start: Spaceport Communications Tower (easiest location).
Steps:
- Load into Spaceport map
- Navigate to Communications Tower on eastern side
- Climb yellow ladder to platform
- Interact with tripod to place scanner
- Extract immediately
Radio Confirmation: Upon entering any raid, Shani radios: “This is Shani. Hope you hear me alright. I’ve identified the places most likely to give us a clean signal. Place the LiDAR scanners there, and don’t fall down, Raider.”
Phase 3: Navigate to Second Location
Continue With: Dam Battlegrounds Control Tower (moderate difficulty).
Steps:
- Load into Dam Battlegrounds
- Navigate to Control Tower south of map center
- Enter building, breach locked doors, take zipline to roof
- Place scanner on rooftop tripod
- Extract via zipline descent
PvP Note: Be prepared for potential player encounters—this is the most dangerous location.
Phase 4: Final Scanner and Extraction
Final Location: Buried City Galleria sign (requires zipline).
Steps:
- Load into Buried City with zipline equipped
- Navigate to Galleria building (east-center, recognizable by Q-shaped pillar)
- Climb to rooftop using wooden planks
- Deploy zipline to reach top of Q pillar walkway
- Place final scanner on platform tripod
- Descend via zipline and extract
Quest Completion: After placing all three scanners, Shani congratulates: “Great work, Raider! Now we won’t just have to rely on our ears to monitor those tremors.”
Rewards Received:
- 1x Zipline
- 3x Tagging Grenade
- 1x Vita Spray
- 5x Yellow Light Stick
Return to Shani in Speranza to collect rewards and unlock subsequent quests in her chain.
Related Quest Guides You Might Need
If you’re working through Shani’s questline or just trying to progress efficiently, check out these related guides:
- A Lay of the Land Quest – Another LIDAR scanner mission
- Hatch Repairs Quest – Learn about extraction points
- Reduced to Rubble Quest – More Shani missions
- Best Skills to Unlock First – Optimize your progression
Eyes in the Sky Quest Summary – Key Takeaways
Eyes in the Sky might feel intimidating at first—especially when you realize you’ll be climbing exposed structures in PvP-heavy areas—but it’s absolutely manageable with the right approach. Take your time, scout locations before committing, and don’t be afraid to retreat and try again if conditions aren’t favorable.
The rewards you earn from this quest, particularly the Tagging Grenade, will serve you well in future raids. Plus, completing missions like this builds your confidence in navigating ARC Raiders’ dangerous world.
Want to dominate in ARC Raiders? Check out our complete tips and tricks guide for beginners and advanced players alike.
You can download ARC Raiders on PlayStation or Xbox to start your survival journey today.
Good luck out there, Raider!